Installation
INSTALLATION
PRECAUTION / NOTICE / HINT
HINT:
- Repeat the same procedure for the right side and the left side.
- The procedure described below applies to the LH side.
PROCEDURE
1. INSPECT REAR 3-POINT OUTER SEAT BELT ASSEMBLY
Click here
2. INSTALL REAR LEFT 3-POINT OUTER SEAT BELT ASSEMBLY (for LH side)
(a) without pretensioner and force limiter:
(1) Engage the guides to install the rear left 3-point outer seat belt assembly onto the left outer belt anchor support subassembly. |
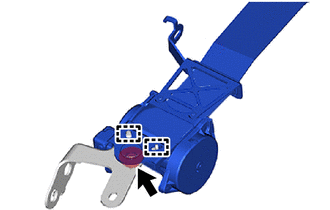 |
(2) Temporarily install the nut.
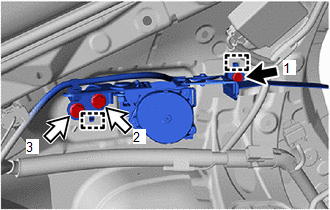
(3) Engage the guides to temporarily install the rear left 3-point outer seat belt assembly with bracket.
 |
Bolt (A) |
 |
Bolt (B) |
(4) Temporarily install the 3 bolts.
(5) Tighten the 3 bolts in the order shown in the illustration.
Torque:
Bolt (A):
12.5 N·m {127 kgf·cm, 9 ft·lbf}
Bolt (B):
42 N·m {428 kgf·cm, 31 ft·lbf}
(6) Tighten the nut.
Torque:
42 N·m {428 kgf·cm, 31 ft·lbf}
(7) Make sure the emergency locking retractor (ELR) locks.
NOTICE:
Perform this check with the rear left 3-point outer seat belt assembly installed on the vehicle.
- With the rear left 3-point outer seat belt assembly installed on the vehicle, make sure the belt locks when pulled quickly.
(b) with pretensioner and force limiter:
(1) Engage the guides to install the rear left 3-point outer seat belt assembly onto the left outer belt anchor support subassembly. |
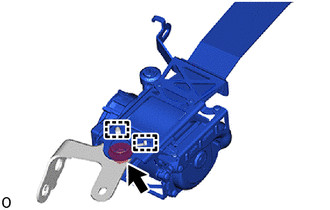 |
(2) Temporarily install the nut.
(3) Connect the pretensioner connector and lock the lock button as shown in the illustration. NOTICE: Lock the lock button securely. |
|
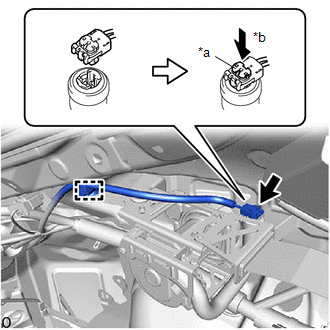
(4) Engage the clip.
(5) Engage the guides to temporarily install the rear left 3-point outer seat belt assembly with bracket.
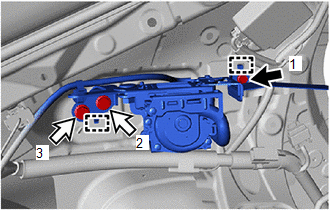
|
Bolt (A) |
|
Bolt (B) |
(6) Temporarily install the 3 bolts.
(7) Tighten the 3 bolts in the order shown in the illustration.
Torque:
Bolt (A):
12.5 N·m {127 kgf·cm, 9 ft·lbf}
Bolt (B):
42 N·m {428 kgf·cm, 31 ft·lbf}
(8) Tighten the nut.
Torque:
42 N·m {428 kgf·cm, 31 ft·lbf}
(9) Make sure the emergency locking retractor (ELR) locks.
NOTICE:
Perform this check with the rear left 3-point outer seat belt assembly installed on the vehicle.
- With the rear left 3-point outer seat belt assembly installed on the vehicle, make sure the belt locks when pulled quickly.
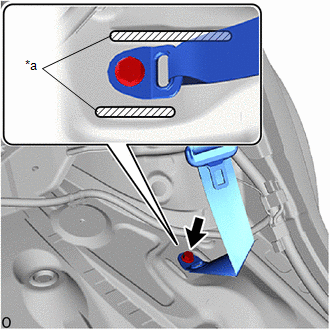
(c) Connect the floor anchor of the rear left 3-point outer seat belt assembly with the bolt. Torque: 42 N·m {428 kgf·cm, 31 ft·lbf} NOTICE: Do not allow the anchor of the rear left 3-point outer seat belt assembly to overlap the protruding parts of the floor panel. |
|
3. INSTALL REAR RIGHT 3-POINT OUTER SEAT BELT ASSEMBLY (for RH side)
(a) without pretensioner and force limiter:
(1) Engage the guides to install the rear right 3-point outer seat belt assembly onto the right outer belt anchor support subassembly. |
 |
(2) Temporarily install the nut.
(3) Engage the guides to temporarily install the rear right 3-point outer seat belt assembly with bracket.
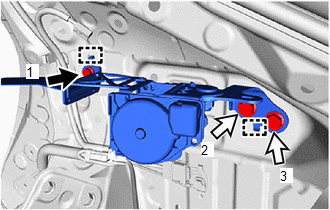
|
Bolt (A) |
|
Bolt (B) |
(4) Temporarily install the 3 bolts.
(5) Tighten the 3 bolts in the order shown in the illustration.
Torque:
Bolt (A):
12.5 N·m {127 kgf·cm, 9 ft·lbf}
Bolt (B):
42 N·m {428 kgf·cm, 31 ft·lbf}
(6) Tighten the nut.
Torque:
42 N·m {428 kgf·cm, 31 ft·lbf}
(7) Make sure the emergency locking retractor (ELR) locks.
NOTICE:
This check must be performed with the RH rear outer seat belt assembly (3-point type) installed in the vehicle.
- With the RH rear outer seat belt assembly (3-point type) installed in the vehicle, make sure the belt locks when pulled quickly.
(b) with pretensioner and force limiter:
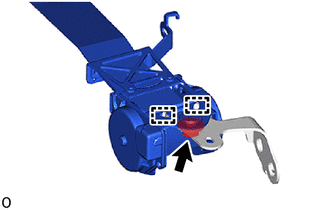
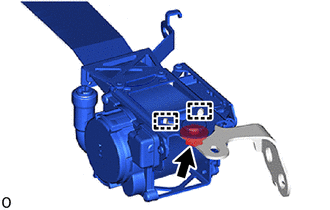
(1) Engage the guides to install the rear right 3-point outer seat belt assembly onto the right outer belt anchor support subassembly. |
 |
(2) Temporarily install the nut.
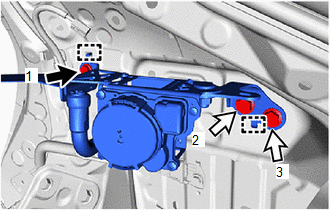
(3) Engage the guides to temporarily install the rear right 3-point outer seat belt assembly with bracket.
|
Bolt (A) |
|
Bolt (B) |
(4) Temporarily install the 3 bolts.
(5) Tighten the 3 bolts in the order shown in the illustration.
Torque:
Bolt (A):
12.5 N·m {127 kgf·cm, 9 ft·lbf}
Bolt (B):
42 N·m {428 kgf·cm, 31 ft·lbf}
(6) Tighten the nut.
Torque:
42 N·m {428 kgf·cm, 31 ft·lbf}
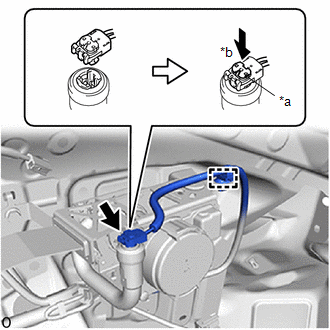
(7) Connect the pretensioner connector and lock the lock button as shown in the illustration. NOTICE: Lock the lock button securely. |
|
(8) Engage the clip.
(9) Make sure the emergency locking retractor (ELR) locks.
NOTICE:
This check must be performed with the RH rear outer seat belt assembly (3-point type) installed in the vehicle.
- With the RH rear outer seat belt assembly (3-point type) installed in the vehicle, make sure the belt locks when pulled quickly.
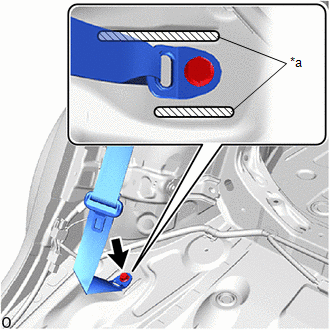
(c) Connect the floor anchor of the RH rear outer seat belt assembly (3-point type) with the bolt. Torque: 42 N·m {428 kgf·cm, 31 ft·lbf} NOTICE: Do not allow the anchor part of the RH rear outer seat belt assembly (3-point type) to overlap the protruding parts of the floor panel. |
|
4. REINSTALL ROOF SIDE INTERIOR GARNISH ASSEMBLY
Click here
5. REINSTALL LUGGAGE COMPARTMENT SIDE FINISH PANEL ASSEMBLY
Click here
6. REINSTALL NO. 1 LUGGAGE COMPARTMENT LIGHT ASSEMBLY
Click here
7. REINSTALL REAR LUGGAGE COMPARTMENT FINISH COVER
Click here
8. REINSTALL REAR SEAT SIDE GARNISH (without rear seat side airbag)
Click here
9. REINSTALL REAR SEAT SIDE GARNISH (with rear seat side airbag)
Click here
10. REINSTALL REAR PILLAR GARNISH (with rear seat side airbag)
Click here
11. REINSTALL REAR SEAT BACK HINGE SUB-ASSEMBLY
Click here
12. REINSTALL REAR DOOR OPENING TRIM WEATHERSTRIP
Click here
13. REINSTALL REAR DOOR SILL PLATE (without rear seat side airbag)
Click here
14. REINSTALL REAR DOOR SILL PLATE (with rear seat side airbag)
Click here
15. REINSTALL LH LUGGAGE COMPARTMENT FLOOR BOX
Click here
16. REINSTALL RH LUGGAGE COMPARTMENT FLOOR BOX
Click here
17. REINSTALL SPARE WHEEL PAN
Click here
18. REINSTALL LUGGAGE COMPARTMENT BOARD ASSEMBLY
Click here
19. REINSTALL LOAD FLOOR TRIM ASSEMBLY (with load floor trim)
Click here
20. REINSTALL REAR SHELF PANEL ASSEMBLY (with rear shelf trim)
Click here
21. REINSTALL REAR SEAT ASSEMBLY
Click here