Installation
INSTALLATION
PRECAUTION / NOTICE / HINT
PROCEDURE
1. INSTALL TRANSMISSION BREATHER HOSE SUB-ASSEMBLY
HINT:
Perform this procedure only when replacement of the transmission breather hose sub-assembly is necessary.
(a) Apply genuine Toyota CVT FLUID FE to a new O-ring, then install it onto the No. 2 breather plug (CVT).
NOTICE:
Be careful not to damage or twist the O-ring.
(b) Install the No. 1 breather plug (CVT) and the No. 2 breather plug (CVT) onto the breather plug hose.
(c) Install the transmission breather hose sub-assembly onto the continuously variable transaxle assembly.
2. INSTALL STRAIGHT THREADED PLUG
HINT:
Perform this procedure only when replacement of the straight threaded plug is necessary.
(a) Install a new gasket and the straight threaded plug onto the continuously variable transaxle assembly.
Torque:
16.2 N·m {165 kgf·cm, 12 ft·lbf}
3. INSTALL AUTOMATIC TRANSMISSION CASE COVER
(a) Install the automatic transmission case cover onto the continuously variable transaxle assembly using the 2 clips.
4. INSTALL OIL COOLER ELBOW SUB-ASSEMBLY
(a) Install a new gasket and the oil cooler elbow sub-assembly onto the continuously variable transaxle assembly using the union bolt.
Torque:
23 N·m {230 kgf·cm, 17 ft·lbf}
NOTICE:
- Be sure to insert the painted (white) end of the No. 2 transmission oil cooler hose into the spool of the oil cooler elbow sub-assembly so that the marking faces the front of the vehicle.
- Be sure to clean and degrease the parts of the No. 2 transmission oil cooler hose and the oil cooler elbow sub-assembly that will be inserted.
(b) Install the No. 2 transmission oil cooler hose onto the oil cooler elbow sub-assembly, then slide the clamp into place to secure it.
5. INSTALL PIPE CONNECTOR
(a) Install a new O-ring onto the pipe connector.
(b) Install the pipe connector onto the continuously variable transaxle assembly.
Torque:
27 N·m {275 kgf·cm, 20 ft·lbf}
NOTICE:
- Be sure to insert the painted (white) end of the No. 1 transmission oil cooler hose into the spool of the pipe connector so that the marking faces the front of the vehicle.
- Be sure to clean and degrease the parts of the No. 1 transmission oil cooler hose and the pipe connector that will be inserted.
(c) Install the No. 1 transmission oil cooler hose onto the pipe connector, then slide the clamp into place to secure it.
6. INSTALL WIRE HARNESS CLAMP BRACKET
(a) Install the 3 wire harness clamp brackets onto the continuously variable transaxle assembly using the 3 bolts. Torque: 8 N·m {82 kgf·cm, 71 in·lbf} |
|
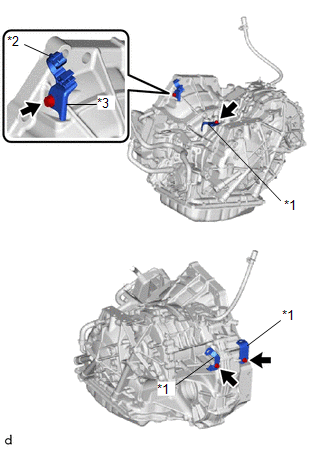
(b) Install the water bypass hose clamp onto the water hose bracket.
(c) Install the water hose bracket onto the continuously variable transaxle assembly using the bolt.
Torque:
10 N·m {102 kgf·cm, 7 ft·lbf}
7. INSTALL TRANSMISSION CONTROL CABLE BRACKET
(a) Install the transmission control cable bracket onto the continuously variable transaxle assembly using the 2 bolts.
Torque:
8 N·m {82 kgf·cm, 71 in·lbf}
8. INSTALL CVT OIL PUMP T-TYPE OIL SEAL
(a) Make sure there is no dust or foreign matter on your hands, then apply MP grease to the entire circumference of the lip of the new CVT oil pump T-type oil seal.
(b) Temporarily install the CVT oil pump T-type oil seal by pressing it onto the oil pump housing installation surface by hand.
NOTICE:
Make sure to install the CVT oil pump T-type oil seal in the correct direction.
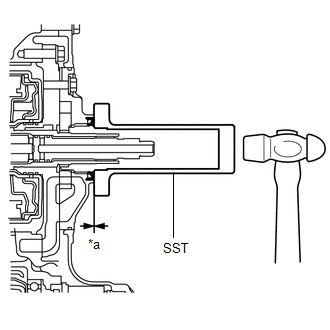
(c) Clean the CVT oil pump T-type oil seal contact surface of the SST and the surrounding area.
SST: 09309-36010
(d) Using the SST, evenly drive the CVT oil pump T-type oil seal until it is flush with the side surface of the oil pump housing. Standard depth: 0 to 0.5 mm (0 to 0.0196 in.) NOTICE:
HINT: The CVT oil pump T-type oil seal must be driven in 0 to 0.5 mm (0 to 0.0196 in.) as measured from the side surface of the oil pump housing. |
|
9. INSTALL TORQUE CONVERTER ASSEMBLY
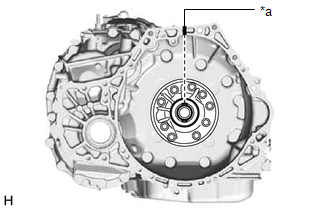
(a) Turn the front oil pump drive gear so that the wide groove is at the top, and make an alignment mark on the transaxle case. NOTICE: Align the alignment mark with the wide groove of the transaxle case. |
|
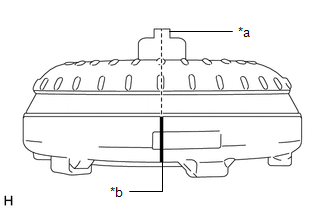
(b) Make an alignment mark on the torque converter assembly so that the position of its key is clearly indicated. |
|
(c) Align the alignment mark on the transaxle case with the one on the torque converter assembly, then engage the input shaft splines with the turbine wheel splines. NOTICE:
|
|
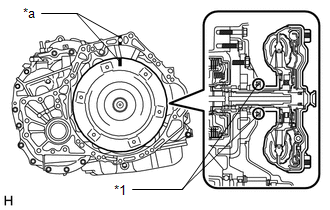
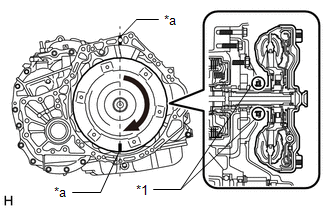
(d) Rotate the torque converter assembly approximately 180° and engage the stator shaft splines with the stator assembly. NOTICE:
|
|
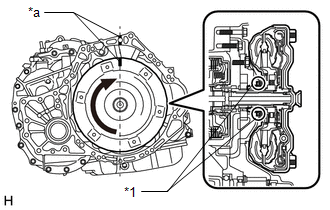
(e) Rotate the torque converter assembly approximately 180° again, align the alignment mark on the torque converter assembly with the one on the transaxle case, and insert the torque converter assembly key into the groove of the front oil pump drive gear. NOTICE:
|
|
(f) Clean the drive plate and torque converter assembly bolt holes.
(g) Using a vernier caliper and a straightedge, measure the distance (A) between the continuously variable transaxle assembly contact surface of the engine assembly*a and the drive plate torque converter assembly contact surfaces*b. |
|
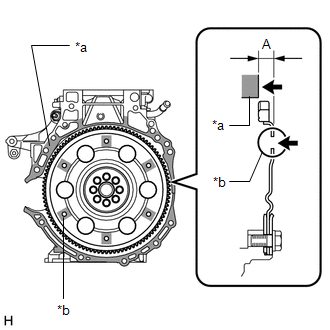
(h) Using a vernier caliper and a straightedge, measure dimension (B) as shown in the illustration, and make sure dimension (B) is greater than dimension (A) measured in the previous step. Standard: B = A + 1 mm (0.0394 in.) minimum NOTICE:
|
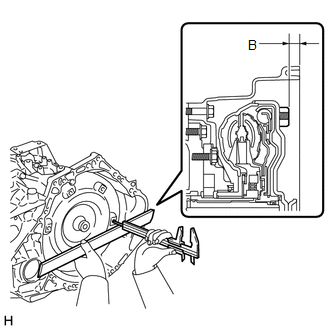 |
10. SUPPORT CONTINUOUSLY VARIABLE TRANSAXLE ASSEMBLY
(a) Using a transmission jack, support the continuously variable transaxle assembly.
NOTICE:
- Adjust the transmission jack attachment to properly secure the continuously variable transaxle assembly on the transmission jack.
- To prevent the continuously variable transaxle (CVT) transaxle oil pan sub-assembly from deforming, do not place any accessories under the CVT transaxle oil pan sub-assembly of the continuously variable transaxle assembly.
- Using a strap or rope, secure the continuously variable transaxle assembly to the transmission jack.
11. INSTALL CONTINUOUSLY VARIABLE TRANSAXLE ASSEMBLY
(a) Apply clutch spline grease to the crankshaft surface that contacts the torque converter assembly center piece. Clutch spline grease: Genuine Toyota clutch spline grease or equivalent Maximum grease quantity: About 1 g (0.0353 oz.) |
|
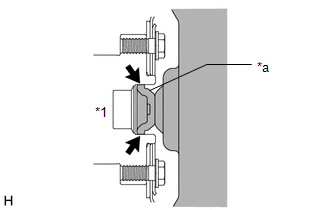
(b) Make sure the 2 impact dowels are installed on the engine assembly and are not damaged. |
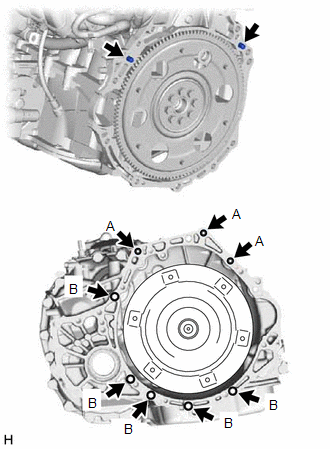 |
(c) Install the continuously variable transaxle assembly onto the engine assembly using the 8 bolts.
Torque:
Bolt (A):
38 N·m {387 kgf·cm, 28 ft·lbf}
Bolt (B):
40 N·m {408 kgf·cm, 30 ft·lbf}
NOTICE:
- Make sure the wire harness or similar component is not pinched between the contact surfaces.
- Be careful not to apply excessive force when installing the continuously variable transaxle assembly.
- When attaching the continuously variable transaxle assembly to the engine assembly, be sure to insert the 2 impact dowels into the corresponding holes.
- Make sure the torque converter assembly rotates.
- When tightening the bolts, make sure the contact surfaces of the engine assembly and the continuously variable transaxle assembly are in contact with each other.
HINT:
- Bolt (A): Install from the continuously variable transaxle assembly side
- Bolt (B): Install from the engine assembly side
12. INSTALL TRANSVERSE ENGINE MOUNTING BRACKET
(a) Install the transverse engine mounting bracket using 5 new bolts. Torque: 41 N·m {418 kgf·cm, 30 ft·lbf} |
|
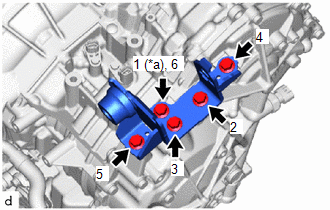
13. INSTALL TRANSVERSE ENGINE MOUNT INSULATOR
(a) Temporarily install the transverse engine mount insulator to the vehicle body with the nut and 4 bolts. |
|
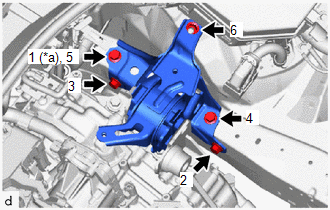
(b) Fully tighten the nut and 4 bolts in the order shown in the illustration.
Torque:
42 N·m {428 kgf·cm, 31 ft·lbf}
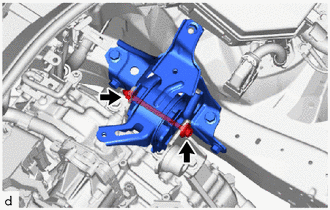
(c) Install the transverse engine mount bracket to the transverse engine mount insulator with the bolt and nut. Torque: 44 N·m {449 kgf·cm, 32 ft·lbf} NOTICE: Turn the bolt while holding the nut. |
 |
14. INSTALL DRIVE PLATE AND TORQUE CONVERTER ASSEMBLY SET BOLT
(a) Using the SST, hold the crankshaft pulley.
SST: 09213-54015
SST: 09330-00021
HINT:
Part number of SST bolt for installing the crankshaft pulley holder SST: 91551-00850 (quantity: 2)
(b) Clean the threads of the 6 drive plate and torque converter assembly set bolts.
(c) Apply a few drops of locking adhesive to the 2 or 3 threads at the end of each of the 6 drive plate and torque converter assembly bolts. Adhesive: Adhesive 1324, Three Bond 1324 Toyota genuine or equivalent NOTICE: To ensure proper installation of the 6 drive plate and torque converter assembly set bolts, apply adhesive to the 6 drive plate and torque converter assembly set bolts and install them within 10 minutes of applying the adhesive. |
|
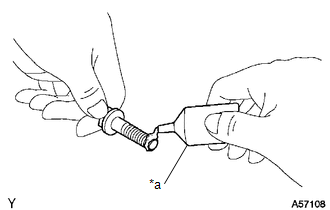
(d) Turn the crankshaft to access the installation positions of the 6 drive plate and torque converter assembly bolts, and install each bolt while holding the crankshaft pulley with the SST.
Torque:
41 N·m {418 kgf·cm, 30 ft·lbf}
NOTICE:
Install the black bolt first, then the remaining 5 silver bolts.
15. INSTALL FLYWHEEL HOUSING UNDER COVER
(a) Install the flywheel housing under cover.
16. INSTALL FLYWHEEL HOUSING SIDE COVER
Click here
17. INSTALL STARTER ASSEMBLY
Click here
18. INSTALL NO. 2 ENGINE POSITION CONTROL ROD
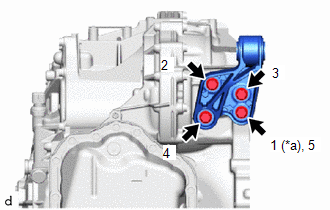
(a) Install the No. 2 engine position control rod to the CVT transaxle assembly with the 4 bolts in the order shown in the illustration. Torque: 44 N·m {449 kgf·cm, 32 ft·lbf} |
|
19. INSTALL FRONT SUSPENSION MEMBER SUB-ASSEMBLY
Click here
20. INSTALL LH REAR SIDE MEMBER REINFORCEMENT SUB-ASSEMBLY
Click here
21. INSTALL RH REAR SIDE MEMBER REINFORCEMENT SUB-ASSEMBLY
Click here
22. REMOVE ENGINE SUPPORT BRIDGE
(a) Remove the SST from the vehicle body.
NOTICE:
Make sure the SST does not contact the vehicle body or the windshield glass.
(b) Install the windshield washer reservoir assembly filler neck with the clip.
23. REMOVE ENGINE HANGER
(a) Remove the 2 bolts and No. 2 engine hanger from the cylinder head.
(b) Remove the 2 bolts and No. 1 engine hanger from the cylinder head.
(c) Install the wire harness clamp bracket with the bolt. Torque: 39 N·m {398 kgf·cm, 29 ft·lbf} |
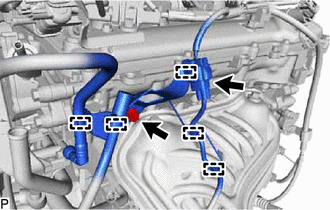 |
(d) Reconnect the air fuel ratio sensor connector.
(e) Engage the 5 clips.
24. INSTALL FRONT AXLE HUB SUB-ASSEMBLIES
Click here
25. INSTALL FRONT EXHAUST PIPE ASSEMBLY (TWC: front and rear catalysts)
Click here
26. INSTALL FRONT FLOOR CENTER BRACE
Click here
27. INSTALL LH FRONT FLOOR COVER (with cover)
Click here
28. INSTALL RH FRONT FLOOR COVER (with cover)
HINT:
Perform the same procedure as for the left side.
29. INSTALL NO. 1 STEERING COLUMN HOLE COVER SUB-ASSEMBLY
Click here
30. ALIGN FRONT WHEELS STRAIGHT AHEAD
31. CONNECT NO. 2 STEERING INTERMEDIATE SHAFT ASSEMBLY
Click here
32. INSTALL STEERING COLUMN HOLE COVER SOUND INSULATION SHEET
Click here
33. INSTALL NO. 1 TRANSMISSION CONTROL CABLE BRACKET
(a) Install the No. 1 transmission control cable bracket to the CVT transaxle assembly with the 2 bolts.
Torque:
12 N·m {122 kgf·cm, 9 ft·lbf}
(b) Connect the clip to the No. 1 transmission control cable bracket.
34. CONNECT ENGINE CABLE
(a) Engage the 5 clips to connect the engine cable to the CVT transaxle assembly.
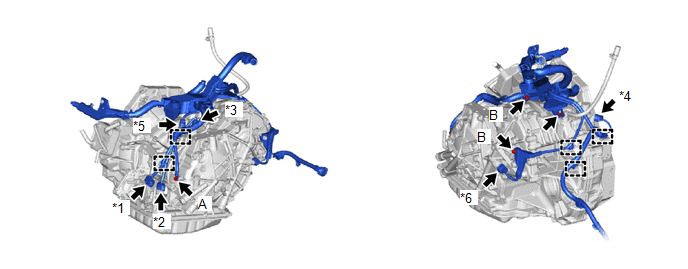
*1 |
Park/neutral position switch connector |
*2 |
Transmission cable connector |
*3 |
Transmission speed sensor (NIN) connector |
*4 |
Transmission speed sensor (NOUT) connector |
*5 |
Transmission speed sensor (NT) connector |
*6 |
Oil pressure sensor connector |
(b) Connect the engine cable to the CVT transaxle assembly with the 3 bolts and nut.
Torque:
Bolt (A):
8.5 N·m {87 kgf·cm, 75 in·lbf}
Bolt (B):
8 N·m {82 kgf·cm, 71 in·lbf}
Nut:
8 N·m {82 kgf·cm, 71 in·lbf}
(c) Reconnect the oil pressure sensor connector.
(d) Connect the transmission speed sensor (NOUT) connector.
(e) Connect the transmission speed sensor (NIN) connector.
(f) Connect the transmission speed sensor (NT) connector.
(g) Connect the transmission cable connector.
(h) Connect the park/neutral position switch connector.
35. CONNECT NO. 3 WATER BYPASS HOSE
(a) Connect the No. 3 water bypass hose to the oil cooler and slide the clamp to secure it.
NOTICE:
- Align each painted mark on the No. 3 water bypass hose with those on the oil cooler.
- Insert the No. 3 water bypass hose fully until it reaches the 2nd rib of each oil cooler pipe.
36. CONNECT NO. 5 WATER BYPASS HOSE
(a) Connect the No. 5 water bypass hose to the oil cooler and slide the clamp to secure it.
NOTICE:
- Align each painted mark on the No. 5 water bypass hose with those on the oil cooler.
- Insert the No. 5 water bypass hose fully until it reaches the 2nd rib of each oil cooler pipe.
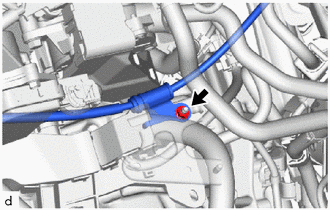
37. CONNECT TRANSMISSION CONTROL CABLE ASSEMBLY
(a) Install the transmission control cable assembly to the transmission control cable bracket with the nut. Torque: 5 N·m {51 kgf·cm, 44 in·lbf} |
 |
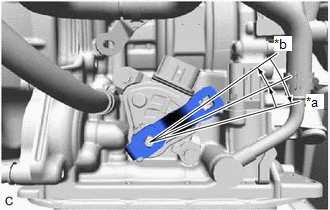
(b) Turn the control shaft lever clockwise until it stops, then turn it 2 detents counterclockwise. |
|
(c) Install the transmission control cable assembly to the transmission control cable bracket with a new clip.
(d) Connect the transmission control cable assembly to the control shaft lever with the nut.
Torque:
12 N·m {122 kgf·cm, 9 ft·lbf}
38. INSTALL BATTERY BRACKET SUB-ASSEMBLY
(a) Install the battery bracket sub-assembly to the vehicle with the 3 bolts.
Torque:
15.4 N·m {157 kgf·cm, 11 ft·lbf}
(b) Engage the clip to connect the engine cable to the battery bracket sub-assembly.
(c) Connect the engine cable to the battery bracket sub-assembly with the bolt and nut.
Torque:
7 N·m {71 kgf·cm, 62 in·lbf}
39. INSTALL ECM
Click here
40. INSTALL AIR CLEANER HOUSING SUB-ASSEMBLY
Click here
41. INSTALL AIR CLEANER COVER WITH AIR CLEANER HOSE
Click here
42. INSTALL AIR CLEANER INLET No. 1
Click here
43. INSTALL RADIATOR COVER
Click here
44. INSTALL FENDER APRON UPPER OUTER PANEL SUB-ASSEMBLY
Click here
45. INSTALL FENDER APRON BODY BRACE RH
Click here
46. INSTALL FENDER APRON BODY BRACE LH
Click here
47. INSTALL WATERPROOF PROTECTIVE PLATE LH
Click here
48. INSTALL HEATER DUCT SPLASH SHIELD SEAL No. 1
Click here
49. INSTALL FRONT WIPER MOTOR AND LINK
Click here
50. INSTALL FRONT WHEELS
Click here
51. INSTALL BATTERY
Click here
52. CONNECT CABLE TO NEGATIVE BATTERY TERMINAL
Click here
NOTICE:
When the cable has been disconnected, some systems must be reset after the cable is reconnected.
Click here
53. ADD ENGINE COOLANT
Click here
54. ADD CONTINUOUSLY VARIABLE TRANSMISSION FLUID
Click here
55. CHECK FOR ENGINE COOLANT LEAK
Click here
56. CHECK FOR CONTINUOUSLY VARIABLE TRANSMISSION FLUID LEAK
57. CHECK FOR EXHAUST GAS LEAK
Click here
HINT:
After repairing or replacing the exhaust system, perform the "Verification After Repair" procedure.
Click here
58. CHECK SHIFT LEVER POSITION
Click here
59. ADJUST SHIFT LEVER POSITION
Click here
60. INSTALL REAR RH ENGINE UNDER COVER
Click here
61. INSTALL REAR LH ENGINE UNDER COVER
Click here
62. INSTALL ENGINE UNDER COVER No. 1
Click here
63. INSTALL NO. 2 CYLINDER HEAD COVER
Click here
64. CHECK SPEED SENSOR SIGNAL
Click here
65. CHECK AND ADJUST FRONT WHEEL ALIGNMENT
Click here
66. INITIALIZE MEMORY
Click here