Inspection
INSPECTION
PRECAUTION / NOTICE / HINT
NOTICE:
- To avoid damaging the pulse sensor in the motor, do not apply battery positive (+) voltage to any terminal except terminal 2 (B).
- Perform initialization of the power window system after removing, inspecting or replacing the power window regulator motor assembly.
Click here

PROCEDURE
1. INSPECT LH POWER WINDOW REGULATOR MOTOR ASSEMBLY
(a) Connect a positive (+) battery cable to terminal 2 (B) of the connector. NOTICE: To avoid damaging the pulse sensor in the motor, do not connect a positive (+) battery wire to any terminal except terminal 2 (B). |
|
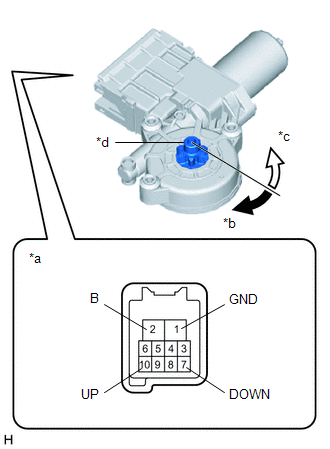
(b) Connect a negative (-) battery wire to connector terminals 1 (GND) and 7 (DOWN) or 10 (UP).
(c) Check that the motor gear rotates freely as shown below:
OK:
Measurement Condition | Specified Condition |
|---|---|
|
The motor gear rotates clockwise |
|
The motor gear rotates counterclockwise |
- If the result does not meet the specification, replace the LH power window regulator motor assembly.
CAUTION:
Initialize the power window control system after reinstalling the power window motor and window regulator assembly.
2. INSPECT RH POWER WINDOW REGULATOR MOTOR ASSEMBLY
(a) Connect a positive (+) battery cable to terminal 2 (B) of the connector. NOTICE: To avoid damaging the pulse sensor in the motor, do not connect a positive (+) battery wire to any terminal except terminal 2 (B). |
|
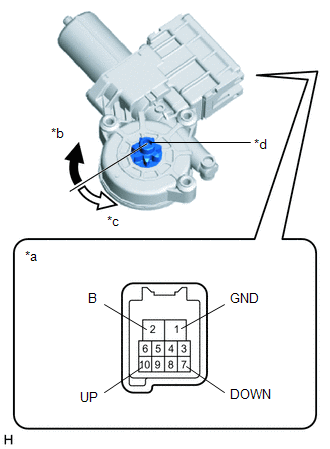
(b) Connect a negative (-) battery wire to connector terminals 1 (GND) and 7 (DOWN) or 10 (UP).
(c) Check that the motor gear rotates freely as shown below:
OK:
Measurement Condition | Specified Condition |
|---|---|
|
The motor gear rotates counterclockwise |
|
The motor gear rotates clockwise |
- If the result does not meet the specification, replace the RH power window regulator motor assembly.
CAUTION:
Initialize the power window control system after reinstalling the power window motor and window regulator assembly.