Oil pump assy (2AZ−FE)(From July, 2003)
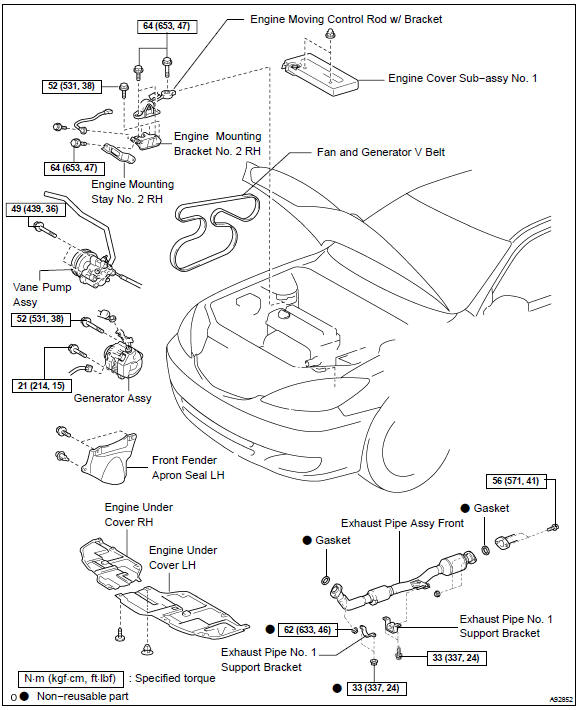
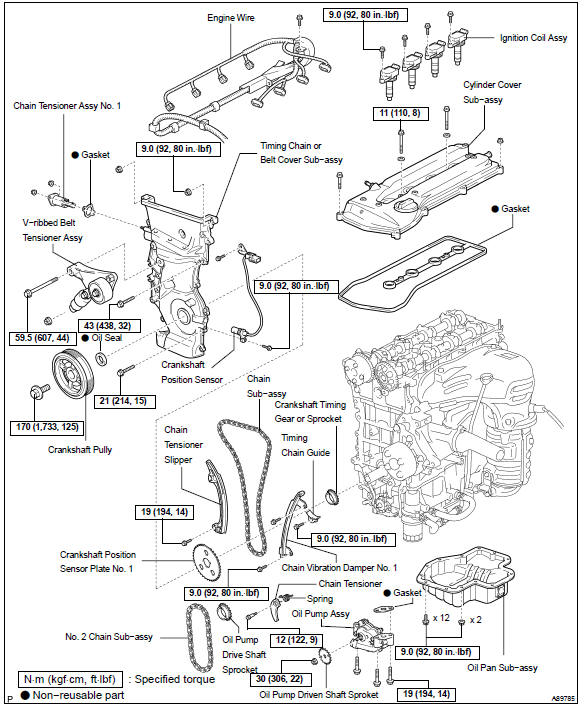
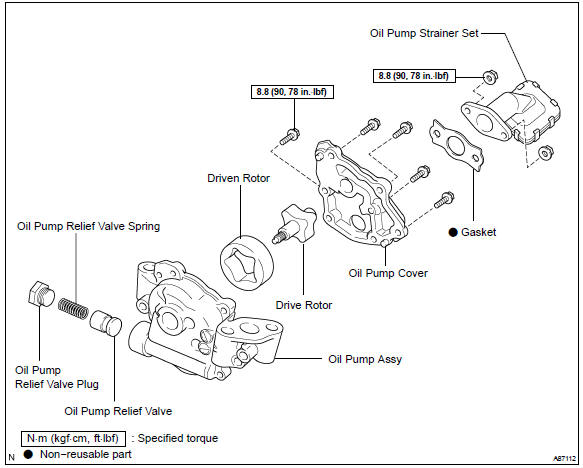
- REMOVE FRONT WHEEL RH
- REMOVE ENGINE UNDER COVER LH
- REMOVE ENGINE UNDER COVER RH
- REMOVE FRONT FENDER APRON SEAL RH
- DRAIN ENGINE OIL
- REMOVE EXHAUST PIPE ASSY FRONT
- REMOVE ENGINE MOVING CONTROL ROD W/BRACKET
a. Remove the 3 bolts and control rod.
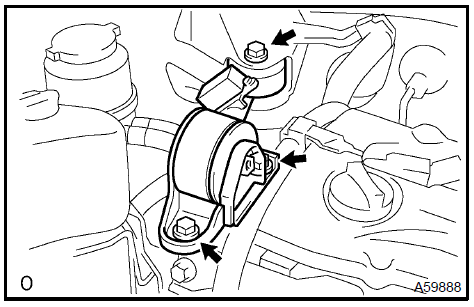 Remove engine moving control rod W/bracket
- REMOVE ENGINE MOUNTING STAY No.2 RH
- REMOVE ENGINE MOUNTING BRACKET No.2 RH
- REMOVE FAN AND GENERATOR V BELT
- REMOVE ENGINE COVER SUB−ASSY No.1
- DISCONNECT ENGINE WIRE
- REMOVE GENERATOR ASSY
- REMOVE VANE PUMP ASSY
- REMOVE IGNITION COIL ASSY
- DISCONNECT VENTILATION HOSE
- DISCONNECT VENTILATION HOSE No.2
- REMOVE CYLINDER HEAD COVER SUB−ASSY
- Remove the bolt and disconnect the engine wire harness clamp.
- Remove the 8 bolts and 2 nuts, and disconnect the cylinder head cover.
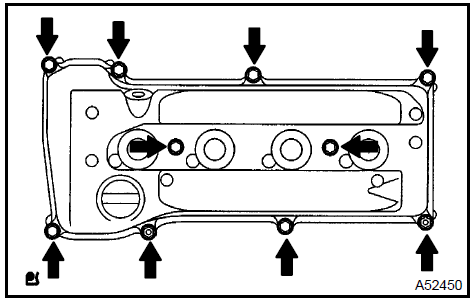 Remove cylinder head cover sub-assy
- SET No. 1 CYLINDER TO TDC/COMPRESSION
- REMOVE CRANKSHAFT PULLEY
- REMOVE CRANKSHAFT POSITION SENSOR
- REMOVE OIL PAN SUB−ASSY
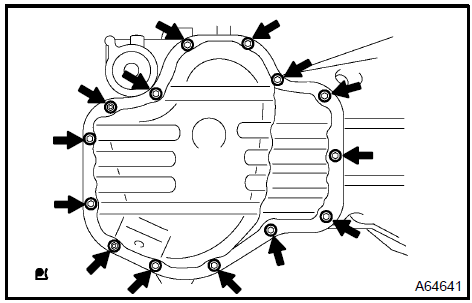
a. Remove the 12 bolts and 2 nuts.

SST 09032−00100
NOTICE: Do not damage the contact surface of the cylinder block and oil pan.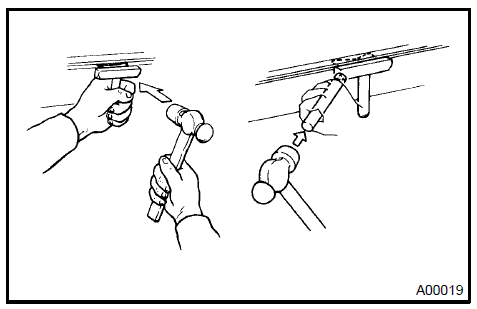
- REMOVE CHAIN TENSIONER ASSY No.1
- REMOVE V−RIBBED BELT TENSIONER ASSY
a. Remove the bolt labeled A and the bolt labeled B. Then remove the tensioner.
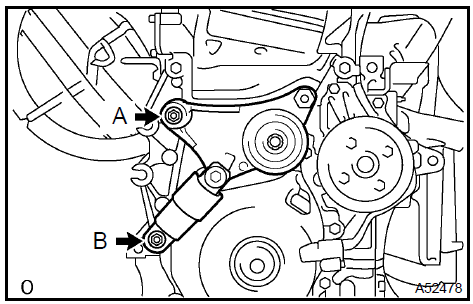 Remove V-ribbed belt tensioner assy 25. REMOVE ENGINE HANGER No.1 a. Install the engine hanger No. 1 and No. 2 Ωith their respective bolts, as shown in the illustration.
Parts No.:

a. Attach the engine chain hoist to the engine hangers.
CAUTION: Do not attempt to hang the engine by hooking the chain to any other part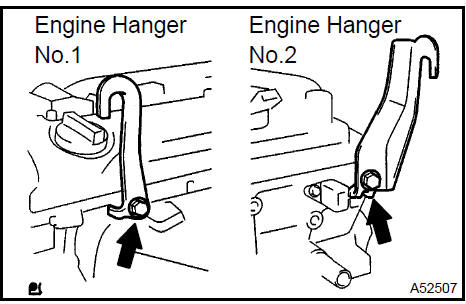
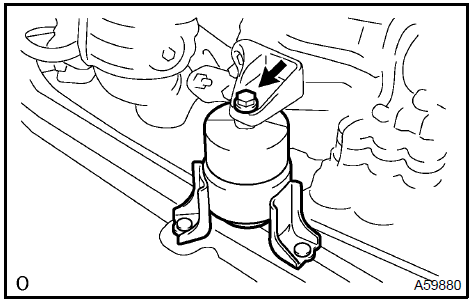
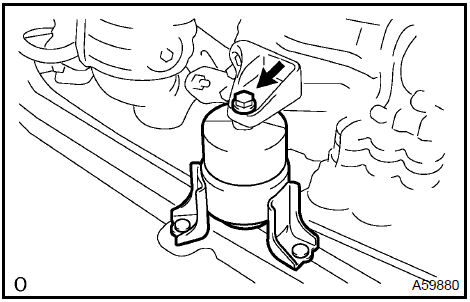
b. Remove the bolt and disconnect the engine mounting insulator FR.
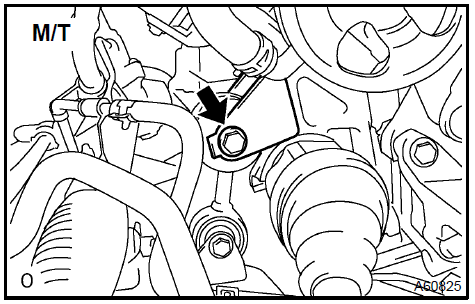
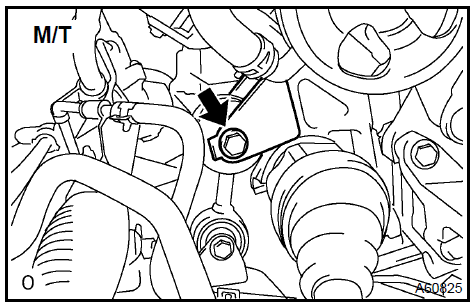
c. M/T: Remove the bolt and disconnect the engine lateral control rod.
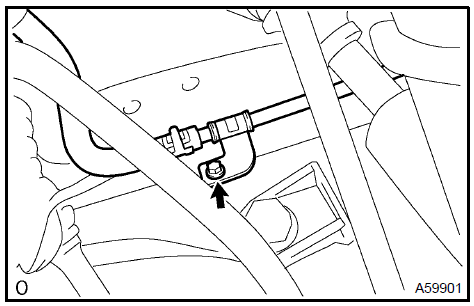
d. Remove the bolt and disconnect the steering gear return hose clamp from the frame.

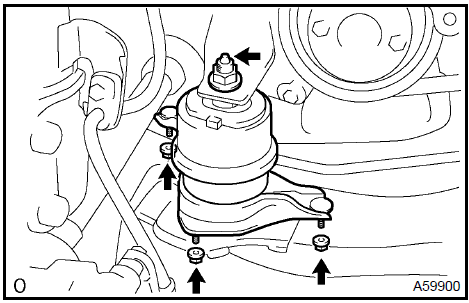
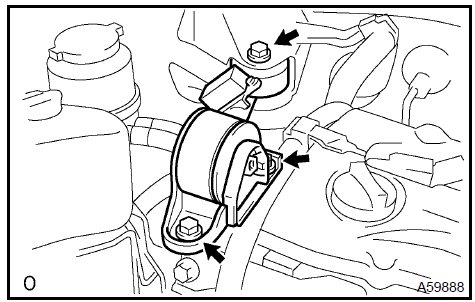
- Remove the 4 nuts from the engine mounting insulator RH.
- Prepare a jack. Place a wooden block on the jack and set the jack under the engine. Remove the engine mounting insulator.
- Raise the jack and lift up the engine. Then remove the engine mounting insulator RH.
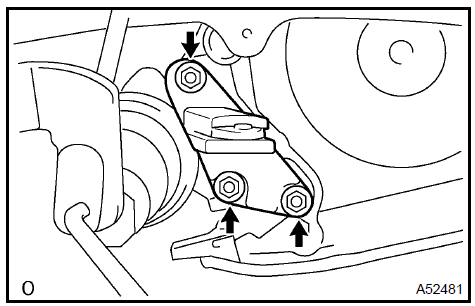
a. Remove the 3 bolts and engine mounting bracket RH.
 Remove engine mounting bracket RH 28. REMOVE TIMING CHAIN OR BELT COVER SUB−ASSY
- Remove the stud bolt for drive belt tensioner from the cylinder block.
- Remove the 14 bolts and 2 nuts.
- Pry out the timing chain cover using a screwdriver.
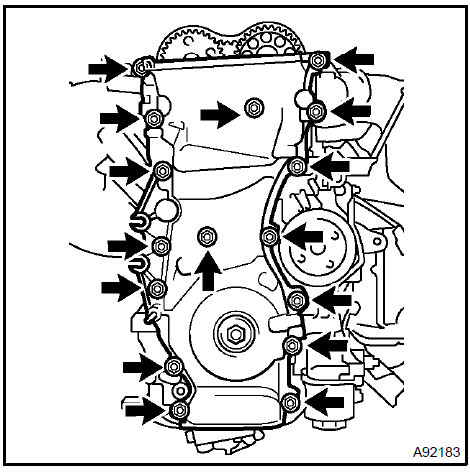 Remove timing chain or belt cover sub-assy
- REMOVE CRANKSHAFT POSITION SENSOR PLATE No.1
- REMOVE CHAIN TENSIONER SLIPPER
- REMOVE CHAIN VIBRATION DAMPER No.1
- REMOVE CHAIN SUB−ASSY
- REMOVE CRANKSHAFT TIMING GEAR OR SPROCKET
- Remove the bolt and timing chain guide.
- Remove the timing gear or sprocket.
a. Turn the crankshaft counterclockΩise 90 and turn the cutout of the oil pump drive shaft gear to the top.
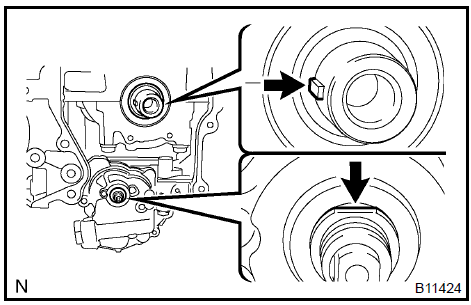
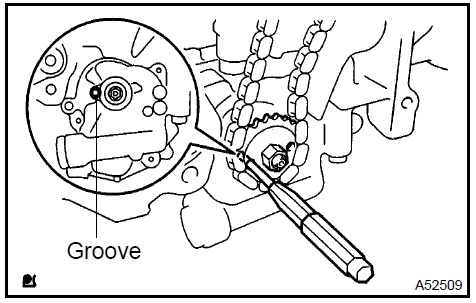
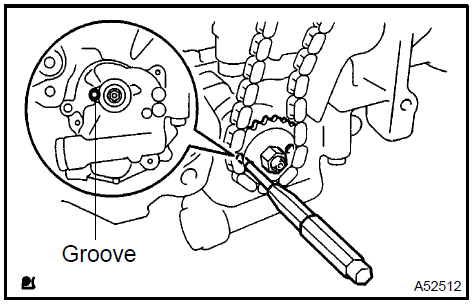
- Align the adjusting hole of the oil pump drive shaft gear with the groove of the oil pump.
- Put a bar (ϕ 4 mm (0.16 in.)) in the adjusting hole of the oil pump drive shaft gear to temporarily lock the gear in position. Remove the nut.
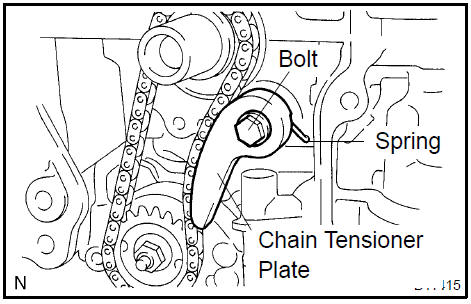
- Remove the bolt, chain tensioner plate and spring.
- Remove the oil pump drive shaft gear and chain.
a. Remove the 3 bolts and pump.
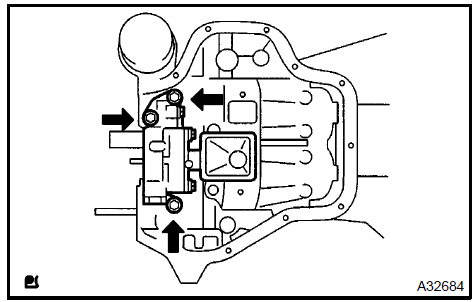 Remove oil pump assy 36. INSTALL OIL PUMP ASSY
- Place a new gasket on the cylinder block.
- Install the pump with the 3 bolts. Torque: 19 N·m
- Set the crankshaft key into the left horizontal position.
- Turn the cutout of the drive shaft gear to the top.
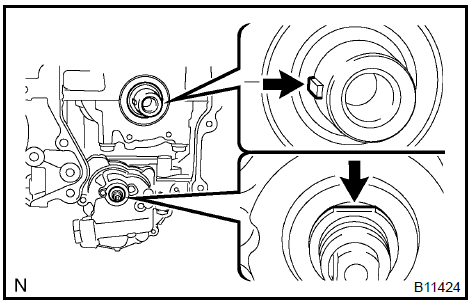
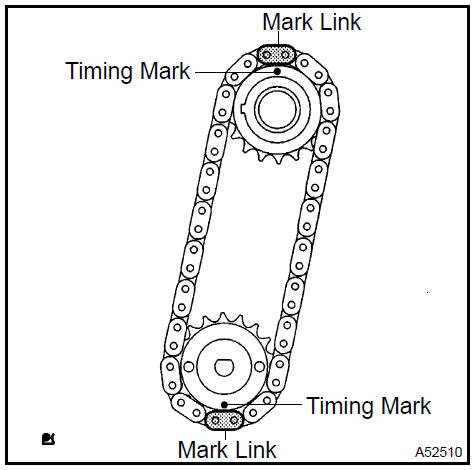
- Align the mark links (yellow colored links) with the timing marks of the gear as shown in the illustration.
- Insert the gears and chain to the crankshaft and oil pump shaft.
- Temporarily tighten the oil pump drive shaft gear with the a nut.
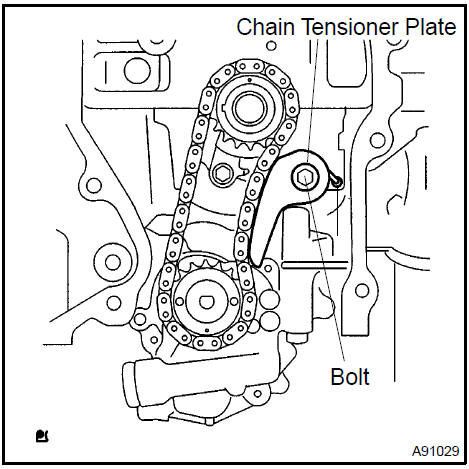
- Align the adjusting hole of the oil pump drive shaft gear with the groove of the oil pump.
- Put a bar (f 4 mm (0.16 in.)) in the adjusting hole of the oil pump drive shaft gear to temporarily lock the gear in position. Install the nut. Torque: 30 N·m
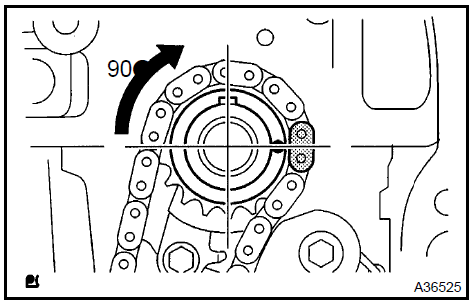
i. Rotate the crankshaft clockΩise 90 , and align the crankshaft key to the top.
- INSTALL CHAIN VIBRATION DAMPER No.1 Torque: 9 N·m
- INSTALL CHAIN SUB−ASSY
a. Set the No.1 cylinder to TDC/compression.
1. Align the timing marks of the camshaft timing sprockets and bearing caps (No. 1 and No. 2).

2. Using the crankshaft pulley bolt, turn the crankshaft and set the set key on the crankshaft upward.
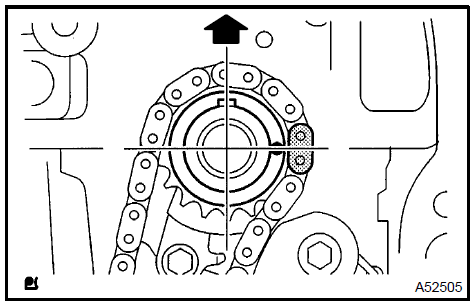
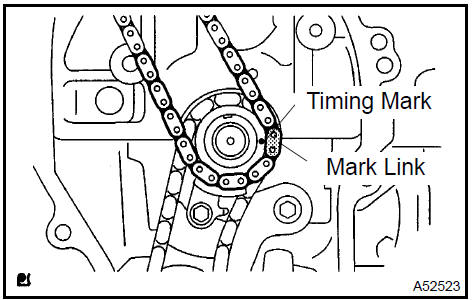
b. Align the mark link (gold or orange colored link) with the timing mark of the crankshaft timing sprocket.
SST 09309−37010
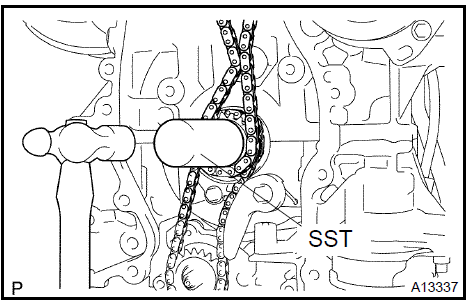
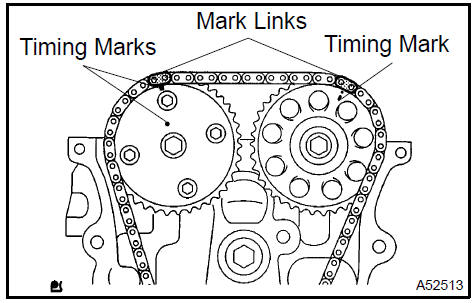
d. Align the mark links (gold or yellow colored links) with the timing marks of the camshaft timing gear and camshaft timing sprocket, and install the chain.
- INSTALL CHAIN TENSIONER SLIPPER Torque: 19 N·m
- INSTALL CRANKSHAFT POSITION SENSOR PLATE No.1
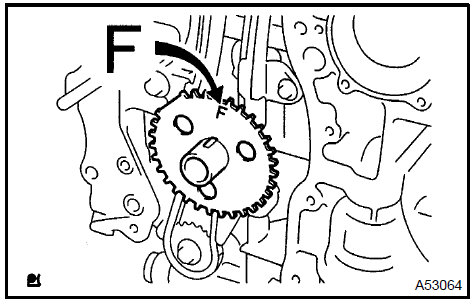
a. Install the sensor plate with the F mark facing outward.
 Install crankshaft position sensor plate No.1 42. INSTALL TIMING CHAIN OR BELT COVER SUB−ASSY NOTICE:
- Remove any oil from the contact surface.
- Install the chain cover within 3 minutes after applying seal packing.
- Do not start the engine for at least 2 hours after installing the chain cover.
- Remove any old packing (FIPG) material and be careful not to drop any oil on the contact surfaces of the timing chain cover, cylinder head and cylinder block.
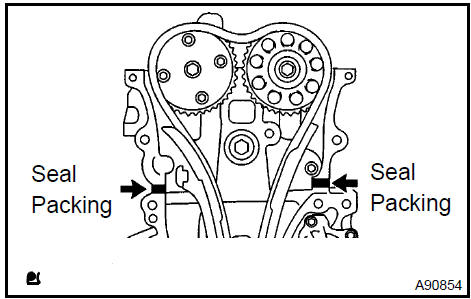
- Apply a continuous bead of seal packing (diameter: 2 mm (0.099 in.)), as shown in the illustration. Seal packing: Part No. 08826−00080 or equivalent
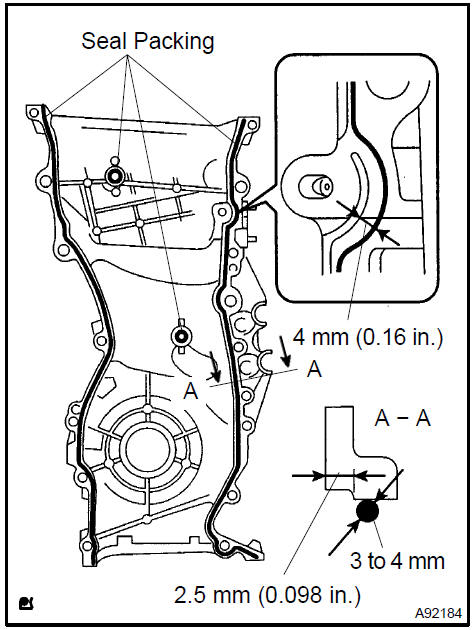
- Install the timing chain cover with the 14 bolts and 2 nuts. Torque:
9 N·m for bolt A 21 N·m for bolt B 43 N·m for bolt C 9 N·m for nut - Install the stud bolt to the drive belt tensioner. Torque: 10 N·m

- INSTALL CHAIN TENSIONER ASSY No.1
- INSTALL V−RIBBED BELT TENSIONER ASSY
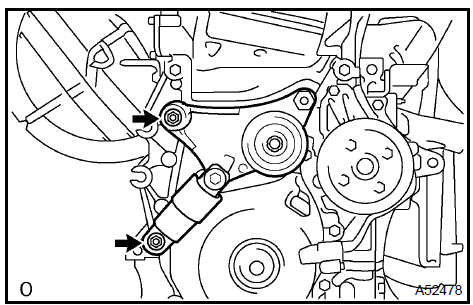 Install V-ribbed belt tensioner assy 45. INSTALL ENGINE MOUNTING BRACKET RH a. Install the engine mounting bracket RH with the 3 bolts.Torque: 54 N·m
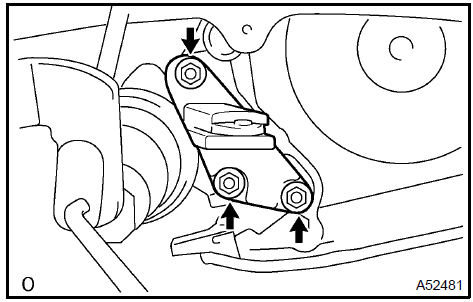 Install engine mounting bracket RH 46. INSTALL ENGINE MOUNTING INSULATOR
- Raise the engine and install the engine mounting insulator RH.
- Install the engine mounting insulator RH with the 4 nuts. Torque: 95 N·m for bolt A 87 N·m for bolt B
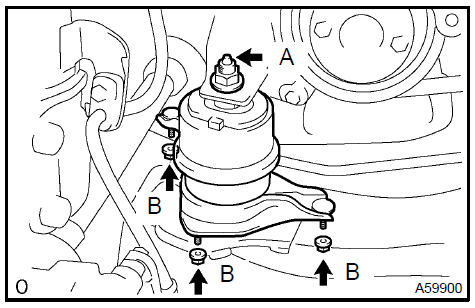
e. M/T: Install the engine lateral control rod with the
- Remove any oil from the contact surface.
- Install the oil pan within 3 minutes after applying seal packing.
- Do not start the engine for at least 2 hours after installing.
- Remove any old packing (FIPG) material and be careful not to drop any oil on the contact surface of the cylinder block and oil pan.
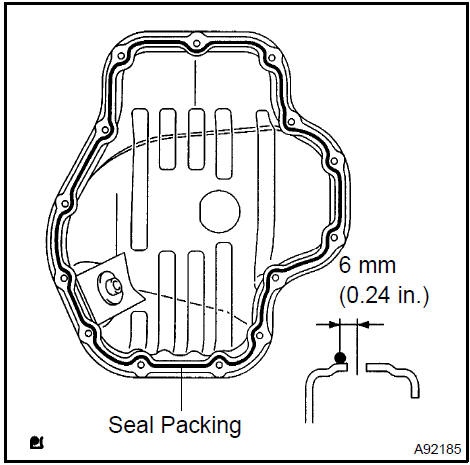
- Apply a continuous bead of seal packing in the shape of bead (diameter: 3 to 4 mm (0.157 in.)) as shown in the illustration, and install the oil pan. Seal packing: Part No. 08826−00080 or equivalent
- Install the bolt and sensor. Torque: 9 N·m
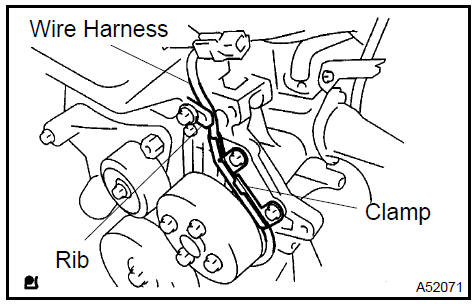
- Confirm the wire harness of the sensor is placed as shown in the illustration.
 Install crankshaft position sensor 49. INSTALL CRANKSHAFT PULLEY
- Install the crankshaft pulley.
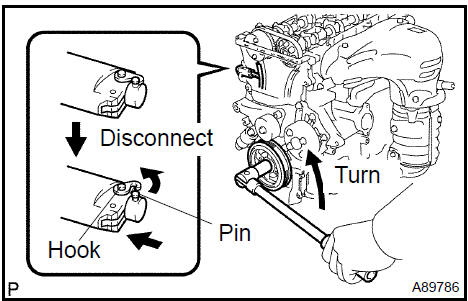
- Disconnect the plunger knock pin.
1. Turn the crankshaft counterclockΩise and disconnect the plunger knock pin from the hook.
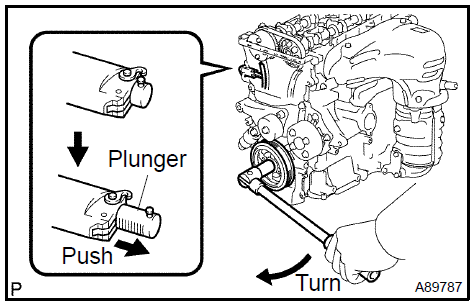
2. Turn the crankshaft clockΩise and check that the slipper is pushed by the plunger.
- INSTALL CYLINDER HEAD COVER SUB−ASSY
- INSTALL IGNITION COIL ASSY Torque: 9 N·m
- INSTALL VANE PUMP ASSY
- INSTALL GENERATOR ASSY
- INSTALL ENGINE WIRE
- INSTALL FAN AND GENERATOR V BELT
- INSTALL ENGINE MOUNTING BRACKET No.2 RH Torque: 52 N·m
- INSTALL ENGINE MOUNTING STAY No.2 RH Torque: 64 N·m
- INSTALL ENGINE MOVING CONTROL ROD W/BRACKET
a. Install the engine mounting control rod wit
 Install engine moving control rod w/bracket
- INSTALL EXHAUST PIPE ASSY FRONT
- INSTALL FRONT WHEEL RH
- ADD ENGINE OIL
- INSPECT CHECK FOR ENGINE OIL LEAKS
Test yourself
A quick Toyota Camry quiz: every answer comes with an explanation and a link to the manual page.