Brake
Adjustment
In this manual: Brake
12steps
~72min
3/5difficulty
Done 0 of 12
1. Check and adjust brake pedal height
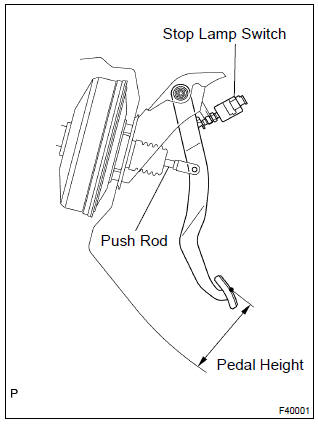
- Inspect brake pedal height.
Pedal height from asphalt sheet: m/t: 134.9 – 144.9 Mm (5.311 – 5.703 In.) A/t: 136.0 – 146.0 Mm (5.353 – 5.747 In.)
- Disconnect the connector from the stop lamp switch.
- Remove the stop lamp switch.
- Loosen the clevis lock nut.
- Adjust the pedal height by turning the pedal push rod.
- Tighten the push rod lock nut.
Torque: 26 nvm (265 Kgf·cm, 19 ft·lbf)
- install the stop lamp switch.
- Connect the connector to the stop lamp switch.
- Push the brake pedal in 5 – 15 mm (0.20 – 0.59 In.), And turn the stop lamp switch to lock the nut in the position where the stop lamp goes off.
- After installation, push the brake pedal in 5 – 15 mm (0.20 – 0.59 In.), Check that stop lamp comes on.
- Stop the engine and depress the brake pedal several times until there is no more vacuum left in the booster.
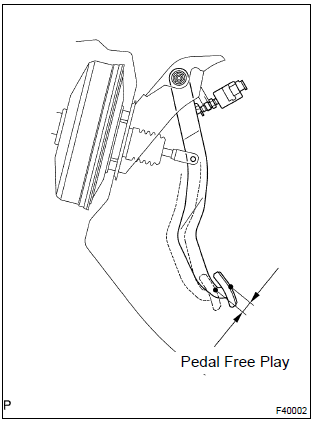
- push in the pedal until the beginning of the resistance is felt. Measure the distance, as shown in the installation.
Pedal free play: 1 – 6 mm (0.04 – 0.24 In.)
If incorrect, check the stop lamp switch clearance.
If the clearance is ok, then troubleshoot the brake system.
Stop lamp switch clearance: 0.5 – 2.4 Mm (0.020 – 0.094 In.)
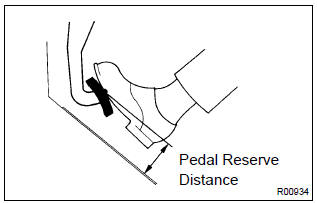
3. Check pedal reserve distance- Release the parking brake lever. With engine running, depress the pedal and measure the pedal reserve distance, as shown in the installation.
Pedal reserve distance from asphalt sheet at 490 n (50 kgf, 110.2 Lbf): more than 70 mm (2.76 In.)
If incorrect, troubleshoot the brake system.
Test yourself
A quick Toyota Corolla quiz: every answer comes with an explanation and a link to the manual page.
Was this page helpful?