Valve body assembly
ON-VEHICLE REPAIR
1. REMOVE ENGINE NO.2 UNDER COVER
2. DRAIN ATF
3. REMOVE OIL PAN
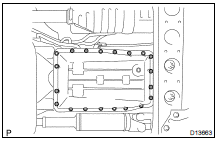
NOTICE: Some fluid will remain in the oil pan.
(a) Remove the 20 bolts.(b) Remove the oil pan gasket.
4. EXAMINE PARTICLES IN PAN
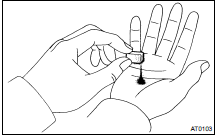
Remove the magnets and use them to collect steel particles.
Carefully look at the foreign matter and particles in the pan and on the magnets to anticipate the type of wear you will find in the transmission.
Steel (magnetic)...bearing, gear and clutch plate wear Brass (non-magnetic)...bushing wear
5. REMOVE OIL STRAINER

Remove the 4 bolts, the oil strainer and the O-ring.
NOTICE: Be careful as some fluid will come out with the oil strainer.
6. DISCONNECT TEMPERATURE SENSOR

(c) Disconnect the 2 temperature sensor from the valve body.
7. DISCONNECT 7 CONNECTORS FROM SHIFT SOLENOID VALVES
8. REMOVE VALVE BODY
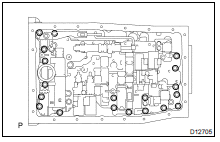
(b) Remove the 3 drum seal gaskets.
9. REMOVE SOLENOID VALVE

(f) Remove the O-ring from the solenoid valve S2.
10. INSTALL SOLENOID VALVE
(a) Install a new O-ring to shift solenoid valve S2. (b) Install the shift solenoid SL1 and the shift solenoid valve SLT. (c) Install the shift solenoid SL2 and the shift solenoid valve SLU.(d) Install the 4 straight pins and the 2 solenoid lock plates with the 2 bolts.
Torque:6,4 N·m
(e) Install the shift solenoid valve S1and S2 with the 2 bolts.
Torque:10 N·m
(f) Install the shift solenoid valve SR with the 2 bolts.
Torque:6,4 N·m
11. INSTALL VALVE BODY
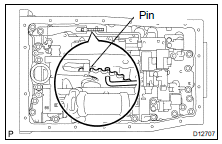
HINT: Align the groove of the manual valve with the pin of the lever.
(a) Install the 3 new drum seal gaskets to the transmission case.
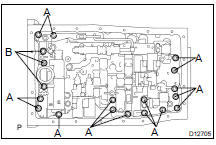
(b) Install the 19 bolts and the valve body.
Torque: BoltA.B: 11 N·m
Bolt length: Bolt A: 25 mm (0.98 in.) Bolt B: 36 mm (1.42 in.)
12. CONNECT TEMPERATURE SENSOR
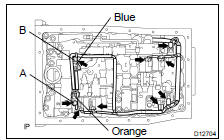
(a) Connect the 2 temperature sensors to the valve body, and install the 2 temperature sensors clamp with the 2 bolts.
Torque:
A: 11 N·m B: 10 N·m
Bolt length: Bolt A: 36 mm (1.42 in.) Bolt B: 12 mm (0.47 in.)
Sensor wire harness:

13. CONNECT 7 CONNECTORS TO SHIFT SOLENOID VALVES
14. INSTALL OIL STRAINER
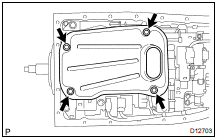
(b) Install the oil strainer with the 4 bolts.
Torque: 10 N·m
15. INSTALL OIL PAN
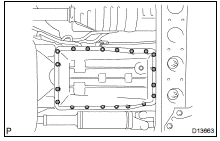
HINT: Remove any packing material, and be careful not to spill oil on the contacting surfaces of the transmission case and the oil pan.
(a) Install a new gasket and oil pan.(b) Install the 20 bolts and oil pan.
Torque: 4,4 N·m
16. FILL ATF AND CHECK ATF LEVEL
(a) Install a new gasket and a drain plug.
Torque: 20 N·m
(b) Remove the refill plug.(c) Fill new fluid through the refill hole ( AT-3-1 ).
17. INSTALL ENGINE NO.2 UNDER COVER
Test yourself
A quick Toyota Land Cruiser quiz: every answer comes with an explanation and a link to the manual page.