Suspension
Front shock absorber with coil spring
In this manual: Suspension
45steps
~295min
5/5difficulty
5special tools
Done 0 of 45
Components
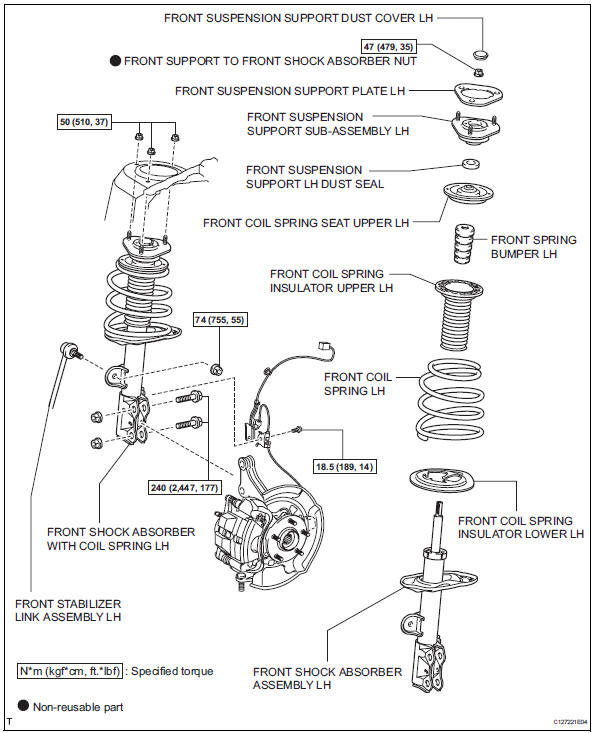
Removal Hint:
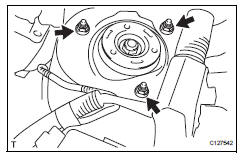

Notice:
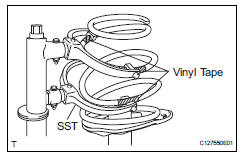
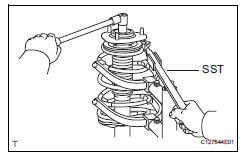
Removal Hint:
- Use the same procedures for the rh side and lh side.
- The procedures listed below are for the lh side.
- Remove front wheel
- Disconnect front speed sensor lh
- Disconnect front stabilizer link assembly lh
- Remove front shock absorber with coil spring lh
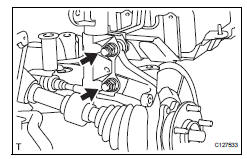
- Remove the 2 bolts and 2 nuts, and disconnect the shock absorber from the steering knuckle.
While fixing the nuts in place, loosen and remove the bolts.
- Remove the 3 nuts and shock absorber with coil spring.
- Use the same procedures for the rh side and lh side.
- The procedures listed below are for the lh side.
- Remove front suspension support plate lh
- Remove the plate from the shock absorber.
- Remove front suspension support dust cover lh
- Using a screwdriver, remove the dust cover from the suspension support.
Tape the screwdriver tip before use.
- Remove front support to front shock absorber nut
- Install 2 nuts and 2 bolts to the bracket at the lower portion of the shock absorber and secure it with a vise.
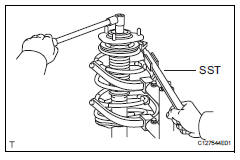
- Using sst, compress the coil spring.
To prevent the coil spring from being damaged, wind vinyl tape on the coil spring.
Notice:- When holding the shock absorber with the coil spring removed, do not hold it by the spring lower seat. Also, do not knock the spring lower seat.
- Do not use an impact wrench which will damage sst.
- Using sst to hold the spring upper seat, remove the nut.
- Remove front suspension support subassembly lh
- Remove the suspension support from the shock absorber.
- Remove front suspension support lh dust seal
- Remove the dust seal from the shock absorber.
- Remove front coil spring seat upper lh
- Remove the seat upper from the shock absorber.
- Remove front coil spring insulator upper lh
- Remove the insulator upper from the shock absorber.
- Remove front spring bumper lh
- Disengage the spring bumper from the spring seat.
- Remove front coil spring lh
- Remove the coil spring from the shock absorber.
- Remove sst from the coil spring.
- Remove front coil spring insulator lower Lh
- Remove the insulator lower from the shock absorber.
- Inspect front shock absorber assembly lh
- Compress and extend the shock absorber rod 4 times or more. Check that there is no abnormal resistance or unusual sound during the operation.

Notice:
When disposing of the shock absorber, see disposal (see page sp-13).
Reassembly Hint:- Use the same procedures for the rh side and lh side.
- The procedures listed below are for the lh side.
- Install front coil spring insulator lower lh
- Install the insulator lower to the shock absorber.
- Install front spring bumper lh
- Engage the spring bumper to the spring seat.
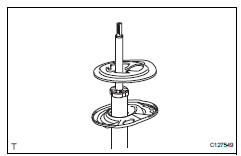
- Install front coil spring lh
- Using sst, compress the coil spring.
To prevent the coil spring from being damaged, wind vinyl tape around the coil spring.
Notice:Do not use an impact wrench which will damage sst.
- Install the coil spring to the shock absorber.
Fit the lower end of the coil spring to the gap of the lower spring seat.
- Install front coil spring insulator upper lh
- Install the insulator upper to the shock absorber.
- Install front coil spring seat upper lh
- Install the seat upper to the shock absorber.
- Install front suspension support lh dust seal
- Install the dust seal to the shock absorber.
- Install front suspension support subassembly lh
- Install the suspension support to the shock absorber.
- Install front support to front shock absorber nut
- Using sst to hold the spring upper seat, install a new nut.
- Remove sst.
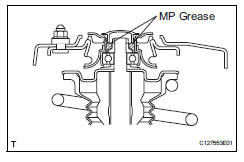
- Pack the suspension support with mp grease.
- Install front suspension support dust cover lh
- Install the dust cover to the shock absorber.
- Install front suspension support plate lh
- Install the support plate to the shock absorber with coil spring.
Test yourself
A quick Toyota RAV4 quiz: every answer comes with an explanation and a link to the manual page.
Was this page helpful?