Front wheel alignment
- Inspect tires
- Inspect the tires (see page tw-1).
- Measure vehicle height
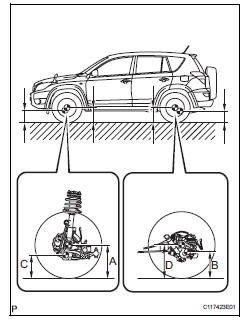
Notice:
Before inspecting the wheel alignment, adjust the vehicle height to the specification.
- Press down on the vehicle several times to stabilize the suspension, and measure the vehicle height.
- Measure the front vehicle height.
- Measure the distance from the ground to the center of the lower suspension arm front mounting bolt.
- Measure the rear vehicle height.
- Rear measure the distance from the ground to the center of the body side no. 2 Suspension arm mounting bolt.
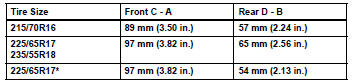
Hint:
- *: W/ 3rd seat.
- If the vehicle height is not as specified, press down on the vehicle several times to stabilize the suspension. Then measure the vehicle height again.
- Inspect toe-in

If the toe-in is not as specified, adjust it at the rack ends.
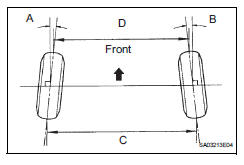
- Adjust toe-in
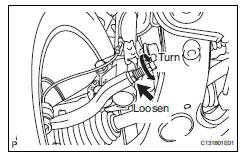
- Remove the boot clips.
- Loosen the tie rod end lock nuts.
- Turn the right and left rack ends by an equal amount to adjust the toe-in to the center value.
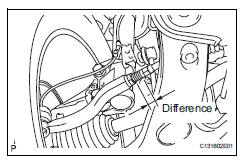
- Make sure that the length of the right and left rack ends are approximately the same.
- Tighten the tie rod end lock nuts.
Make sure that the boots are not twisted.
- Inspect wheel angle
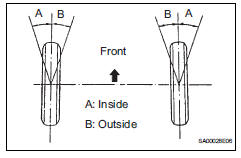
- Turn the steering wheel to the left and right full lock positions, and measure the turning angle.
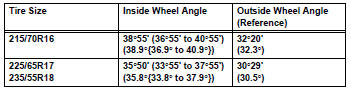
If the angles are not as specified, check and adjust the right and left rack end lengths.
- Inspect camber, caster and steering axis inclination

- Install the camber-caster-kingpin gauge or place the front wheels on the center of the wheel alignment tester.
- Inspect the camber, caster and steering axis inclination.

Standard caster inclination (unloaded vehicle)
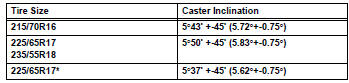
Hint:
*: W/ 3rd seat
Standard steering axis inclination (unloaded vehicle)
- Adjust camber and caster
After the camber has been adjusted, inspect the toein.
- Remove the front wheel.
- Remove the 2 nuts on the lower side of the shock absorber.
- Coat the threads of the nuts with engine oil.
- Temporarily install the 2 nuts.

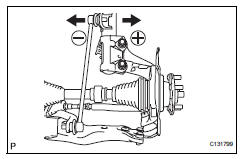
- Adjust the camber by pushing or pulling the lower side of the shock absorber in the direction where the camber adjustment is required.
- Tighten the 2 nuts.
Torque: 240 n*m (2,447 kgf*cm, 177 ft.*Lbf)
Torque: 103 n*m (1,050 kgf*cm, 76 ft.*Lbf)
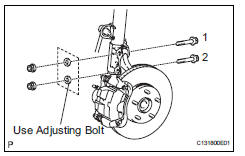
If the camber is not within the specification, estimate how much additional camber adjustment will be required and select the camber adjusting bolt using the following table.
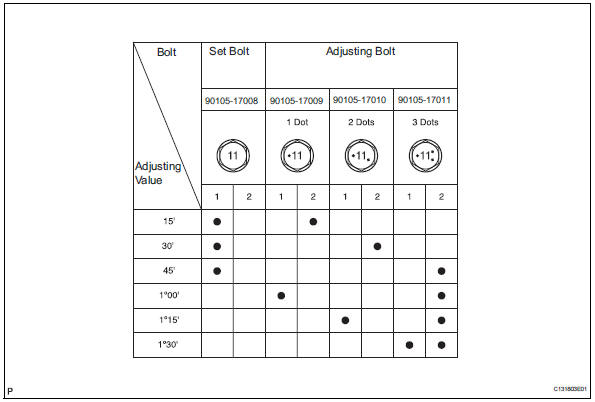
- Repeat the steps mentioned above. When temporarily installing the 2 nuts, replace 1 or 2 selected bolts.
Replace 1 bolt at a time when replacing 2 bolts.
Test yourself
A quick Toyota RAV4 quiz: every answer comes with an explanation and a link to the manual page.