Installation
1. INSTALL FUEL INJECTOR ASSEMBLY

(a) Apply a light coat of spindle oil or gasoline to new Orings, and install them to each injector.
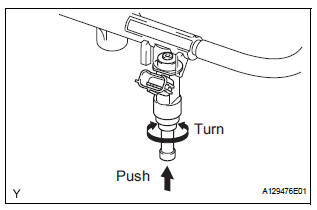
(b) Apply a light coat of spindle oil or gasoline where the fuel delivery pipe contacts the O-ring.
(c) Push the fuel injector while turning it to install the injector in the fuel delivery pipe.
(d) Position the fuel injector connector outward.
NOTICE:- Be careful not to twist the O-ring.
- After installing the fuel injector, check that it turns smoothly. If not, reinstall it with a new O-ring.
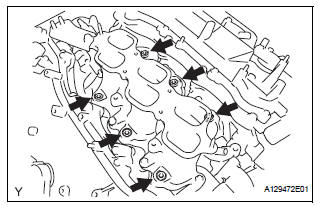
(e) Install 6 new insulators to the intake manifold.
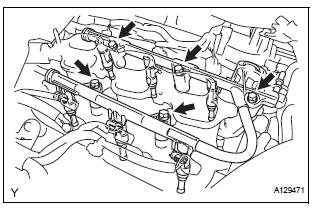
(f) Place the fuel delivery pipe which has the 6 fuel injectors installed to it in position on the intake manifold.
NOTICE: Be careful not to drop the fuel injectors when installing the fuel delivery pipe.(g) Temporarily install the 5 bolts which are used to hold the fuel delivery pipe to the intake manifold.
NOTICE: After installing the fuel injectors, check that they turn smoothly. If not, reinstall the injectors with new O-rings.(h) Tighten the 5 bolts which are used to hold the fuel delivery pipe to the intake manifold.
Torque: 21 N*m (214 kgf*cm, 15 ft.*lbf)
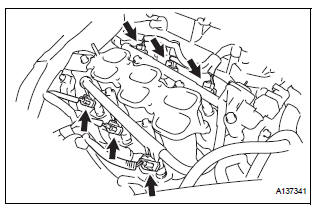
(i) Connect the 6 fuel injector connectors.
2. CONNECT FUEL TUBE SUB-ASSEMBLY
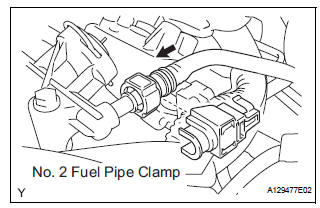
(a) Push in the tube connector onto the pipe until the tube connector makes a "click" sound.
NOTICE:- Before connecting the tube, make sure that it is not damaged. Make sure that there is no dirt present on the connecting surfaces.
- After connecting, check that the fuel tube connector and the pipe are securely connected by pulling on them.
(b) Install the No. 2 fuel pipe clamp.
3. INSTALL INTAKE AIR SURGE TANK ASSEMBLY
NOTICE: DO NOT apply oil to the bolts listed below:
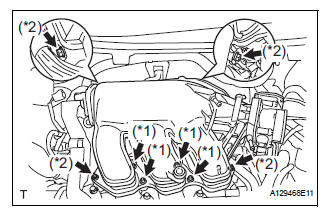
(a) Install a new gasket to the intake air surge tank assembly.
(b) Using a 5 mm hexagon socket wrench, install the 4 bolts. (*1) Torque: 18 N*m (184 kgf*cm, 13 ft.*lbf) (c) Install the intake air surge tank assembly with the 2 nuts and 2 bolts. (*2)
Torque: Nut 16 N*m (163 kgf*cm, 12 ft.*lbf) Bolt 21 N*m (214 kgf*cm, 15 ft.*lbf)
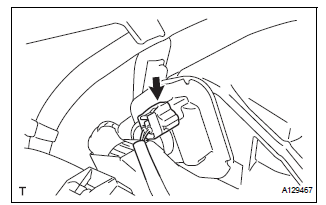
(d) Connect the connector.
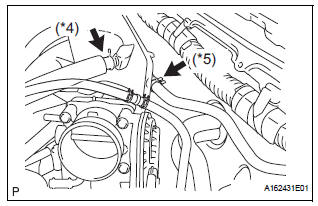
(e) Connect the union to check valve hose. (*1) (f) Connect the No. 1 ventilation hose. (*2)
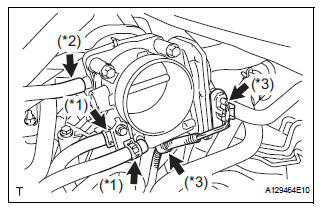
(g) Install the clamp and connect the throttle with motor body assembly connector. (*3) (h) Connect the vapor feed hose assembly. (*4) (i) Connect the 2 water by-pass hoses to the throttle with motor body assembly. (*5)
4. INSTALL AIR CLEANER CAP SUB-ASSEMBLY
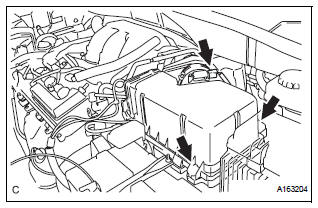
(a) Install the 2 bolts and air cleaner cap sub-assembly.
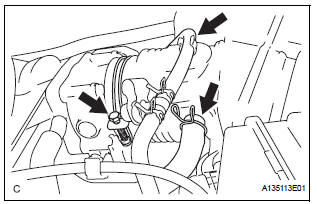
(b) Connect the No. 2 ventilation hose and air cleaner hose band.
(c) Connect the vacuum hose (EVAP) to the air cleaner hose.
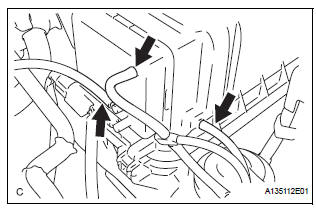
(d) Connect the 3 vacuum hoses.
5. ADD ENGINE COOLANT (See page CO-7)
6. CONNECT CABLE TO NEGATIVE BATTERY TERMINAL 7. INSPECT FOR ENGINE COOLANT LEAK (See page CO-1) 8. INSTALL NO. 1 ENGINE UNDER COVER 9. INSPECT FOR FUEL LEAK (See page FU-7)
10. INSTALL V-BANK COVER SUB-ASSEMBLY (See page EM-63) 11. INSTALL COWL TOP PANEL SUB-ASSEMBLY OUTER FRONT
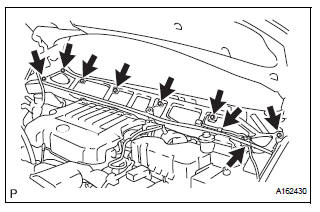
(a) Install the 7 bolts and the cowl top panel subassembly outer front.
Torque: 7.5 N*m (76 kgf*cm, 66 in.*lbf) (b) Connect the fuel pump resistor connector.
(c) Connect the wire harness clamp.
12. INSTALL NO. 1 COWL TOP TO COWL BRACE INNER
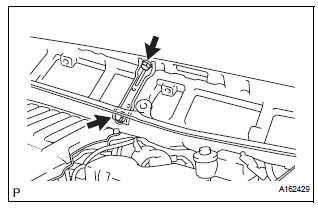
(a) Install the 2 bolts and the No.1 cowl top to cowl brace inner.
Torque: 7.5 N*m (76 kgf*cm, 66 in.*lbf)
13. INSTALL WINDSHIELD WIPER MOTOR AND LINK ASSEMBLY (See page WW-6) 14. INSTALL FRONT WIPER ARM LH (See page WW-6) 15. INSTALL FRONT WIPER ARM RH (See page WW-7)
Test yourself
A quick Toyota Sienna quiz: every answer comes with an explanation and a link to the manual page.