DESCRIPTION
- When the ignition switch is off and the shift lever is in P, the power seat slides rearwards when the seat belt tongue plate is disengaged from the front seat inner belt assembly LH (auto away function). Also the power seat slides forward when the seat belt tongue plate is engaged to the front seat inner belt assembly LH with the ignition switch ACC or ON, and the shift lever in P.
WIRING DIAGRAM 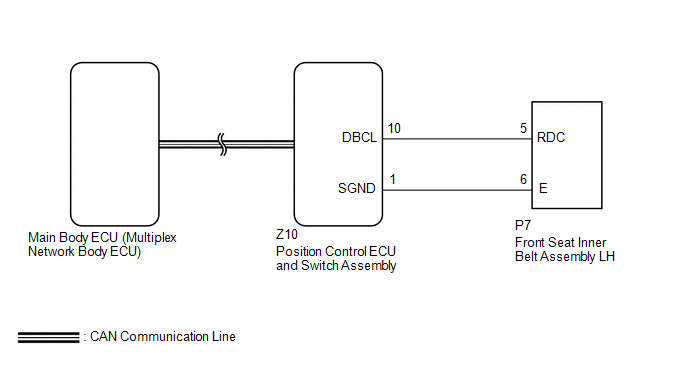
PROCEDURE
CHECK CAN COMMUNICATION SYSTEM
(a) Use the Techstream to check if the CAN communication system is functioning normally (See page  ).
OK:
CAN communication DTC is not output.
| NG |
 |
Go to CAN COMMUNICATION SYSTEM |
| OK |
 |
|
CHECK FRONT POWER SEAT OPERATION
(a) Check that each function of the power seat operates normally by using the front power seat switches (See page ).
OK:
Each function of power seat operates normally by using the front power seat seat switches. Result
Result | Proceed to |
Power seat functions operate normally |
A |
All power seat functions do not operate |
B |
One or more power seat motors do not operate |
C |
| B |
|
Go to OTHER FLOW CHART (Front Power Seat does not Operate with Front Power Seat Switch) |
| C |
|
Go to OTHER FLOW CHART (One or more Power Seat Motors do not Operate) |
| A |
|
|
CHECK SEAT POSITION MEMORY FUNCTION
(a) Perform a memory operation and check that the buzzer sounds to indicate the completion of the memory operation (See page ).
NOTICE:
- The seat position will not be recorded if the SET switch and 2 seat memory switches are pressed simultaneously.
- If a memorizing operation has failed, release all switches. The seat memory function does not operate unless the switches are released.
OK:
Seat position memory function operates normally.
| NG |
|
Go to GO TO PROBLEM SYMPTOMS TABLE |
| OK |
|
|
READ VALUE USING TECHSTREAM (DRIVER SEAT BUCKLE SW)
(a) Connect the Techstream to the DLC3.
(b) Turn the ignition switch to ON.
(c) Turn the Techstream on.
(d) Enter the following menus: Body Electrical / Driver Seat / Data List.
(e) Read the Data List according to the display on the Techstream. Driver Seat
Tester Display | Measurement Item/Range | Normal Condition | Diagnostic Note |
Driver Seat Buckle SW |
Status of the driver seat belt / ON or OFF |
ON: Tongue plate is engaged
OFF: Tongue plate is not engaged |
- |
OK:
"ON" and "OFF" appears on the screen.
| NG |
|
GO TO STEP 7 |
| OK |
|
|
REPLACE POSITION CONTROL ECU AND SWITCH ASSEMBLY
(a) Temporarily replace the position control ECU and switch assembly with a new or normally functioning one (See page ).
| NEXT |
|
|
CHECK POWER SEAT POWER EASY ACCESS SYSTEM
(a) Check that the power seat easy access system operates normally when engaging and disengaging the tongue plate of the front seat inner belt with the shift lever in P (See page ).
OK:
Power seat power easy access system is normal.
| OK |
|
END (POSITION CONTROL ECU AND SWITCH ASSEMBLY WAS DEFECTIVE) |
| NG |
|
REPLACE MAIN BODY ECU (MULTIPLEX NETWORK BODY ECU) |
INSPECT FRONT SEAT INNER BELT ASSEMBLY LH
(a) Remove the front seat inner belt assembly LH (See page ).
(b) Inspect the front seat inner belt assembly LH (See page ).
| NG |
|
REPLACE FRONT SEAT INNER BELT ASSEMBLY LH |
| OK |
|
|
CHECK HARNESS AND CONNECTOR (POSITION CONTROL ECU AND SWITCH ASSEMBLY - FRONT SEAT INNER BELT ASSEMBLY LH)
(a) Disconnect the Z10 position control ECU and switch assembly connector.
(b) Disconnect the P7 front seat inner belt assembly LH connector.
(c) Measure the resistance according to the value(s) in the table below.
Standard Resistance:
Tester Connection | Condition | Specified Condition |
Z10-10 (DBCL) - P7-5 (RDC) |
Always |
Below 1 Ω |
Z10-1 (SGND) - P7-6 (E) |
Always |
Below 1 Ω |
Z10-10 (DBCL) or P7-5 (RDC) - Body ground |
Always |
10 kΩ or higher |
Z10-1 (SGND) or P7-6 (E) - Body ground |
Always |
10 kΩ or higher |
| OK |
|
REPLACE POSITION CONTROL ECU AND SWITCH ASSEMBLY |
| NG |
|
REPAIR OR REPLACE HARNESS OR CONNECTOR |
|