Back Door Support

Removal REMOVAL PROCEDURE
1. REMOVE BACK DOOR STAY ASSEMBLY
NOTICE:
- Avoid touching the piston rod as much as possible to prevent foreign matter from attaching to it. Be sure to hold the cylinder while servicing.
- Do not wear cotton gloves or other similar materials when handling the piston rod. Fibers may attach to the rod and result in gas leaks.
- Do not apply any horizontal load to the door stay in order to prevent the piston rod from deforming.
(a) Using a screwdriver, remove the stop ring along the groove. HINT: Tape the screwdriver tip before use. Text in Illustration
|
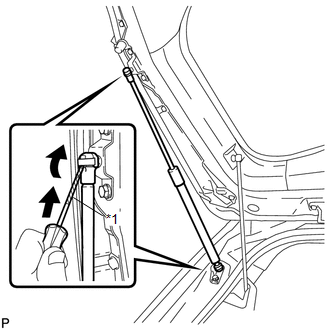 |
(b) Release the ball joint and remove the back door stay assembly.
NOTICE:
Remove the back door stay assembly while supporting the back door by hand.
2. REMOVE BACK DOOR LOWER DAMPER STAY BRACKET
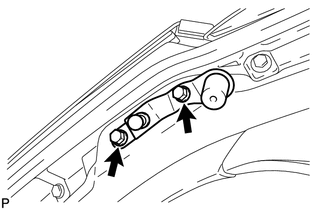
(a) Remove the 2 bolts and back door lower damper stay bracket. |
 |
3. REMOVE BACK DOOR UPPER DAMPER STAY BRACKET
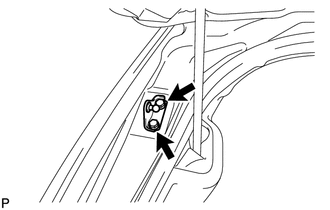
(a) Remove the 2 bolts and back door upper damper stay bracket. |
 |
1. DISPOSE OF BACK DOOR STAY ASSEMBLY
(a) Secure the back door stay assembly horizontally in a vise with the piston rod pulled out.
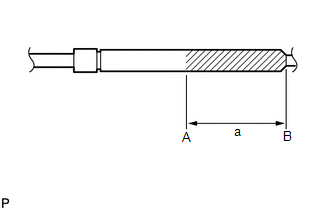
(b) Wear safety glasses. Use a metal saw to slowly cut a groove between A and B shown in the illustration to release the gas. Standard Dimension: a 80.0 mm (3.150 in.) NOTICE: Although the gas inside the back door stay assembly is colorless, odorless and harmless, metal debris may scatter. Therefore, cover the back door stay assembly with a piece of cloth or other material. |
 |
1. INSTALL BACK DOOR UPPER DAMPER STAY BRACKET
(a) Clean the threaded portion on the vehicle body with a non-residue solvent.
(b) Apply adhesive to the threads of the 2 bolts.
Adhesive:
Toyota Genuine Adhesive 1324, Three Bond 1324 or equivalent
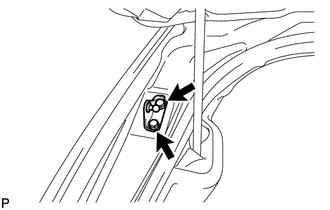
(c) Install the back door upper damper stay bracket with the 2 bolts. Torque: 8 N·m {82 kgf·cm, 71 in·lbf} |
 |
2. INSTALL BACK DOOR LOWER DAMPER STAY BRACKET
(a) Clean the threaded portion on the vehicle body with a non-residue solvent.
(b) Apply adhesive to the threads of the 2 bolts.
Adhesive:
Toyota Genuine Adhesive 1324, Three Bond 1324 or equivalent
(c) Install the back door lower damper stay bracket with the 2 bolts. Torque: 8 N·m {82 kgf·cm, 71 in·lbf} |
 |
3. INSTALL BACK DOOR STAY ASSEMBLY
NOTICE:
- Avoid touching the piston rod as much as possible to prevent foreign matter from attaching to it. Be sure to hold the cylinder while servicing.
- Do not wear cotton gloves or other similar materials when handling the piston rod. Fibers may attach to the rod and result in gas leaks.
- Do not apply any horizontal load to the door stay in order to prevent the rod from deforming.
(a) When reusing the back door stay assembly:
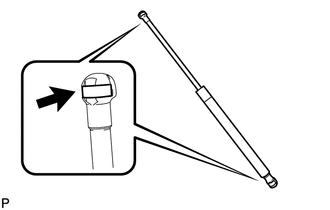
(1) Install the 2 stop rings to the back door stay assembly. |
 |
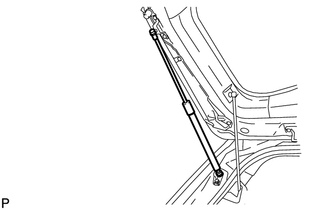
(b) Install the back door stay assembly. NOTICE: Install the back door stay assembly while supporting the back door by hand. |
 |
(c) Check that the back door stay assembly is engaged in the ball joint and that the back door stay assembly cannot be pulled out.
Test yourself
A quick Toyota Venza quiz: every answer comes with an explanation and a link to the manual page.