Disassembly
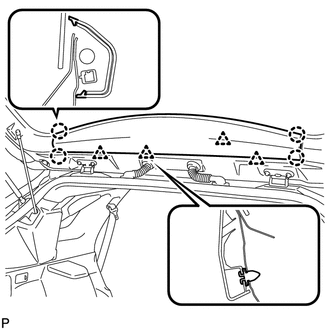
1. REMOVE UPPER BACK WINDOW PANEL TRIM
(a) Disengage the 4 clips and 4 claws, and remove the upper back window panel trim. |
 |
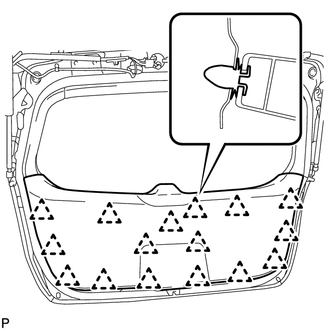
2. REMOVE BACK DOOR PANEL TRIM ASSEMBLY
(a) Disengage the 16 clips and remove the back door panel trim assembly. |
 |
3. DISCONNECT POWER BACK DOOR ROD (w/ Power Back Door)
(a) Using a screwdriver, remove the stop ring along the groove. HINT: Tape the screwdriver tip before use. Text in Illustration
|
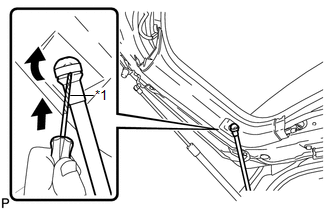 |
(b) Release the ball joint and disengage the power back door rod.
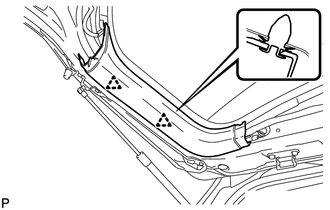
4. REMOVE BACK DOOR TRIM COVER LH (w/o Power Back Door)
(a) Disengage the 2 clips and remove the back door trim cover LH. |
 |
5. REMOVE BACK DOOR TRIM COVER LH (w/ Power Back Door)
(a) Disengage the 2 clips and remove the back door trim cover LH. |
 |
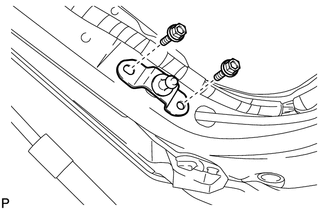
6. REMOVE UPPER BACK DOOR STAY BRACKET LH (w/ Power Back Door)
(a) Remove the 2 bolts and upper back door stay bracket LH. |
 |
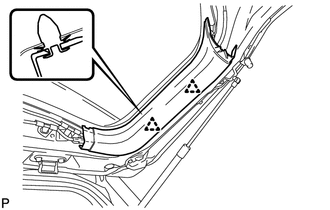
7. REMOVE BACK DOOR TRIM COVER RH
(a) Disengage the 2 clips and remove the back door trim cover RH. |
 |
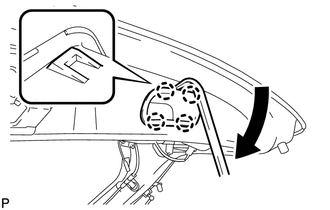
8. REMOVE DOOR PULL HANDLE
(a) Using a moulding remover, disengage the 4 claws and remove the back door pull handle as shown in the illustration. |
 |
9. REMOVE POWER BACK DOOR CLOSER SWITCH ASSEMBLY (w/ Power Back Door)

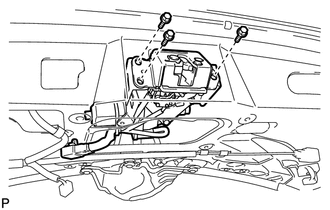
10. REMOVE BACK DOOR LOCK ASSEMBLY
(a) Disconnect the connector. |
 |
(b) Disengage the clamp.
(c) Remove the bolt.
(d) Remove the 3 bolts and back door lock assembly. |
 |
11. REMOVE POWER BACK DOOR TOUCH SENSOR ASSEMBLY LH (w/ Power Back Door)
12. REMOVE POWER BACK DOOR TOUCH SENSOR ASSEMBLY RH (w/ Power Back Door)
HINT:
Use the same procedure for the RH side and LH side.
13. REMOVE BACK DOOR STAY ASSEMBLY LH
14. REMOVE BACK DOOR STAY ASSEMBLY RH
HINT:
Use the same procedure for the RH side and LH side.
15. REMOVE BACK DOOR LOWER DAMPER STAY BRACKET LH
16. REMOVE BACK DOOR LOWER DAMPER STAY BRACKET RH
HINT:
Use the same procedure for the RH side and LH side.
17. REMOVE POWER BACK DOOR WARNING BUZZER (w/ Power Back Door)
18. REMOVE AMPLIFIER ANTENNA ASSEMBLY
19. REMOVE REAR LIGHT ASSEMBLY LH
20. REMOVE REAR LIGHT ASSEMBLY RH
HINT:
Use the same procedure for the RH side and LH side.
21. REMOVE BACK DOOR OUTSIDE GARNISH SUB-ASSEMBLY
22. REMOVE LICENSE PLATE LIGHT ASSEMBLY
23. REMOVE REAR SPOILER ASSEMBLY
24. REMOVE REAR WASHER NOZZLE
25. REMOVE REAR WIPER ARM HEAD CAP
26. REMOVE REAR WIPER ARM AND BLADE ASSEMBLY
27. REMOVE REAR WIPER MOTOR GROMMET
28. REMOVE REAR WIPER MOTOR AND BRACKET ASSEMBLY
29. REMOVE ROOF HEADLINING ASSEMBLY
HINT:
Refer to the procedure up to Remove Roof Headlining Assembly (See page ).
30. REMOVE NO. 3 ANTENNA CORD SUB-ASSEMBLY
Test yourself
A quick Toyota Venza quiz: every answer comes with an explanation and a link to the manual page.