Power Source Circuit
1. w/o Multi-information Display
(a) This circuit is the power source circuit for the accessory meter assembly. This circuit provides two types of power sources; one is a constant power source mainly used as a backup power source, and the other is a power source mainly used for signal transmission.
HINT:
If the accessory meter assembly displays "1:00" when the ignition switch is turned off, then to ON again, the B terminal has a malfunction.
The maximum clock assembly margin of error is -4 to 4 seconds per day when the temperature is between -20°C (-4°F) and 60 °C.
2. w/ Multi-information Display
(a) This circuit is the power source circuit for the accessory meter assembly. This circuit provides two types of power sources; one is a constant power source mainly used as a backup power source, and the other is a power source mainly used for signal transmission.
HINT:
If the accessory meter assembly displays "1:00" when the ignition switch is turned off, then to ON again, the +B terminal has a malfunction.
The maximum clock assembly margin of error is -4 to 4 seconds per day when the temperature is between -20°C (-4°F) and 60 °C.
WIRING DIAGRAM1. w/o Multi-information Display

2. w/ Multi-information Display

PROCEDURE
CHECK HARNESS AND CONNECTOR
(a) w/o Multi-information Display
(1) Disconnect the F2 connector. |
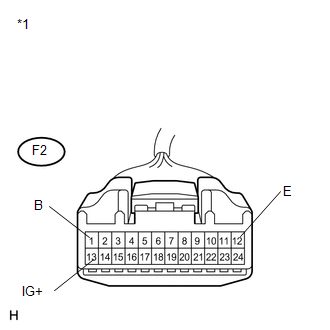 |
(2) Measure the voltage according to the value(s) in the table below.
Standard Voltage:
Tester Connection | Condition | Specified Condition |
|---|---|---|
F2-1 (B) - Body ground |
Always |
11 to 14 V |
F2-13 (IG+) - Body ground |
Ignition switch ON |
11 to 14 V |
(3) Measure the resistance according to the value(s) in the table below.
Standard Resistance:
Tester Connection | Condition | Specified Condition |
|---|---|---|
F2-12 (E) - Body ground |
Always |
Below 1 Ω |
*1 |
Front view of wire harness connector (to Accessory Meter Assembly) |
(b) w/ Multi-information Display
(1) Disconnect the F2 and F5 connectors. |
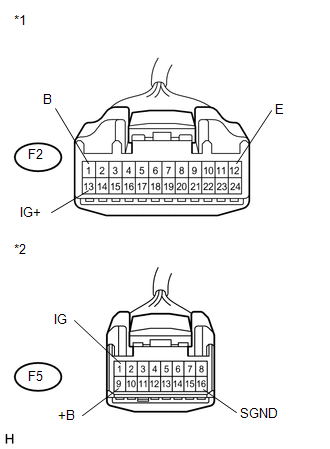 |
(2) Measure the voltage according to the value(s) in the table below.
Standard Voltage:
Tester Connection | Condition | Specified Condition |
|---|---|---|
F5-1 (IG) - Body ground |
Ignition switch ON |
11 to 14 V |
F5-9 (+B) - Body ground |
Always |
11 to 14 V |
F2-1 (B) - Body ground |
Always |
11 to 14 V |
F2-13 (IG+) - Body ground |
Ignition switch ON |
11 to 14 V |
(3) Measure the resistance according to the value(s) in the table below.
Standard Resistance:
Tester Connection | Condition | Specified Condition |
|---|---|---|
F2-12 (E) - Body ground |
Always |
Below 1 Ω |
F5-16 (SGND) - Body ground |
Always |
Below 1 Ω |
*1 |
Front view of wire harness connector (to Accessory Meter Assembly) |
*2 |
Front view of wire harness connector (to Accessory Meter Assembly ) |
| OK |  | REPLACE ACCESSORY METER ASSEMBLY |
| NG | | REPAIR OR REPLACE HARNESS OR CONNECTOR |
Test yourself
A quick Toyota Venza quiz: every answer comes with an explanation and a link to the manual page.