Security Horn Circuit
When the theft deterrent system is switched from the armed state to the alarm sounding state, the main body ECU (driver side junction block assembly) controls the security horn.
WIRING DIAGRAM
PROCEDURE
PERFORM ACTIVE TEST USING TECHSTREAM
(a) Connect the Techstream to the DLC3.
(b) Turn the ignition switch to ON.
(c) Turn the Techstream on.
(d) Select the item below in the Active Test and then check that the security horn assembly operates.
BodyTester Display | Test Part | Control Range | Diagnostic Note |
|---|---|---|---|
Security Horn |
Security horn |
ON/OFF |
- |
OK:
The security horn assembly sounds and stops correctly when operated through the Techstream.
| OK |  | PROCEED TO NEXT SUSPECTED AREA SHOWN IN PROBLEM SYMPTOMS TABLE |
|

INSPECT SECURITY HORN ASSEMBLY
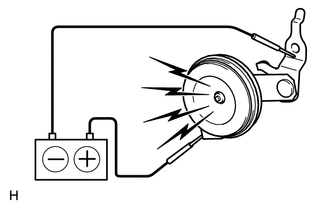
(a) Remove the security horn assembly (See page |
 |
 ).
(b) Check the operation of the security horn assembly.
OK:
Measurement Condition | Specified Condition |
|---|---|
Battery positive (+) → Terminal 1 |
Horn sounds |
Battery negative (-) → Horn body |
| NG | | REPLACE SECURITY HORN ASSEMBLY |
|
INSPECT SEC HORN RELAY
(a) Remove the SEC HORN relay from the engine room relay block. |
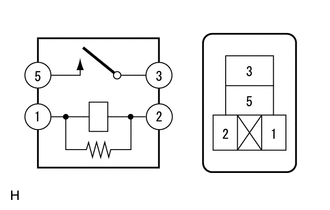 |
(b) Measure the resistance according to the value(s) in the table below.
Standard Resistance:
Tester Connection | Condition | Specified Condition |
|---|---|---|
3 - 5 |
Battery voltage applied between terminals 1 and 2 |
Below 1 Ω |
3 - 5 |
Battery voltage not applied between terminals 1 and 2 |
10 kΩ or higher |
| NG | | REPLACE SEC HORN RELAY |
|
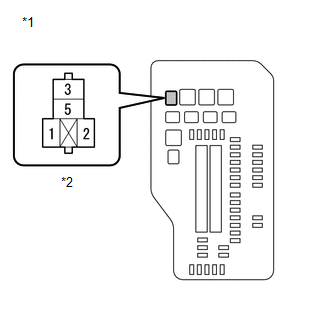
CHECK HARNESS AND CONNECTOR (SEC HORN RELAY POWER SOURCE)
(a) Measure the voltage according to the value(s) in the table below. Standard Voltage:
|
 |
| NG | | REPAIR OR REPLACE HARNESS OR CONNECTOR |
|
CHECK HARNESS AND CONNECTOR (SEC HORN RELAY - MAIN BODY ECU)
(a) Disconnect the D51 main body ECU (driver side junction block assembly) connector. |
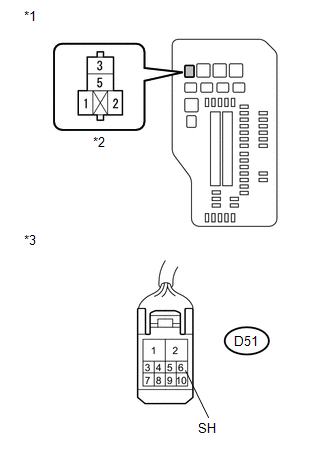 |
(b) Measure the resistance on the relay block side according to the value(s) in the table below.
Standard Resistance:
Tester Connection | Condition | Specified Condition |
|---|---|---|
Engine room relay block SEC HORN relay terminal 1 - D51-6 (SH) |
Always |
Below 1 Ω |
Engine room relay block SEC HORN relay terminal 1 - Body ground |
Always |
10 kΩ or higher |
*1 |
Engine Room Relay Block |
*2 |
SEC HORN Relay Terminal |
*3 |
Front view of wire harness connector (to Main Body ECU (Driver Side Junction Block Assembly)) |
| NG | | REPAIR OR REPLACE HARNESS OR CONNECTOR |
|
CHECK HARNESS AND CONNECTOR (SEC HORN RELAY POWER SOURCE)
(a) Measure the voltage according to the value(s) in the table below. Standard Voltage:
|
|
| NG | | REPAIR OR REPLACE HARNESS OR CONNECTOR |
|
CHECK HARNESS AND CONNECTOR (SEC HORN RELAY - SECURITY HORN ASSEMBLY)
(a) Disconnect the A23 security horn assembly connector. |
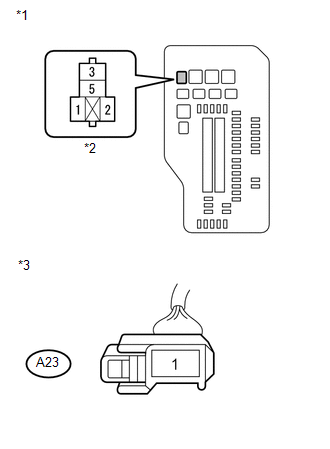 |
(b) Measure the resistance according to the value(s) in the table below.
Standard Resistance:
Tester Connection | Condition | Specified Condition |
|---|---|---|
Engine room relay block SEC HORN relay terminal 5 - A23-1 |
Always |
Below 1 Ω |
Engine room relay block SEC HORN relay terminal 5 - Body ground |
Always |
10 kΩ or higher |
*1 |
Engine Room Relay Block |
*2 |
SEC HORN Relay Terminal |
*3 |
Front view of wire harness connector (to Security Horn Assembly) |
| OK | | REPLACE MAIN BODY ECU (DRIVER SIDE JUNCTION BLOCK ASSEMBLY) |
| NG | | REPAIR OR REPLACE HARNESS OR CONNECTOR |
Test yourself
A quick Toyota Venza quiz: every answer comes with an explanation and a link to the manual page.