Adjusting the exhaust gas volume
NOTE:
Be sure to set the CO density level to standard, and then adjust the exhaust gas volume.
1. Remove:
- Rider seat Refer to "GENERAL CHASSIS" on page 4-1.
2. Set the main switch to "OFF".
3. Disconnect:
- Self-diagnosis signal connector "1"
4. Connect:
- FI diagnostic tool "2"


5. While pressing the "MODE" button "1", turn the main switch to "ON".
NOTE:
- "DIAG" appears on the LCD "2" of the FI diagnostic tool.
- "POWER" LED (Green) "3" comes on.
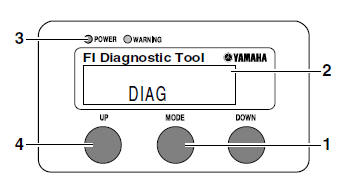
6. Press the "UP" button "4" to select the CO adjustment mode "CO" or the diagnostic mode "DIAG".
7. After selecting "CO", press the "MODE" button.
8. Check that "C1" appears on the LCD of the FI diagnostic tool, and then press the "MODE" button.
9. Start the engine.
CAUTION:Perform the adjustment after the battery has been sufficiently charged.
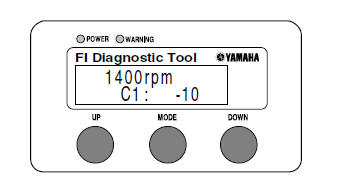
10.Change the CO adjustment volume by pressing the "UP" and "DOWN" buttons.
NOTE:
The CO adjustment volume and engine idling speed appears on the LCD of the FI diagnostic tool.
- To decrease the CO adjustment volume, press the "DOWN" button.
- To increase the CO adjustment volume, press the "UP" button.
11.Release the "DOWN" and "UP" buttons to execute the selection.
12.Set the main switch to "OFF" to cancel the mode.
13.Disconnect:
- FI diagnostic tool
14.Connect:
- Self-diagnosis signal connector
15.Install:
- Rider seat Refer to "GENERAL CHASSIS" on page 4-1.
Test yourself
A quick Yamaha YZF-R125 quiz: every answer comes with an explanation and a link to the manual page.