Checking the Exhaust System
GENERAL INFORMATION
After each installation of exhaust system components, the system must be checked to eliminate any stresses in the components that could cause cracks or noise.
PROCEDURE
1. Check the exhaust system when cold. A heated system must be cooled down to ambient temperature.
CAUTION
There is a risk involved when lifting and supporting the vehicle on stands! Therefore, first read the subsection Jacking Up the Vehicle.2. Raise the vehicle and support it on stands.

3. For correct installation of the exhaust system, fabricate a special tool from an M10 bolt, see illustration. Dimensions: x = 4 mm, y = 25 mm.
4. Loosen the clamp bolt between the catalytic converter and the center muffler.
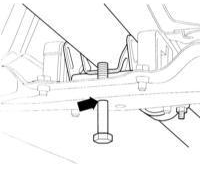
5. Insert the special tool through the hole (arrow in illustration) in the front crossmember. The flat faces toward the suspension pin.
CAUTION
Using a special tool, press the muffler in the direction of vehicle travel.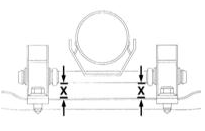
6. Align the muffler horizontally: the transverse pin must be parallel to the crossmember, and dimension (X) must be equal on both left and right sides.
7. Align the rear muffler with the tailpipe horizontally relative to the underbody.
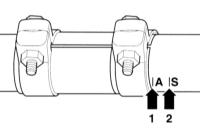
8. Front-wheel drive vehicles: Slide the tailpipe approx. 5 mm relative to the corresponding mark in the clamp. Mark (A), (arrow 1) applies to all vehicles except 1.6 L. Vehicles with 1.6 L engines and manual transmission: Slide the muffler to the "S" mark (arrow 2) in the clamp.
Vehicles with 1.6 L engines and manual transmission
All other front-wheel drive vehicles
9. Tighten the clamp to torque 40 N·m. Bolts must be horizontal and point to the left side of the vehicle.
10. Remove the special tool from the crossmember hole.
11. Lower the vehicle to the wheels.
Test yourself
A quick Audi A3 quiz: every answer comes with an explanation and a link to the manual page.