Oil Pan Removal and Installation
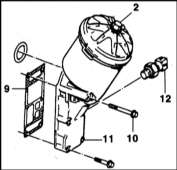
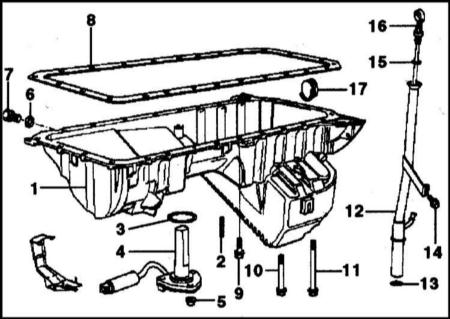
1 — oil pan
2 — dowel pin
3 — sealing ring
4 — oil level sensor
5 — nut
6 — sealing ring, A12 x 15.5-AL
7 — drain plug
8 — oil pan gasket
9-11 — bolts
12 — guide tube
13 — sealing ring
14 — bolt
15 — sealing ring
16 — oil level dipstick
17 — cover
Models 520i, 523i, 528i
Removal
Because there is insufficient space to remove the oil pan, both engine mounts must be disconnected and the front suspension crossmember lowered. Refer to the section Front Suspension Crossmember Removal and Installation.
PROCEDURE
1. Disconnect the negative cable from the battery. The battery is located in the luggage compartment behind the right side trim.
When the battery is disconnected, stored data in electronic control unit memories, such as engine fault memory, will be erased. Refer to the recommendations in the section Battery Removal and Installation.
2. Disconnect the air filter housing with hose from the throttle body connection and remove it. Refer to the section Air Filter Housing and Mass Air Flow Meter Removal and Installation.
3. Raise the vehicle and support it on stands. Unscrew the fixing bolts and remove the engine undertray. Refer to the section Engine Compartment Undertray Removal and Installation.
4. Drain the engine oil.
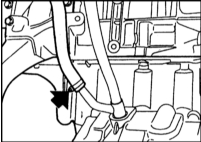
5. Disconnect the oil return hose from the oil separator at the oil level dipstick guide tube. To do this, open the hose clamp. Refer to the accompanying illustration.
6. Unscrew the oil level dipstick guide tube from its bracket (bolt (14), see illustration at the beginning of the subsection). Pull the tube upward out of the oil pan. Note the sealing ring.
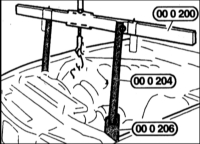
7. Attach the engine to the lifting device and raise it slightly. If no lifting device is available, pass a cable through the engine lifting eyes and insert a strong pipe through the cable loop. Support the pipe on stands or on the engine compartment side panels. Refer to the accompanying illustration.
* Do not support the pipe on the wings. Raise the engine slowly, making sure no cable or hose is trapped. The engine lifting device rests on the left and right engine beams.
8. Slowly raise the engine with the lifting device by approximately 5 mm.
9. Disconnect the steering shaft from the steering gear. To do this, unscrew the clamp bolt and remove the universal joint from the steering gear.

10. Unscrew the fixing bolts and remove the power steering pump. Move it aside with the connected hoses, securing it with wire to the engine.
* The hoses must remain connected to the pump. Otherwise oil will leak out. If the hydraulic system is opened, observe strict cleanliness, as dirt entering the system may cause malfunctions.
11. Loosen the fixing bolts of the left and right engine mounts by four turns.
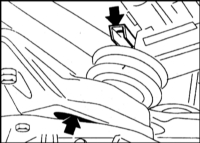
12. Remove the nuts securing both mounts from underneath the vehicle.
13. Disconnect the oil lines from the brackets on the oil pan, if equipped.
14. Disconnect the plug connector of the oil level warning sensor.
15. Place a garage jack under the front suspension crossmember. The illustration shows the BMW special tool. Refer to the accompanying illustration.

16. Unscrew the front suspension crossmember mounting bolts and lower the crossmember as far as possible. Refer to Front Suspension Crossmember Removal and Installation.
* Do not loosen the steering gear and steering arm mounting bolts from the front suspension crossmember.
17. Remove the oil pan mounting bolts at the front and rear.

18. Lower the oil pan and remove it toward the rear.
* If the oil pan cannot be removed, disconnect the left and right push rods from the stabilizer bar and lower the front suspension crossmember further. Refer to Front Suspension Crossmember Removal and Installation.
Installation
PROCEDURE
1. Clean the sealing surfaces of the oil pan and cylinder block.
2. Apply a bead of “3 Bond 1209” sealant to the grooves of the timing sprocket cover and the front cover. The bead must be 3 mm wide and 2 mm high.
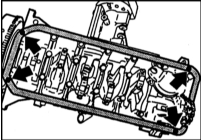
3. Glue a new gasket in place using a small amount of grease. Check that the gasket is positioned correctly.
* Always install a new gasket.
4. Install the oil pan.
5. Install the oil pan mounting bolts without tightening them. Lightly tighten the bolts at the transmission side first, then at the engine side. Then tighten all bolts to a torque of 10 N·m. If the bolts are overtightened, the gasket may be crushed and sealing will be lost.
6. Secure the oil lines, if equipped, in the clips on the oil pan.
7. Insert the oil level gauge guide tube with its O-ring and screw it in. Always replace a damaged O-ring with a new one.
8. Secure the oil return hose from the oil separator to the oil level gauge guide tube with a clamp.
9. Connect and lock the low oil level sensor plug connector.
10. Secure the stabilizer bar links.
11. Raise the front suspension crossmember and secure it. Refer to Front Suspension Crossmember Removal and Installation.
12. Secure the steering shaft to the steering gear. Tighten the clamp bolt to a torque of 20 N·m.
13. Lower the engine and move the hoist aside. Tighten both engine mounts to a torque of 45 N·m.
* Engine mount and engine bracket torques are as follows: M8 thread - 25 N·m, M10 - 45 N·m
14. Install the power steering pump. Refer to Power Steering Pump Mounting.
15. Fill the system with oil. The oil level gauge has two marks, min and max. The difference in oil volume between the marks is 1 L.
16. Lower the vehicle to the wheels.
17. Install the fan. Refer to Air Filter Housing and Mass Air Flow Meter Removal and Installation.
18. Connect the negative battery cable. Set the clock. Program the radio stations.
19. Check the oil pan for leaks by driving the vehicle. If necessary, carefully retighten the mounting bolts.
20. Secure the engine compartment lower cover.
Test yourself
A quick BMW 1 quiz: every answer comes with an explanation and a link to the manual page.