Disassembly of Strut/Shock Absorber. Removal and Installation of Coil Spring
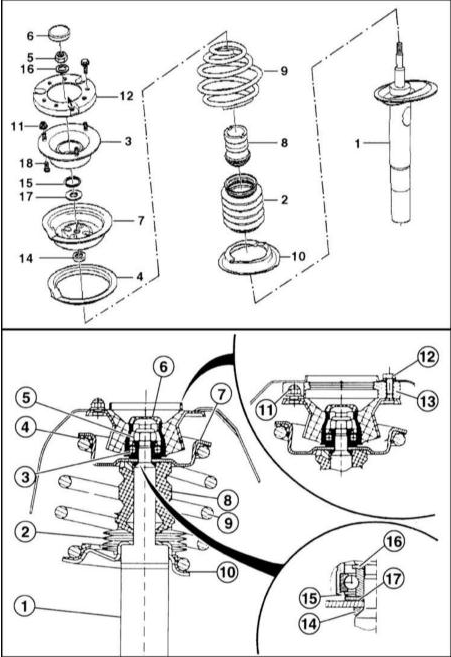
Strut
1 — shock absorber
2 — protective boot
3 — mount
4 — lower spring seat
5 — nut
Piston rod torque:
- with external hex
65 N·m
- with internal hex
45 N·m
6 — protective cap
7 — upper spring seat
8 — plastic bump stop
9 — coil spring
10 — lower spring seat
11 — nut
12 — bolt
Version for rough roads only (Eastern Europe)
13 — adapter
14 — ring
15 — O-ring
16 — washer
17 — washer
18 — pin
* Springs on one axle are replaced in pairs only. Use springs with the same BMW number. The spring number is marked on its end.
REMOVAL
1. Remove the strut, refer to Strut Removal and Installation.
2. To remove the shock absorber, the coil spring must be compressed. Compress the spring with a special spring compressor. Use a plastic pad to protect the spring surface.
* Never remove the shock absorber if the spring is not compressed.
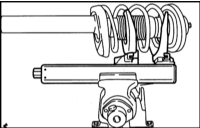
3. * Insert the spring compressor into the coils so that it grips the coils firmly and cannot slip. The coil spring has a very high stiffness. Therefore use only a serviceable tool. Never use wire to compress the spring. Risk of injury!
4. Loosen the nut with an open-end wrench. Depending on version, hold the piston rod with an Allen key or an open-end wrench.
* The nut has a very high loosening torque. If necessary, strike the wrench with a hammer.

5. Remove the washer.
6. Remove the mount with the O-ring and washer.
7. Remove the upper spring seat with the spacer and the coil spring. Remove the shock absorber from the spring.
* If only the spring is being replaced, slowly release the spring. If only the shock absorber is to be removed, do not release the spring.
8. Remove the plastic bump stop, protective boot and lower spring seat.
INSTALLATION
1. The new spring has a protective anti-corrosion coating. Check the coating for damage before installation. Repair any damage if necessary.
2. Inspect the protective boot, plastic bump stop and spring seats. Replace any damaged parts.
3. Insert the shock absorber with the lower seat, bump stop and protective boot into the compressed spring.
4. Assemble the strut as shown in Fig. 4.0a and 4.0b. Make sure the spring seats against the shoulders of the lower and upper spring seats.
5. Screw on a new self-locking nut a few turns.
6. Slowly release the spring so that it seats against the spring seats. Make sure the lower spring seat is correctly positioned (rectangular slots).
7. Tighten the nut to 65 N·m (with internal hex on the piston rod, to 45 N·m). Hold the piston rod against rotation. To maintain the tightening torque, workshops use head BMW-312210 or HAZET 2593-* (* - wrench size).
8. Fully release the spring and remove the compressor.
9. Install the strut.
Shock Absorber Inspection and Disposal
Signs of damaged shock absorbers include:
a) Excessive body movement when driving over uneven road surfaces.
b) Increasing body oscillation when driving over a series of consecutive bumps.
c) Wheel bounce when driving on a normal road.
d) Vehicle pulls to one side when braking (may be caused by other factors).
e) Instability when cornering due to poor road holding and vehicle skidding.
f) Excessive tire wear with cupping (scalloping) of the tread.
The shock absorber can be checked by hand. An accurate check of shock absorber operation is only possible using a shock tester or shock absorber testing device.
Manual Inspection
INSPECTION
1. Remove the shock absorber.
2. Hold the shock absorber by hand in its working position. Compress and extend the shock absorber at least three times. The shock absorber should move smoothly without jerking and without unusual noise.
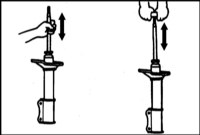
3. Fully compress the shock absorber rod and release it. The rod should extend at a steady speed.
4. During normal operation, small traces of oil are not a sign of shock absorber malfunction.
5. If there is significant oil loss, replace the shock absorber.
6. Install the shock absorber.
Shock Absorber Disposal
The shock absorber is filled with oil. Used oil must be taken to special collection points.
In workshops, gas is released from shock absorbers before disposal. This is done as follows.
PROCEDURE
1. Clamp the shock absorber vertically with the rod facing down.
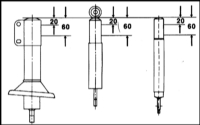
2. Drill a Ø 3 mm hole 20 mm from the bottom of the shock absorber. A colorless, odorless and non-toxic gas will escape through the hole.
3. Drill another Ø 5 mm hole 60 mm from the bottom to drain the oil.
4. Pump out the oil by moving the shock absorber rod and collect it in a container.
* Do not dispose of used oil with household waste. Shock absorber oil is mineral oil and, under current regulations, must be disposed of together with engine oil.
Test yourself
A quick BMW 1 quiz: every answer comes with an explanation and a link to the manual page.