Vehicle Readiness Checks
Introduction
This Section lists all components and systems subject to inspection and describes methods for checking their condition and operation independently. Based on the results of these checks, you can assess whether the vehicle is ready for operation and for a safety inspection. Naturally, self-performed checks cannot match professional measurements in accuracy, due to the lack of appropriate operator qualifications and the limited availability of specialized diagnostic equipment. If self-performed checks reveal the need for repair or replacement of any component, refer to the relevant Sections of the relevant Chapters of this Manual for more complete information.
In most cases, performing the following checks requires an assistant.
Checks Performed from the Driver's Seat
Parking Brake
Check the operation of the parking brake by fully applying the parking brake lever. Make sure that the lever travel (number of ratchet clicks) required to obtain full resistance from the brake mechanism is not excessive. If this requirement is not met, check the condition of the rear wheel brake mechanisms and/or the adjustment of the parking brake cables.
With the parking brake fully applied, rock the parking brake lever from side to side (tap it from the sides). The brake must not release. Otherwise, the ratchet or pawl of the lever is worn. Release the parking brake and rock the lever from side to side to check for signs of wear in the pivot bearing. Check the lever mounting for security and check for corrosion of the body structure within a 30 cm radius around the lever support. If the condition of the lever fasteners cannot be checked from inside the vehicle, check them later during the checks performed under the vehicle.
Brakes
Make sure the brake pedal makes no noise when pressed and released, shows no obvious signs of excessive wear of the pivot bushings, and check the condition of the pedal pad. Make sure there are no signs of brake fluid leaks on the pedal, the floor, or the surface of the floor mat around the pedal, which would indicate a loss of sealing of the master cylinder cup seals.
Press the pedal first slowly, then quickly, and make sure you can hold steady pressure. Apply pressure and make sure the pedal does not then slowly sink toward the floor, which would again indicate problems with the master cylinder. Release the pedal, wait a few seconds, then press it again until firm resistance is felt. Make sure the resistance begins already in the upper part of the pedal travel. If the pedal must be depressed almost to the floor before resistance is felt, this indicates incorrect brake adjustment. If firm resistance does not develop at all, i.e. the pedal feels spongy, this indicates air in the hydraulic system and the need for a complete bleeding of the system.
Check the operation of the brake booster by pressing the brake pedal several times to release the vacuum. Then, holding the pedal depressed, start the engine. When the engine starts, the resistance to pedal depression should change (decrease). If this does not occur, there may be a leak in the booster vacuum hoses or a malfunction of the brake booster itself.
Steering Wheel and Column
Check the steering wheel for cracks or loosening of the hub, spokes, or rim. Rock the wheel from side to side, then up and down in relation to the column. Make sure there is no play of the wheel on the column, which indicates a loose wheel nut or worn shaft splines. Continue rocking the wheel as described above, but add a slight rotation to the right and left. Make sure there is no excessive play of the wheel, which indicates excessive wear of the upper shaft support bearing, the universal joint(s), or the flexible coupling.
Windshield and Rearview Mirrors
The windshield must not have cracks or other damage that could noticeably restrict the driver's field of view or interfere with the operation of the wipers. Small chips caused by stone impacts are permissible. Stickers and hanging ornaments must also not restrict the driver's view.
Rearview mirrors must be securely mounted, undamaged, and adjustable. The passenger-side door mirror is not subject to inspection provided that the interior rearview mirror mounted on the inside of the windshield is serviceable and usable.
Seats and Seat Belts
* The checks below apply to the seat belts of both the front and rear seats.
Carefully inspect the belt webbing for cuts, signs of heavy abrasion, or material aging. If retractor-type belts with return devices are installed, fully pull the belts out of the retractor housing during inspection.
Fasten and unfasten each belt, checking the operation of the buckle mechanisms (both latching and release) and their security. If retractor-type belts are installed, check the operation of the return devices.
Check the security of belt attachment to body components and the condition of their anchorages, which are accessible without removing trim panels. Signs of heavy corrosion or deformation of load-bearing body components within the radius of the belt anchorage are also unacceptable. Some seat belt anchorages are inaccessible and cannot be visually inspected from inside the vehicle; in this case, their condition must be checked later during the underbody inspection. If any parts of the belt mechanism are mounted directly on the front seat, the seat mountings must be securely bolted to the floor, and their condition must be checked in the same way as described above for the belt anchorages.
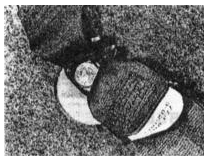
Check that the seat belts are securely fastened
The front seats themselves must also be securely fastened and must not allow spontaneous change of their position. The seatbacks must lock securely in the upright position.
Doors
The front doors must open and close from inside the vehicle and latch securely in the closed position.
Electrical Equipment
Turn the ignition on and operate the horn. The horn must produce a clear sound that is clearly audible to other road users. Gongs, sirens or two-tone horns installed as aftermarket accessories are not permitted.
Check the operation of the windshield washers and wipers. The washers must spray fluid with adequate pressure and flow, and their nozzles must be adjusted so that the spray hits the upper edge of the windshield.
Operate the wipers together with the washers and make sure the blades wipe the windshield effectively over the full range of their travel. No streaks or smeared road film that restrict the driver's view in the straight-ahead or peripheral areas of vision may remain on the glass. Otherwise, replace the wiper blades.
Depress the brake pedal with the ignition on and ask an assistant to check the operation of the brake lights. The brake lights must come on when the pedal is depressed and go off when it is released. If only one brake light is not illuminated, the cause is most likely a burned-out bulb or poor electrical contact at or near the bulb socket. If both brake lights fail, check their fuse and switch. Do not entirely rule out the possibility that both bulbs have burned out at the same time. Brake lights that do not switch off when the brake pedal is released indicate a faulty switch.
Checks Performed on the Vehicle on the Ground
License Plates and Vehicle Identification Numbers
The front and rear license plates must be in satisfactory condition, securely attached and easy to read.
The Vehicle Identification Number (VIN) on the plate under the hood must be legible.
Electrical Equipment
Turn on the parking lights and make sure that the front and rear marker lights as well as the license plate lights illuminate. Lenses and reflectors must be clean, undamaged and securely mounted. Lens integrity is especially important on the rear lamps, where the white light of a damaged lamp can be confused by other road users with the reverse light signal. Dirty lenses noticeably reduce the light output of the bulb.
Turn on the headlights and make sure that both low beam and high beam operate normally and with the same intensity for both headlights. A reduction in intensity of either headlight is usually related to poor electrical contacts or heavy corrosion of the internal reflector. Check the headlight lenses for cracks and stone chip pitting. Defects of this kind are not acceptable; however, assessing their severity is usually subjective. Remember that all lamps must operate reliably the first time the switches are operated. Tapping on the lamp unit to make it work is not permitted.
The headlights must not only be adjusted so as not to dazzle other road users in low beam mode, but also provide adequate illumination of the road surface in front of the vehicle. Headlight aim is checked using special optical equipment, so if you are not confident in its correctness, contact specialists in advance to check and adjust the headlight position.
With the ignition on, check the operation of the turn signals. Make sure that both the front and rear turn signals emit amber light and flash at a rate of about one to two times per second. In addition, the turn signal indicators on the instrument cluster must be working. Operation of the parking lights and brake lights must not affect the turn signals; if it does, the cause is usually poor grounding in the rear combination lamp assemblies. Similarly, make sure the hazard warning system operates with the ignition both on and off. Check the condition of the lenses (see above).
Check the operation of the fog lamp(s). The mandatory check usually applies only to the externally mounted fog lamp, which is standard equipment and located on one side of the vehicle. The lamp must be securely mounted and must produce a bright, sharply focused red light beam. The indicator lamp on the instrument cluster (or inside the switch) must also function.
Brakes
From the engine compartment, inspect the brake lines for signs of leaks, corrosion, insecure mounting, chafing and other damage. Inspect the master cylinder and brake vacuum booster for signs of leaks, secure mounting, and excessive corrosion of both the component mounts and the surrounding body structure. The master cylinder reservoir must be securely mounted; the fluid level must be between the upper and lower marks on the sides.
Turn the steering wheel so that the flexible hose of the right front brake assembly can be inspected. Carefully check the hose for cracks and signs of rubber aging. Defects are most easily detected by bending the hose in half, and they are almost always found in the areas where the hose connects to the fittings. Turn the steering wheel fully to the left, then to the right, and make sure the hose does not contact the wheel disc, tire or any moving suspension or steering components. Have an assistant depress the brake pedal firmly, then check the hose for swelling and signs of fluid leaks under pressure. Repeat the checks for the left brake hose. If defects are found, replace the components as required.
Inspect the brake lines and hoses for signs of damage and material aging.

Inspect the flexible brake hoses for cracks and signs of material aging
Steering Gear
Inspect the condition of the rubber protective boots on the steering rack. Make sure there are no cuts, signs of leakage, and that the clamps are not loose. If the steering is equipped with power steering, inspect its rubber hydraulic hoses, tubes and their connections for signs of material aging, leaks, chafing and other damage. Carefully check all steering components for signs of binding or excessively tight operation, missing cotter pins and other locking devices, and signs of excessive corrosion of body parts within 30 cm around the mounting points of any of the components.
Ask an assistant to turn the steering wheel fully to the left, then fully to the right. Make sure that the steering components (column, gear and linkage) move smoothly and freely, and that none of them (including the wheel discs and tires) comes into contact with brake lines or hoses or any part of the vehicle body.
Front and Rear Suspension and Wheel Bearings
Starting with the right front, check the condition of the wheel bearings, ball joints, steering knuckles and suspension component fasteners one at a time. To do this, grasp the wheel at the 3 o'clock and 9 o'clock positions and pull it forcefully. Any play in these components is not permitted. Inspect the rubber and metal bushings of the suspension components for signs of aging or material damage, and check the components themselves for bends, deformation and signs of excessive corrosion. Check that all cotter pins, lock washers or other locking devices are present on the suspension component fasteners. Make sure there is no severe corrosion of body parts within 30 cm around the component mounting points.

Inspect the rubber bushings of all suspension mounts (arrows) for damage and signs of material aging
Any excessive play can be determined by inserting a pry bar or a large screwdriver between the component mount and its body and using it as a lever. In this way it can be determined whether the play is caused by wear of the pivot bushing, the mounting bolt or the mount itself (bolt holes are often worn into an oval shape).
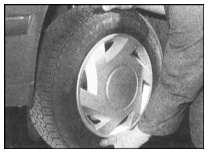
Pull the wheel sharply to check for excessive play in the bearings and suspension components
Now grasp the wheel at the 12 o'clock and 6 o'clock positions and repeat the check described above. Rotate the wheel and check for binding in its bearing.
Repeat the check for the second front wheel, then for both rear wheels.
Springs and Shock Absorbers
Inspect the strut assemblies for signs of fluid leakage, corrosion, deep pitting of the piston rods or damage to the boots. Also make sure the strut mounting fasteners are secure.
Make sure the ends of the coil springs are correctly seated in their seats, and that the spring wire is not damaged by corrosion, broken, or cracked or otherwise defective.
Check that the support assemblies are secure and inspect them for excessive wear, corrosion, cracks, deformation and other damage to the components and their bushings. Make sure there are no signs of leaks and no damage to the hoses or tubes (hydraulic suspension).
Check the shock absorbers for signs of serious leakage (slight fluid seepage is normal for some types of shock absorbers). Check the mounts and bushings of the support assemblies for wear and damage to the housings.
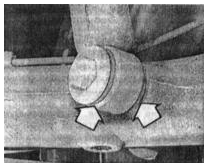
Inspect the mounts and bushings (arrows) of the shock absorbers
Drive Shafts
Turn the steering wheel fully, then rotate each front wheel in turn and inspect the constant velocity (CV) joint boots (where fitted) for cracks and other damage. Also check that the boots are secure to their respective housings with their clamps.
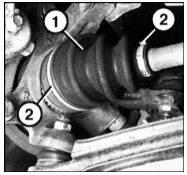
Inspect the CV joint boots for cracks and other damage
While continuing to rotate the wheel, make sure that the drive shaft is not bent or otherwise damaged.
Brake System
If possible, without disassembling the components, check the condition of the brake pads and discs. Make sure that the friction material is not excessively worn and that the disc surfaces have no cracks, scoring, grooves or other signs of excessive wear.
Carefully inspect the rigid brake lines under the vehicle floor and the flexible hoses of the rear brake assemblies. Excessive corrosion, abrasion, insecure fittings of the line connections, as well as cracks, signs of material aging, leaks, or bulging under pressure in the flexible hoses are not permitted.
Check the calipers and brake backing plates for signs of brake fluid leakage, which indicate deterioration of the hydraulic seals of the corresponding components.
Slowly rotate each wheel in turn while an assistant depresses and then releases the parking brake pedal. Make sure that each brake assembly operates properly and that the wheel rotates freely when the brake pedal is released. Brake effectiveness cannot be checked without special equipment; however, road tests (under suitable road and weather conditions) can reveal vehicle pulling to one side during straight-line driving.
Check the parking brake linkage for fraying and broken cables, excessive wear, and insecure attachment of the rods. Have an assistant apply and then release the parking brake, and make sure that the brake assemblies of each rear wheel engage and release reliably.
Fuel and Exhaust Systems
Check the condition of the fuel tank, lines, hoses and fittings (including connections at the pump, filter and fuel injection system: lift pump, filter and high-pressure pump). All components must be securely fastened and show no signs of leakage. The fuel tank cap must close securely and match the type specified by the vehicle manufacturer.
Check the entire length of the exhaust system for damage to mounts and hangers, secure attachment of the pipe joint clamps, and signs of corrosion.
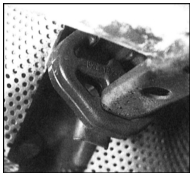
Check the condition of the exhaust system, paying particular attention to its hangers (arrows)
Wheels and Tires
Carefully inspect all tires, both on the outside and inside, and across the entire tread surface. Cuts, cracks, bulges, punctures, tread separation, or exposed cord or carcass due to wear or damage are not permissible. Make sure the tire bead is seated securely on the wheel rim. Check the valve stem and valve condition. Rotate each wheel and check the rims for signs of distortion, especially along the rim edge.
Make sure tires of the correct size for the vehicle model are installed. Mixing tires of different types or sizes on the same axle is not permitted. Temporary-use (compact) spare tires must not be used during normal vehicle operation. Also, tires must be inflated to the specified pressure.
Using a suitable tread depth gauge, measure the tire tread depth. Under current road safety regulations, the tread pattern must be clearly visible across the entire tread surface and must have a depth of at least 1.6 mm over at least three-quarters of the tread width. Some tread wear on the outer and inner edges is acceptable; however, it must form an even, continuous ring, and the tread pattern must remain visible on the worn area. Any excessive wear of the types described above may indicate incorrect front wheel alignment, which must be checked before the tires are worn out. For more information on typical tread wear patterns and front wheel alignment, refer to the relevant Chapters of this Manual.
Body Corrosion
Inspect all load-bearing and structural body and frame components for signs of corrosion. Load-bearing and structural components include all frame members, rocker panels, cross members, body pillars, suspension and steering mounts and fasteners, brake system components, and seat belts. Corrosion that significantly reduces the metal thickness of load-bearing body areas and causes weakening is not permissible. In this case, the vehicle must be repaired by body repair.
Exhaust Emission Test
Warm up the engine to normal operating temperature and make sure the preliminary requirements for checking idle speed and idle mixture are met (i.e., the ignition system operates normally and the air filter element is in satisfactory condition).
Before taking measurements, raise engine speed to approximately 2500 rpm and hold it there for about 20 seconds. Return to idle and observe the smoke coming from the exhaust pipe. If idle speed is clearly exceeded, or if clearly visible dark blue or black smoke is emitted from the exhaust system for more than 5 seconds, the vehicle must be repaired. Blue smoke indicates engine oil burning (wear of valve stem seals, valve guides, piston rings, or cylinder bores), while black smoke indicates incomplete fuel combustion (contaminated air filter element, excessively rich mixture, or other fuel injection system problems, faulty injectors).
If idle speed and exhaust appearance are normal, use an exhaust gas analyzer to measure the carbon monoxide (CO) and hydrocarbon (HC) content in the exhaust. It is assumed that such an analyzer can be rented or borrowed; purchasing one is not practical for a home mechanic. Alternatively, have this test performed at a service station.
CO Emission (Mixture Quality)
When performing this check, observe the CO exhaust gas limits specified by road traffic regulations.
If the CO level cannot be reduced to within permissible limits (assuming the fuel and ignition systems are otherwise functioning correctly), suspect a fault in the fuel injection system.
It is possible that the CO level meets traffic regulation requirements but exceeds the value specified by the vehicle manufacturer.
Hydrocarbon Emission
Once you have confirmed that the exhaust CO level is within specification (or have brought it there), measure the hydrocarbon content in the exhaust. It must not exceed 1200 parts per million. If the vehicle fails this test at idle, repeat the test at an engine speed of 2000 rpm; if the hydrocarbon content is now within specification, the test is considered passed.
Excessive hydrocarbon content in the exhaust may indicate oil burning, but incomplete fuel combustion may be an equally likely cause. Possible causes include:
• Worn or faulty spark plugs or incorrect spark plug gap.
• Incorrect ignition timing.
• Incorrect valve clearance.
• Low cylinder compression.
Also note that excessive hydrocarbons in the exhaust may result from a malfunctioning catalytic converter (if equipped).
Test yourself
A quick BMW 1 quiz: every answer comes with an explanation and a link to the manual page.