Tire repair kit
Minor damage to the tread and sidewalls of the tire can be repaired with the tire repair kit.
Do not remove foreign objects from the tire.
The tire repair kit cannot be used to repair damage larger than 4 mm or damage located near the wheel rim.
Warning Do not exceed a speed of 80 km/h. Do not use a repaired tire for an extended period.Steering and handling of the vehicle may be impaired.
Procedure in case of a tire puncture: Apply the parking brake.
For a manual transmission, engage first or reverse gear.
For an automatic transmission, select position P.
The tire repair kit is located in the compartment under the cargo area floor.
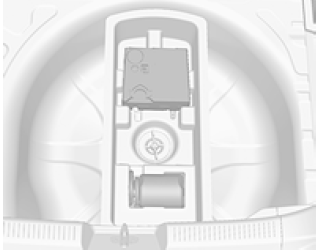
- Remove the tire repair kit from the compartment.
- Remove the compressor and the sealant bottle.
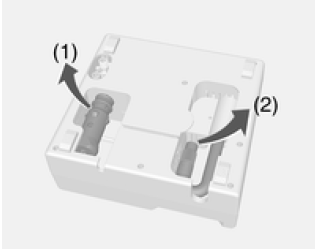
- Remove the power cable (1) and the air hose (2) from the storage compartment under the compressor.
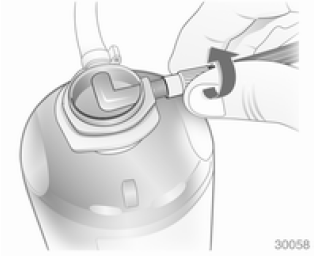
- The switch on the compressor must be set to the position
 .
- Screw the air hose onto the connector on the sealant bottle.
- Plug the compressor power plug into the accessory socket (power outlet or cigarette lighter socket). To avoid discharging the battery, it is recommended to keep the engine running.
- Place the sealant bottle in the holder on the compressor.
Position the compressor next to the wheel so that the sealant bottle is upright.
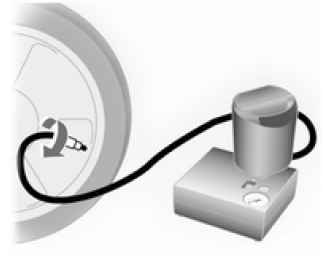
- Unscrew the valve cap from the damaged tire.
- Screw the tire inflation hose end onto the tire valve.
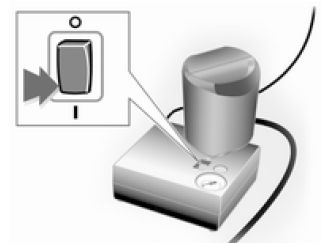
- Set the switch on the compressor to position I. The tire will be filled with sealant.
- While the sealant bottle is emptying (approx. 30 seconds), the compressor pressure gauge may show pressure up to 6 bar.
Then the pressure will begin to drop.
- Once all the sealant has been pumped into the tire, the tire will start to inflate.
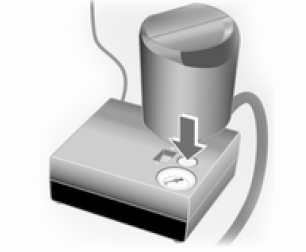
- The correct tire pressure (approx. 2.4 bar) should be reached within 10 minutes. Once the correct pressure is reached, switch off the compressor. If the recommended pressure is not reached within 10 minutes, disconnect the tire repair kit. Move the vehicle forward by one wheel revolution. Reconnect the tire repair kit and continue inflating for 10 minutes. If the recommended pressure still cannot be reached, the tire damage is too severe. Seek assistance from a service center. Release excess pressure from the tire using the button above the pressure gauge.
The compressor must not operate for longer than 10 minutes.
- Disconnect the tire repair kit. Press the latch on the holder to remove the sealant bottle from it.
Screw the compressor hose end onto the outlet of the sealant bottle. This will prevent sealant from leaking out. Store the tire repair kit in the cargo area.
- Wipe off excess sealant with a cloth.
- Remove the maximum speed sticker (approx. 80 km/h) from the sealant bottle and stick it in the driver's field of view.
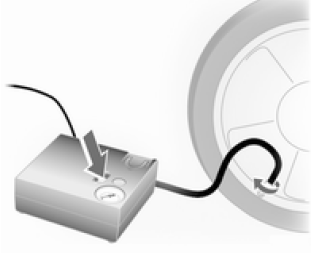
- Drive off immediately so that the sealant is distributed evenly in the tire. After driving approx. 10 km (no later than 10 minutes), stop and check the tire pressure. To do this, screw the compressor hose end directly onto the tire valve and compressor. If the tire pressure exceeds 1.3 bar, inflate the tire to the correct pressure (approx. 2.4 bar). Repeat the procedure (no. 17) until there is no further pressure loss. If the pressure has dropped below 1.3 bar, stop driving.
Seek assistance from a service center.
- Store the tire repair kit in the cargo area.
Note Because driving on a repaired tire significantly reduces ride comfort, it should be replaced as soon as possible.
If the compressor makes unusual noises or overheats, switch it off for at least 30 minutes.
Check the expiration date of the repair kit. After this date, the repair capability of the kit is not guaranteed. Observe the storage information on the sealant bottle.
Replace the used sealant bottle. Dispose of the bottle in accordance with applicable regulations.
The compressor and sealant can be used at temperatures from -30°C to 70°C.
Test yourself
A quick Chevrolet Aveo quiz: every answer comes with an explanation and a link to the manual page.