Ensure front wheels are in straight ahead position.
Remove driver air bag module as outlined under "Driver Air Bag Module, Replace."
On models equipped with speed control, disconnect switch and harness from steering wheel.
On all models, remove steering wheel using puller tool No. J-1859-A and legs tool No. J-42578, or equivalents.
Remove steering column upper and lower covers mounting screws.
Remove ignition switch bezel and column lower cover.
Remove clockspring rosebud type fastener from bracket below steering column.
Disconnect horn and cruise control electrical connector under steering column.
Guide wiring harness from behind lever control switch and remove clockspring.
Reverse procedure to install, noting the following:
a.
New clockspring connector is equipped with yellow tab that is removed after steering wheel is installed. This tab passes through steering wheel.
b.
Ensure clockspring is properly centered as outlined under "Clockspring, Centering."
c.
Ensure electrical connectors and wiring are properly routed to avoid pinching.
Air Bag Clockspring Centering
Identify clockspring type as outlined in chart.
Make & Model
Year
Clock Spring Type
BUICK
Enclave
2012-16
Type 2
Encore
2013-16
Type 3
CADILLAC
Escalade
2012-16
Type 4
SRX
2012-16
Type 1
CHEVROLET
Avalanche
2012-13
Type 4
Captiva Sport
2013-14
Type 6
City Express
2015-16
Type 5
Colorado
2012
Type 2
2015-16
Type 1
Equinox
2012-16
Type 1
Express
2012-16
Type 4
Silverado
2012-16
Type 4
Suburban
2012-16
Type 4
Tahoe
2012-16
Type 4
Traverse
2012-16
Type 2
Trax
2013-16
Type 3
GMC
Acadia
2012-16
Type 2
Canyon
2012
Type 2
2015-16
Type 1
Savana
2012-16
Type 4
Sierra
2012-16
Type 4
Terrain
2012-16
Type 1
Yukon
2012-16
Type 4
Yukon XL
2012-16
Type 4
Type 1
A new clockspring assembly will be centered.
Improper alignment of SIR coil assembly may damage unit, causing an inflatable restraint fault.
Ensure front wheels are straight ahead position.
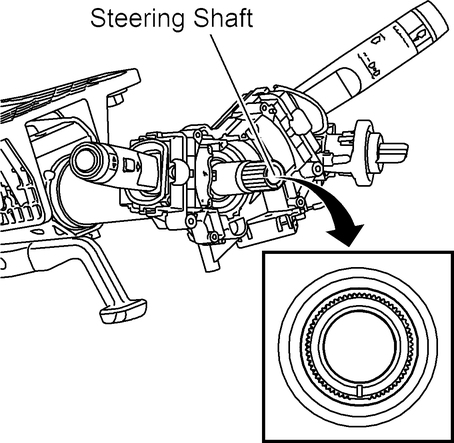
Ensure centering mark of steering shaft is in 6 o'clock position, Fig. 1.
Turn lobe of coil clockwise until coil ribbon stops. Do not force.
Turn lobe of coil counterclockwise approximately three turns to neutral position.
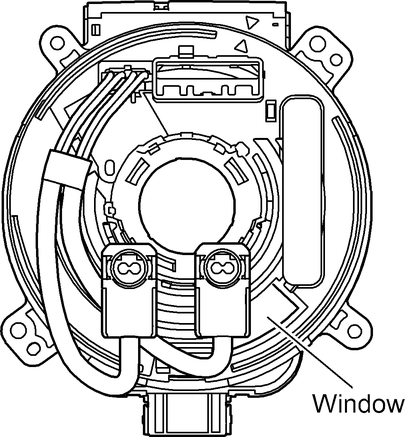
Properly align coil until centering window turns yellow. Fig. 2. This indicates center position of coil.
Type 2
A new clockspring assembly will be centered.
Improper alignment of SIR coil assembly may damage unit, causing an inflatable restraint fault. If double wire harness strap is installed onto wire harness assembly and column, reuse holder for wire straps during installation. Remove wire harness strap(s) where required.
Ensure front wheels are straight ahead position.
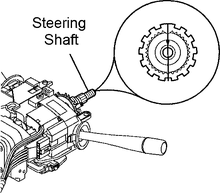
Ensure centering mark of steering shaft is in 12 o'clock position, Fig. 3.
Ensure ignition switch is in Lock position.
Hold components with bottom facing upward.
While holding clockspring, depress spring lock to rotate hub six revolutions in direction of arrow.
Rotate coil hub in opposite direction approximately 21/2 turns.
Release spring lock between locking tabs.
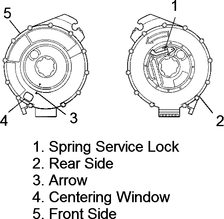
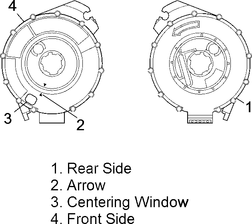
If front of clockspring has a centering window and back side includes a spring service lock, Fig. 4, proceed as follows:
a.
Hold clockspring with face up.
b.
While depressing spring service lock, rotate coil hub clockwise until coil ribbon stops.
c.
Slowly rotate coil hub counterclockwise until centering window appears yellow and both arrows align.
d.
Release spring service lock between locking tabs.
e.
Clockspring is now properly centered.
f.
Align clockspring with horn tower and slide it onto steering shaft.
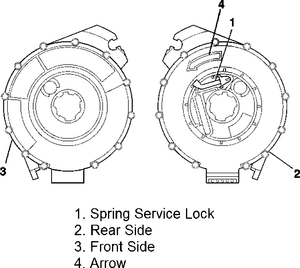
If front of clockspring has a centering window and back side does not include a spring service lock, Fig. 5, proceed as follows:
a.
Hold clockspring with face up.
b.
Rotate coil hub clockwise until coil ribbon stops.
c.
Slowly rotate coil hub counterclockwise until centering window appears yellow and both arrows align.
d.
Clockspring is now properly centered.
e.
Hold clockspring in centered position, align it with horn tower and slide it onto steering shaft.
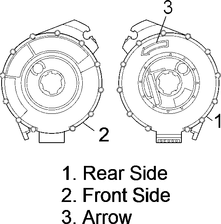
If front side of clockspring does not have a centering window, but rear side includes a spring service lock, Fig. 6, proceed as follows:
a.
Hold clockspring with rear side up.
b.
While depressing spring service lock, rotate coil hub in direction of arrow until coil ribbon stops.
c.
Keeping service lock depressed, rotate coil hub counterclockwise 21/2 turns.
d.
Release spring service lock between locking tabs.
e.
Clockspring is now properly centered.
f.
Align clockspring with horn tower and slide it onto steering shaft.
If front side of clockspring has no centering window and back side has no spring service lock, Fig. 7 proceed as follows:
a.
Hold clockspring with rear side up.
b.
While depressing spring service lock, rotate coil hub in direction of arrow until coil ribbon stops.
c.
Keeping service lock depressed, rotate coil hub counterclockwise 21/2 turns.
d.
Clockspring is now properly centered.
e.
While maintaining center position, align clockspring with horn tower and slide it onto steering shaft.
Type 3
A new clockspring assembly will be centered.
Improper alignment of SIR coil assembly may damage unit, causing an inflatable restraint fault.
Ensure front wheels are straight ahead position.
Ensure centering mark of steering shaft is in 6 o'clock position, Fig. 1.
Turn lobe of coil clockwise until coil ribbon stops. Do not force.
Turn lobe of coil counterclockwise approximately three turns to neutral position.
Type 4
A new clockspring assembly will be centered.
Improper alignment of SIR coil assembly may damage unit, causing an inflatable restraint fault.
Ensure front wheels are straight ahead position.
Ensure block tooth of steering shaft is in 12 o'clock position, Fig. 3.
Ensure ignition switch is in Lock position.
Remove wire harness strap or straps where required.
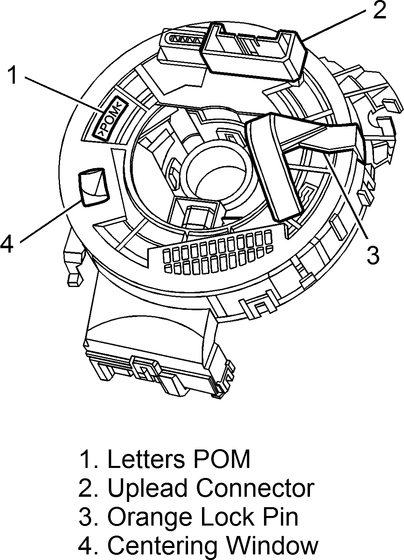
Hold SIR coil and look at side with letters POM, Fig. 8.
Rotate coil hub clockwise until coil ribbon stops. Do not rotate SIR coil more than three turns counterclockwise from center position. There is no stop in counterclockwise direction. Rotating SIR coil more than three turns counterclockwise from center position will damage SIR coil, causing an inflatable restraint fault.
From clockwise stop, rotate coil hub slowly counterclockwise approximately 3.3 turns. Place uplead connector in 12 o'clock position. Ensure flat wire cable loop appears in centering window. This is center position.
If you have orange lock pin, use lock pin to lock SIR coil in center position. If you do not have orange lock pin, hold SIR coil in center position.
Align SIR coil with horn tower and slide SIR coil onto steering shaft assembly.
If a double wire harness strap is installed onto wire harness assembly and column, you must route wires up against steering column. One wire harness strap will surround one lead from coil to steering column. Other wire harness strap will surround all other leads to steering column.
Type 5
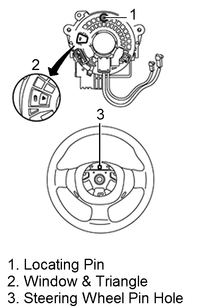
Turn spiral cable clockwise to end position.
Turn spiral cable counterclockwise 2.5 turns stopping when locating pin is at top most position.
A triangle will be displayed in window, Fig. 9.
Align steering wheel air bag coil with steering angle sensor and complete installation. Ensure that steering wheel pin hole is aligned with locating pin of steering wheel air bag coil.
Type 6
A new clockspring assembly will be centered.
Improper alignment of SIR coil assembly may damage unit, causing an inflatable restraint fault.
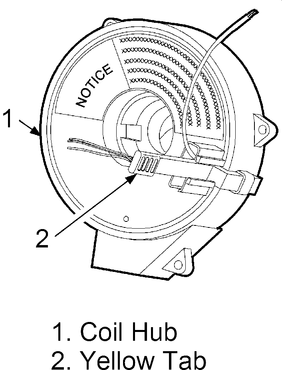
Remove yellow tab and save for reassembly, if equipped, Fig. 10.
Carefully rotate coil hub clockwise until a slight tension is present.
Count number of revolutions, while carefully rotating coil hub counterclockwise until a slight tension is present.
Carefully rotate coil hub clockwise 1/2 of previously counted revolutions.
Rotate coil hub as required to align yellow tab.
Install yellow tab into coil hub. Tape if tab is not available.
Driver Air Bag Module R&R
Disarm air bag system as outlined under "Air Bag System Disarming & Arming."
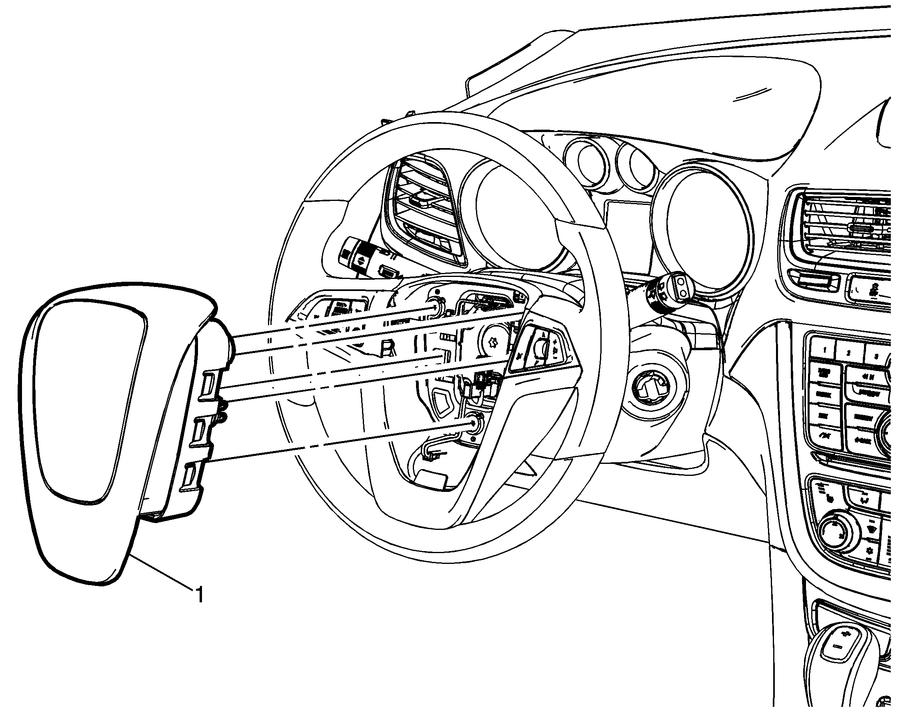
Position steering wheel so one of two openings on back side of steering wheel is at top.
Push spring fastener inward through access hole using a blunt ended tool, Fig. 11.
Place other access hole on top and push spring fastener inward through access hole.
Pull module away from steering wheel.
Release Connector Position Assurance (CPA) retainer and disconnect electrical connectors.
Reverse procedure to install.
Passenger Air Bag Module R&R
Disarm air bag system as outlined under "Air Bag System Disarming & Arming."
Remove heater hoses from heater core.
Remove air conditioning lines from thermal expansion valve.
Remove nuts securing heating control module to module plate.
Remove front floor console.
Remove hood latch release handle screws.
Release handle by pulling down cable and unhooking from handle.
Remove hood latch release handle.
Remove driver knee bolster screw.
Release knee bolster from retainer clips.
Remove knee bolster assembly.
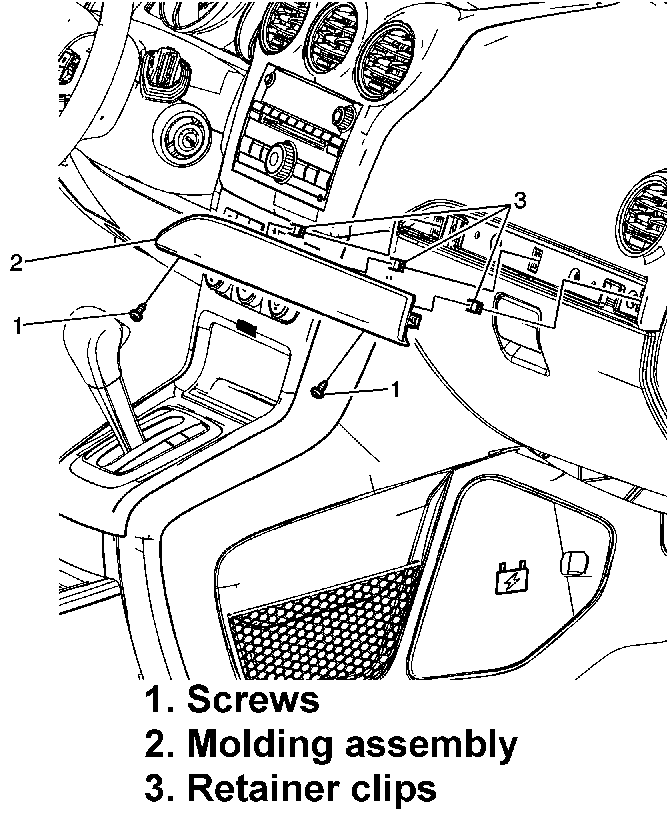
Open instrument panel compartment door to access and remove instrument panel screws, Fig. 12.
Release instrument panel molding assembly from instrument panel retainer clips using a flat bladed plastic trim tool.
Release instrument panel compartment from four retainer clips.
Remove front floor console storage tray fastener cover and then fastener.
Remove front floor console storage tray assembly.
Starting in lower left corner of upper accessory trim, insert a flat bladed plastic trim tool between trim plate and edge of console. Pull on upper accessory trim outward as you slide trim tool upward until all clips are disengaged.
Repeat previous step on right side of upper accessory trim plate.
Remove front floor console.
Disconnect lower accessory trim panel electrical connections.
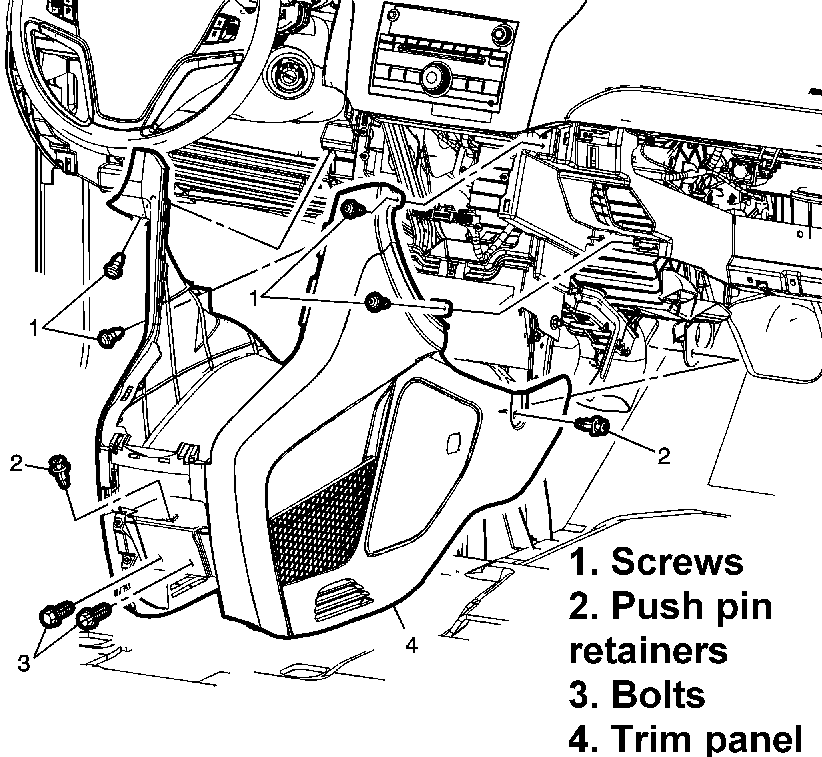
Remove front floor console extension trim panel screws, Fig. 13.
Disconnect range select cable from range select lever.
Disconnect range select lever electrical connector.
Remove automatic transmission range select lever nuts and then automatic transmission range select lever.
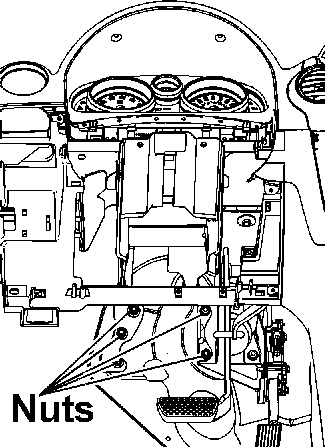
Remove transmission control bracket bolts and four transmission control bracket nuts.
Remove transmission control bracket.
Tether clip at upper portion of windshield pillar garnish molding must be replaced every time windshield pillar molding is removed.
Starting at top, gently pull on garnish molding to disengage clip.
Remove left and right windshield pillar garnish moldings.
Pull inward at front of carpet retainer to disengage retainer clips from kick panel area, then pull up to disengage remaining retainers. A-pillar trim and floor carpet retainer are all one piece. Do not attempt to disassemble.
Remove front floor carpet retainers.
Remove brake pedal bracket to tie bar bolt.
Turn steering wheel to straight ahead position.
Insert a small blunt ended punch or equivalent tool, through access openings on left and right side of steering wheel.
Push spring fastener inward to release steering wheel inflator from steering wheel.
Release Connector Position Assurance (CPA) retainer.
Remove steering wheel using puller No. J-1859-A and puller legs No. J-36541-A or equivalents.
Remove steering column lower trim cover screws.
Steering column lower trim cover may need to be turned slightly to maneuver it around steering column tilt lever.
Remove steering column lower trim cover.
Remove steering column upper trim cover bolts.
Remove steering column upper trim cover. Steering column upper trim cover consists of both cover and instrument panel cluster trim plate bezel. Do not try and separate these pieces; they are serviced as one part only.
Disconnect electrical connector, then remove rollover sensor.
Reverse procedure to install.
Air Bag Control Module R&R
Position front seats rearward.
Disarm air bag system as outlined under "Air Bag System Disarming & Arming."
Remove console mounting screws under front seats.
Remove cup holder liner and mounting screw.
Lift rear center floor console and disconnect auxiliary power outlet electrical connector.
Remove console.
Remove retainers from connector position assurance (CPA) and disconnect electrical connectors.
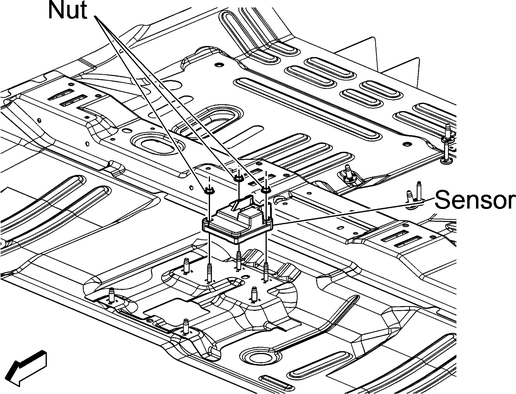
Remove mounting nuts and air bag control module.
Reverse procedure to install.
Air Bag Control Module Programming
Connect a suitably programmed scan tool to DLC.
Access Service Programming System (SPS) and follow on screen instructions.
On SPS Supported Controllers screen, select Inflatable Restraint Sensing and Diagnostic Module Programming and Setup and follow on screen instructions.
At end of programming, choose Clear All DTCs function on SPS screen.
Air Bag Occupant Sensor R&R
Position seat fully forward.
Disarm air bag system as outlined under "Air Bag System Disarming & Arming."
Disconnect shoulder belt from seat quick disconnect feature using a suitable flat bladed tool to press tab.
Remove front seat adjuster bolts.
Move seat to full rearward position and disconnect seat electrical connectors.
Lift front seat adjuster hooks from floor pan and remove seat from vehicle.
Remove recliner handle and seat cushion outer trim panel.
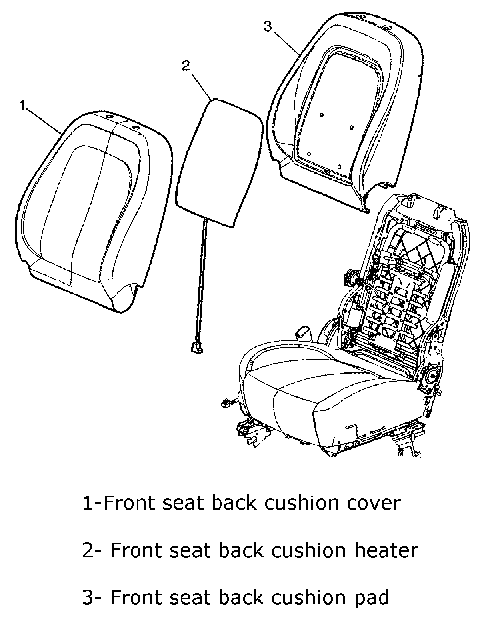
Remove seat cushion cover.
Remove seat cushion heater.
Remove seat cushion. Passenger Presence System (PPS) is an integral part of seat cushion. PPS sensor, module and seat cushion must be replaced as a unit.
Reverse procedure to install. Rezero PPS system as outlined under "Passenger Presence System (PPS), Rezeroing."
Air Bag Occupant Sensor Rezeroing
Empty front passenger seat.
Verify all air bag system/Passenger Presence System (PPS) components and connectors are properly connected and mounted.
Connect a suitable scan tool to Data Link Connector (DLC) and turn ignition to On position.
Ensure all air bag system and PPS Diagnostic Trouble Codes (DTCs) are cleared before rezeroing PPS. Presence of current or history DTCs will prevent PPS from rezeroing and may set additional DTCs.
With scan tool, request and initiate PPS rezeroing procedure.
PPS will illuminate both PASSENGER AIR BAG ON and OFF indicators until rezeroing procedure has been completed.
When rezeroing procedure has been successfully completed, PPS will display current system status at indicator.
If rezeroing procedure was unsuccessful, both PASSENGER AIR BAG ON and OFF indicators will alternate from no illumination to full illumination in 1 second intervals for 5 seconds.
PPS will treat an unsuccessful rezero attempt as a system fault. Repair system as required and repeat rezeroing procedure.
Air Bag Module Disposal
Some vehicles with air bag systems that have live (undeployed) air bag modules may have to be scrapped because they have completed their useful life or have been severely damaged in a non-deployment type accident. The following procedures should be followed when scrapping a vehicle with an undeployed module. When a deployed air bag module has been removed from a vehicle, it may be disposed of with any other scrap material. Handle with gloves and safety glasses, then wash hands afterward. These module contain explosive material and must be deactivated before disposal. Failure to deactivate before disposal may result in personal injury.
Air Bag Module Deployment
Inside VehicleDriver
Turn ignition switch to Lock position and remove key.
Ensure driver air bag module is secured to steering wheel and there is nobody in vehicle.
Remove all loose objects from vehicle.
Disconnect lower steering column connector and remove shorting clip from connector.
Cut lower steering column connector from vehicle harness leaving at least 6 inches of wire at connector.
Splice two 18 gauge (or thicker) wires, at least 20 feet long, into driver air bag module circuit wiring at base of steering column.
Stretch wires away from vehicle to their full length.
Ensure no people, animals or objects are in area of unit.
Apply 12 volts from fully charged battery across wires to deploy module. Do not touch air bag module for 30 minutes because of heat generated by deployment. If air bag module fails to deploy, contact General Motors.
Turn ignition switch to Lock position and remove key.
Ensure passenger air bag module is secured to instrument panel and there is nobody in vehicle.
Remove all loose objects from vehicle.
Disconnect passenger air bag module connector and remove shorting clip from connector.
Cut passenger air bag module connector from vehicle harness leaving at least 6 inches of wire at connector.
Splice two 18 gauge (or thicker) wires, at least 20 feet long, into passenger air bag module circuit.
Stretch wires away from vehicle to their full length.
Ensure no people, animals or objects are in area of unit.
Apply 12 volts from fully charged battery across wires to deploy module. Do not touch air bag module for 30 minutes because of heat generated by deployment. If air bag module fails to deploy, contact General Motors.
Disarm air bag system as outlined under "Air Bag System Disarming & Arming."
Remove driver air bag module as outlined under "Driver Air Bag Module, Replace."
Position air bag module in secured paved outdoor location free of activity.
Connect deployment harness tool No. J-38826, or equivalent, to air bag module.
Ensure air bag module is positioned with pad side facing upward.
Stretch wires away from air bag module to their full length.
Ensure no people, animals or objects are in area of air bag module.
Apply 12 volts from fully charged battery across wires to deploy module. Do not touch air bag module for 30 minutes because of heat generated by deployment. If air bag module fails to deploy, contact General Motors.
Disarm air bag system as outlined under "Air Bag System Disarming & Arming."
Remove passenger air bag module as outlined under "Passenger Air Bag Module, Replace."
Fill reservoir of deployment fixture tool No. J-39401-B, or equivalent, with water or sand.
Mount module into deployment fixture tool with trim cover facing upward.
Position module and deployment fixture tool in secured paved outdoor location free of activity.
Connect deployment harness tool No. J-38826, or equivalent, to air bag module.
Ensure air bag module is positioned with pad side facing upward.
Stretch wires away from air bag module to their full length.
Ensure no people, animals or objects are in area of air bag unit.
Apply 12 volts from fully charged battery across wires to deploy module. Do not touch air bag module for 30 minutes because of heat generated by deployment. If air bag module fails to deploy, contact General Motors.
Passenger Outside VehicleDriver Passenger
Seat Belt Pretensioner Deployment
Inside Vehicle
Turn ignition switch to Lock position and remove key.
Ensure seat belt pretensioner is secured to vehicle and there is nobody inside vehicle.
Remove all loose objects from vehicle.
Disconnect seat belt pretensioner connector and remove shorting clip from connector.
Cut pretensioner connector from vehicle harness leaving at least 6 inches of wire at connector.
Splice two 18 gauge (or thicker) wires, at least 20 feet long, into seat belt pretensioner circuit.
Stretch wires away from vehicle to their full length.
Ensure no people, animals or objects are in area of unit.
Apply 12 volts from fully charged battery across wires to deploy pretensioner. Do not touch pretensioner for 30 minutes because of heat generated by deployment. If seat belt pretensioner fails to deploy, contact General Motors.
Disarm air bag system as outlined under "Air Bag System Disarming & Arming."
Remove driver air bag module as outlined under "Seat Belt Pretensioner, Replace."
Clamp seat belt pretensioner in a vise near attachment bolt hole.
Vise should be in an area with a clear space of at least 6 feet in diameter.
Connect deployment harness tool No. J-38826, or equivalent, to seat belt pretensioner harness.
Stretch deployment harness wires away from pretensioner.
Ensure no people, animals or objects are in area of unit.
Apply 12 volts from fully charged battery across wires to deploy pretensioner. Do not touch pretensioner for 30 minutes because of heat generated by deployment. If pretensioner fails to deploy, contact General Motors.
Outside Vehicle
Side Impact Air Bag Module Deployment
Inside Vehicle
Turn ignition switch to Lock position and remove key.
Remove all loose objects from vehicle.
Disconnect side impact air bag module electrical connector and remove shorting clip from connector.
Cut side impact air bag module connector from vehicle harness leaving at least 6 inches of wire at connector.
Splice two 18 gauge (or thicker) wires, at least 20 feet long, into side impact air bag module circuit.
Stretch wires away from vehicle to their full length.
Ensure no people, animals or objects are in area of unit.
Apply 12 volts from fully charged battery across wires to deploy module. Do not touch air bag module for 30 minutes because of heat generated by deployment. If air bag module fails to deploy, contact General Motors.
Disarm air bag system as outlined under "Air Bag System Disarming & Arming."
Remove driver air bag module as outlined under "Driver Air Bag Module, Replace."
Position air bag module in secured paved outdoor location free of activity.
Connect deployment harness tool No. J-38826, or equivalent, to air bag module.
Ensure air bag module is positioned with pad side facing upward.
Stretch wires away from air bag module to their full length.
Ensure no people, animals or objects are in area of air bag unit.
Apply 12 volts from fully charged battery across wires to deploy module. Do not touch air bag module for 30 minutes because of heat generated by deployment. If air bag module fails to deploy, contact General Motors.
Outside Vehicle
Fig. 1 Steering shaft centering mark at 6 o'clock position. Type 1 & 3
Fig. 2 Clockspring center position. Type 1
Fig. 3 Steering shaft block tooth at 12 o'clock position. Type 2 & 4
Fig. 4 Clockspring centering. Type 2 w/center window & spring service lock
Fig. 5 Clockspring centering. Type 2 w/center window
Fig. 6 Clockspring centering. Type 2 w/spring service lock
Fig. 7 Clockspring centering. Type 2 less centering window & spring service lock
Fig. 8 Centering clockspring. Type 4
Fig. 9 Centering clockspring. Type 5
Fig. 10 Centering clockspring. Type 6
Fig. 11 Driver air bag module removal
Fig. 12 Instrument panel molding replacement. Captiva Sport
Fig. 13 Front floor console extension panel replacement. Captiva Sport
Fig. 14 Instrument panel tie bar to mod plate nuts replacement. Captiva Sport
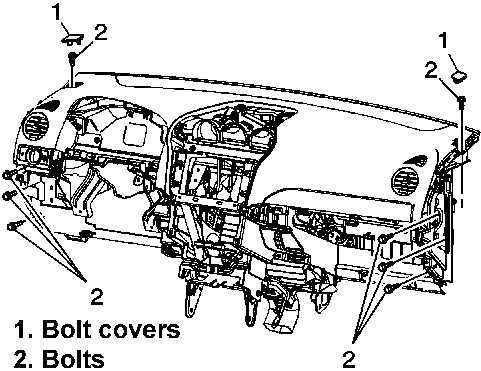
Fig. 15 Instrument panel replacement. Captiva Sport
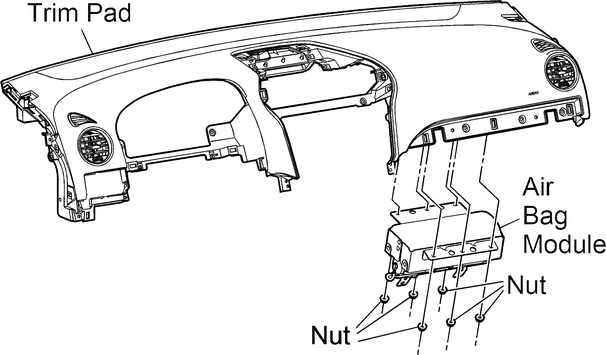
Fig. 16 Passenger air bag module replacement. Captiva Sport
Fig. 17 Seat assembly. Captiva Sport
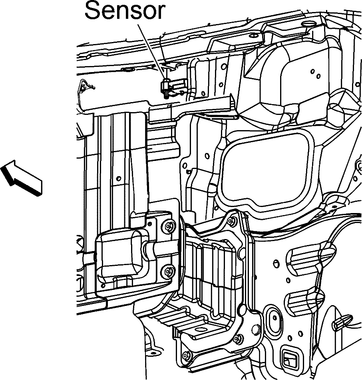
Fig. 18 Front impact sensor replacement. Captiva Sport
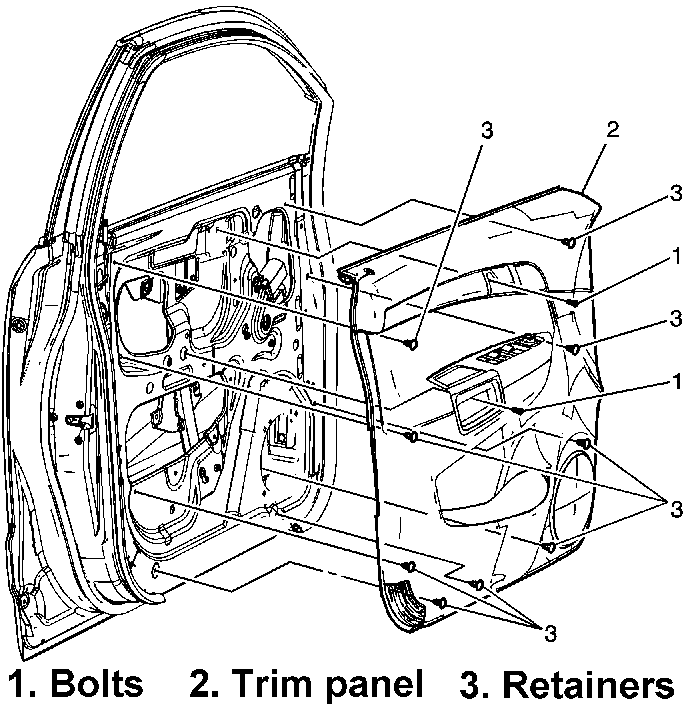
Fig. 19 Front door trim panel replacement. Captiva Sport
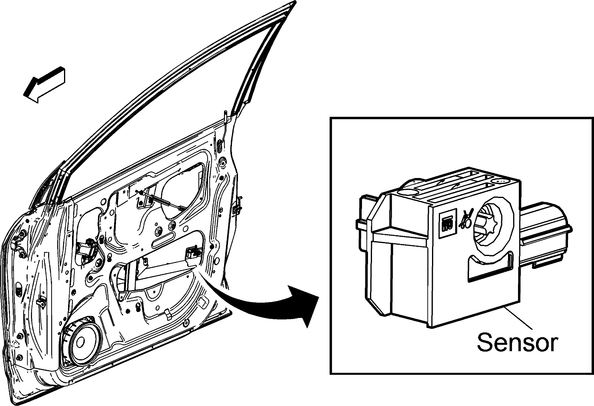
Fig. 20 Front side impact sensor replacement. Captiva Sport
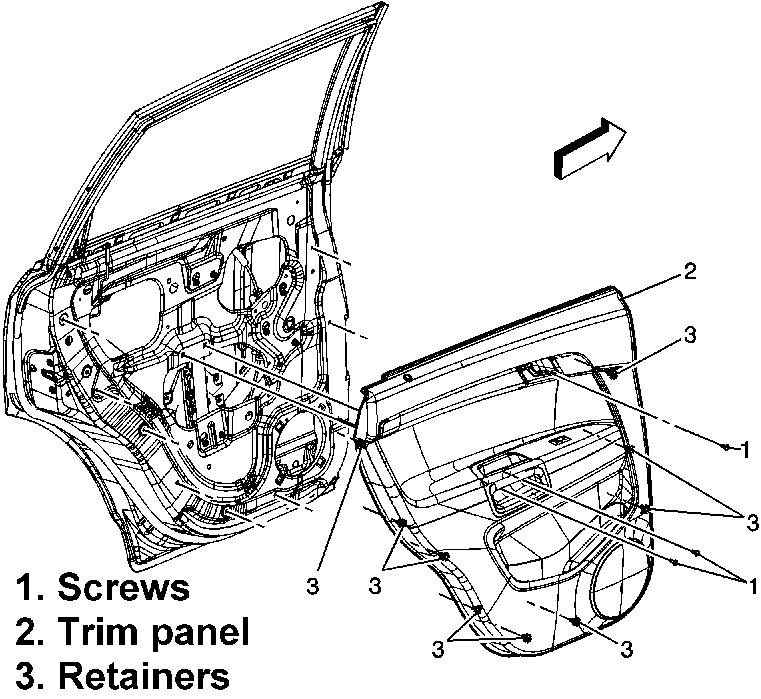
Fig. 21 Rear door trim panel replacement. Captiva Sport
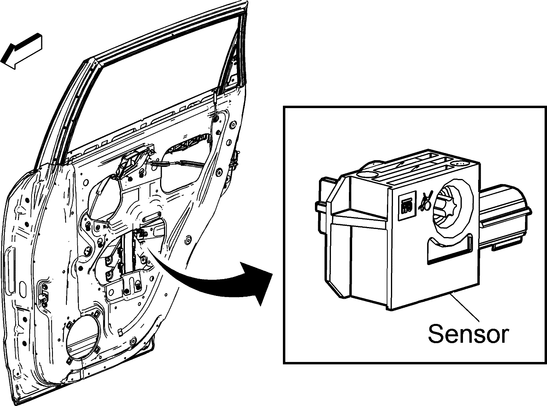
Fig. 22 Rear side impact sensor replacement. Captiva Sport
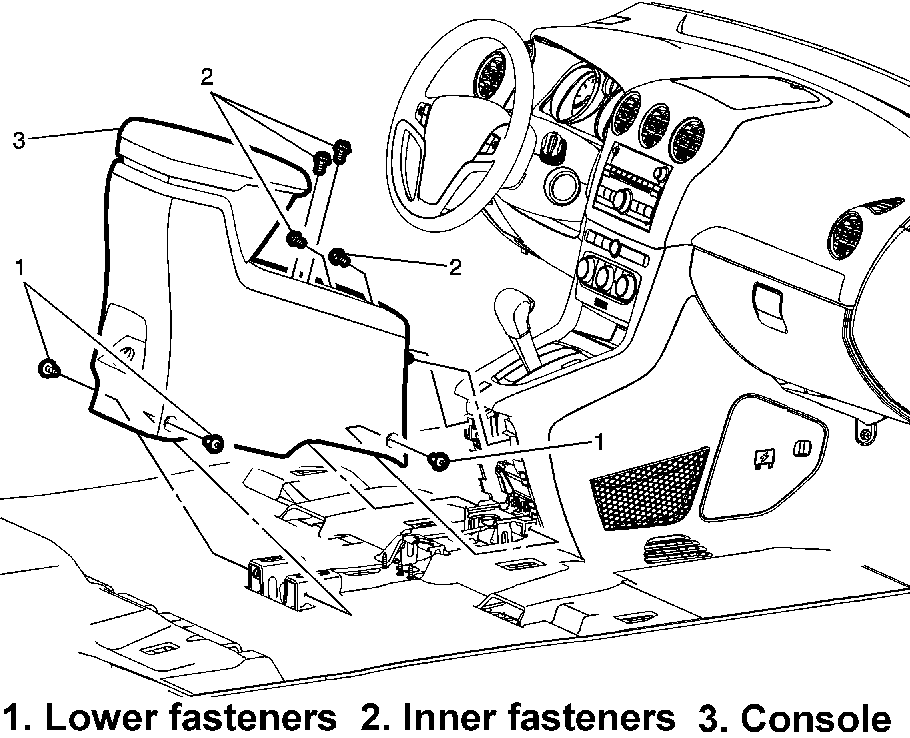
Fig. 23 Floor console replacement. Captiva Sport
Fig. 24 Rollover sensor replacement. Captiva Sport
Chevrolet Captiva Sport Service and Repair Manual covers a wide range of component services aimed at maintaining and repairing various parts of the vehicle. This manual is a comprehensive guide that technicians and DIY enthusiasts use to perform routine maintenance, diagnose issues, and conduct repairs effectively. One of the key aspects covered in the manual is the service of engine components. This includes tasks such as inspecting and replacing engine oil, filters, spark plugs, belts, hoses, and other vital engine parts. Proper engine maintenance ensures optimal performance, fuel efficiency, and longevity of the vehicle. The manual also delves into servicing the vehicle's transmission system. It provides detailed instructions on checking transmission fluid levels, performing fluid changes, and diagnosing transmission-related problems. Proper transmission service is crucial for smooth gear shifts, enhanced driving experience, and preventing costly transmission repairs. Additionally, the articleincludes guidance on servicing the vehicle's braking system. This involves inspecting and replacing brake pads, rotors, calipers, brake fluid, and other brake components. A well-maintained braking system is essential for vehicle safety, responsive braking performance, and preventing brake-related issues.
Chevrolet Captiva Repair Manual offers comprehensive guidance on servicing and repairing various vehicle components, ensuring optimal performance, reliability, and longevity of the vehicle. It serves as a valuable resource for maintaining and troubleshooting different systems and components of the Chevrolet Captiva.
?
Test yourself
A quick Chevrolet Captiva quiz: every answer comes with an explanation and a link to the manual page.