Assembly - Engine
Special Service Tools / General Equipment
 |
100-002 (TOOL-4201-C) Dial Indicator Holding Fixture |
 |
205-153 (T80T-4000-W) Handle |
 |
303-050 (T70P-6000) Engine Lift Bracket |
 |
303-096 (T74P-6150-A) Installer, Front Camshaft Seal TKIT-2009TS-F |
 |
303-103 (T74P-6375-A) Flywheel Holding Tool T74P-77000-A TKIT-2009TS-F |
 |
303-1252 Elastic Belt Removal/Installation Tool TKIT-2006UF-FLM TKIT-2006UF-RYAD |
 |
303-1521 Crankshaft Position Sensor Alignment Tool TKIT-2010C-FLM |
 |
303-1567 Size, Teflon Seal TKIT-2010C-FLM |
 |
303-1685 Camshaft Alignment Tool |
 |
303-1687 VCT Solenoid Seal Installer |
 |
303-1688 Balance Shaft Preload Tool |
 |
303-1689 Crankshaft Damper Holding Tool |
 |
303-328 (T88P-6701-B1) Replacer, Rear Seal TKIT-1988-FLM TKIT-1988-F TKIT-1988-LM |
 |
303-507 Timing Pin, Crankshaft TDC TKIT-2001N-FLM TKIT-2001N-RYAD |
 |
310-205 Fuel Injector Brush |
 |
310-207 Installer, Fuel Injector Seal Assembly TKIT-2009A-FLM |
| Feeler gauge | |
| Strap wrench | |
| Mounting Stand | |
| Hose Clamp Removal/Installation Tool | |
| Piston Ring Compressor | |
Materials
| Name | Specification |
|---|---|
| Motorcraft® High Performance Engine RTV Silicone TA-357 |
ALL-M4G323-A6 |
Left Full-Time 4WD/Left Rear-Wheel Drive
NOTICE: Do not loosen or remove the crankshaft pulley bolt without first installing the special tools as specified in this procedure. The crankshaft pulley and crankshaft sprocket are not keyed to the crankshaft. The crankshaft, crankshaft sprocket and pulley are connected to each other by friction. For this reason the crankshaft sprocket can also come loose if the pulley bolt is loosened. Before any repair requiring loosening or removal of the crankshaft pulley bolt, the crankshaft and camshafts must be locked with the special service tools, otherwise serious engine damage may occur.
NOTICE: During engine repair procedures, cleanliness is extremely important. Any foreign material, including any material created while cleaning gasket surfaces, that enters the oil passages, coolant passages or oil pan may cause engine failure.
NOTICE: Turbocharger compressor blades can be damaged by even the smallest particles. When removing any turbocharger or engine air intake system component, make sure that no debris enters the system. Failure to do so may result in damage to the turbocharger.
- Inspect the turbocharger or engine air intake system components and clean them as necessary.
- If necessary, install a new rear cylinder block plug.
Torque: 50 lb-ft (68 N·m)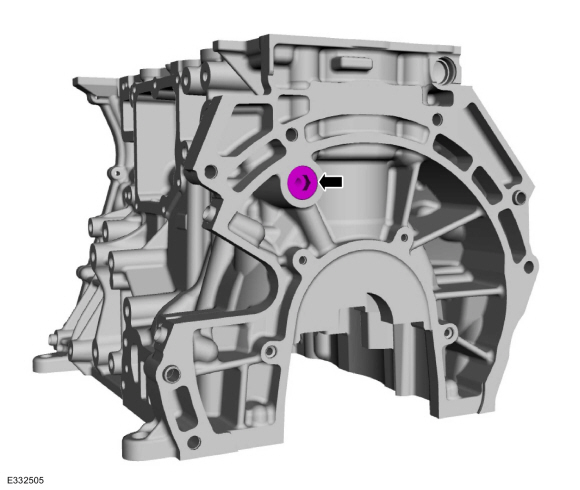
- If necessary, install a new front cylinder block plug.
Torque: 50 lb-ft (68 N·m)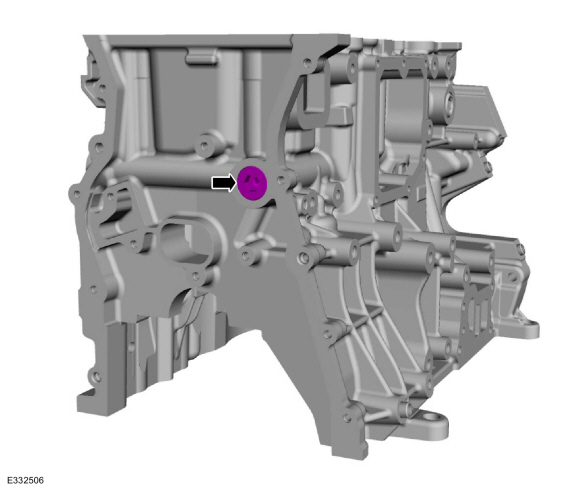
- Install the engine piston oil cooler valves and bolts. Inspect the turbocharger or engine air intake system components and clean if necessary.
Torque: 89 lb-in (10 N·m)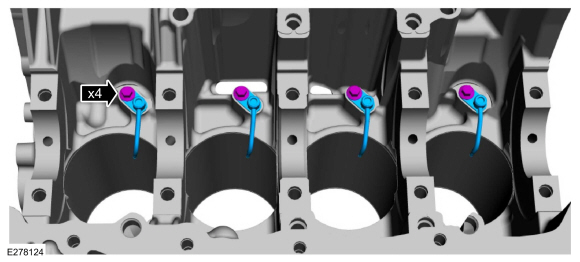
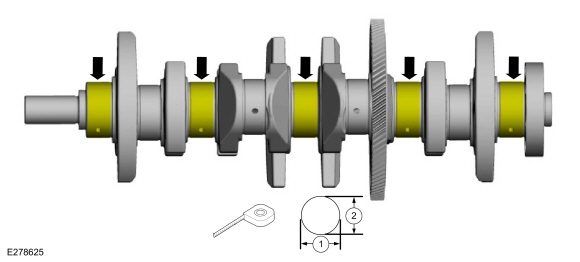
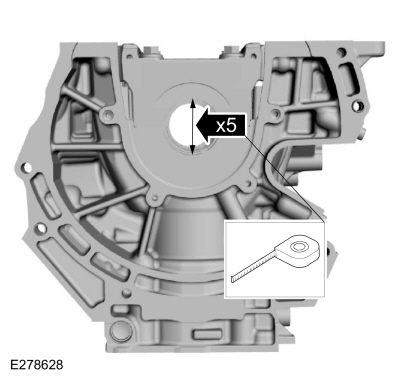
- Measure the length or distance in two directions.
- Record the smallest value for each crankshaft main journal.
- Using a straightedge, align flush and install the original main bearing beam bolts, tightening them by hand.
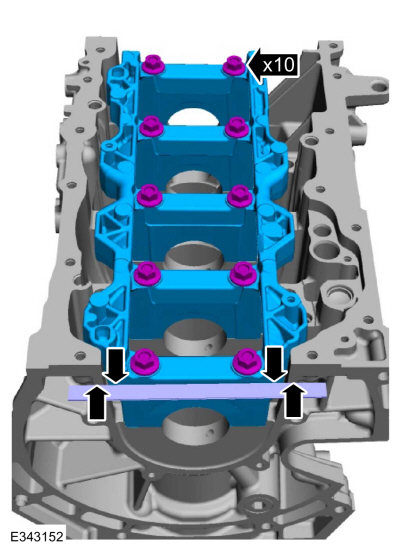
- Using a straightedge, tighten the bolts in the sequence shown.
Torque:
Stage 1: 44 lb-in (5 N·m)
Stage 2: 18 lb-ft (25 N·m)
Stage 3: 90°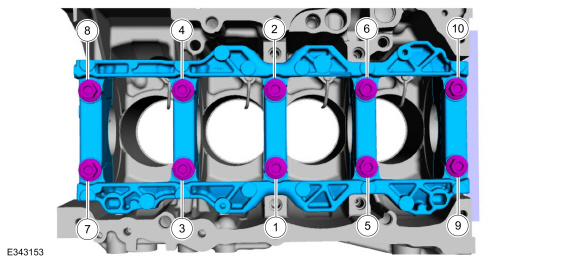
- Measure the bore diameter of each crankshaft main bearing bore in the cylinder block.
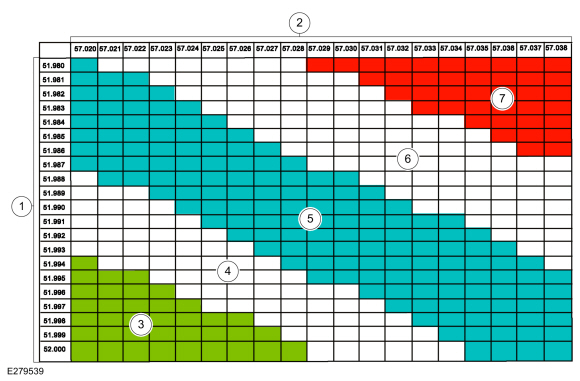
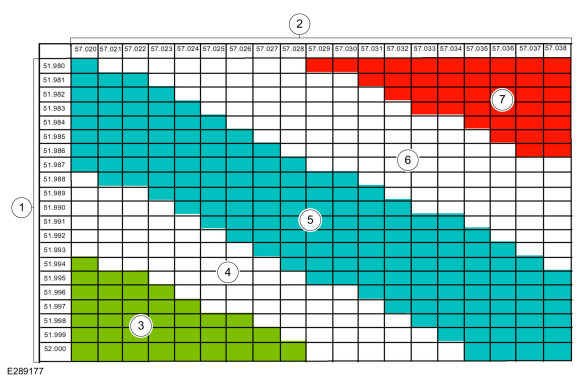
- Using the chart, select the correct class of connecting rod bearings.
- Crankshaft Journal Diameter
- Cylinder Block Bore Diameter
- Green upper bearing: 1 / Green lower bearing: 1
- Upper bearing Blue: 2 / Lower bearing Green: 1
- Blue upper bearing: 2 / Blue lower bearing: 2
- Upper bearing Red: 3 / Lower bearing Blue: 2
- Upper bearing Red: 3 / Lower bearing Red: 3
- Crankshaft Journal Diameter
- Cylinder Block Bore Diameter
- Green: Upper bearing Green: 1 / Lower bearing Blue: 2
- White: Upper bearing Green: 1 / Lower bearing Brown: 4
- Blue: Upper bearing Blue: 2 / Lower bearing Brown: 4
- Yellow: Upper bearing Red: 3 / Lower bearing Brown: 4
- Red: Upper bearing Red: 3 / Lower bearing Black: 6
- Using the original bolts, install the connecting rod caps.
Torque:
Stage 1: 177 lb-in (20 N·m)
Stage 2: 30 lb-ft (40 N·m)
Stage 3: 90°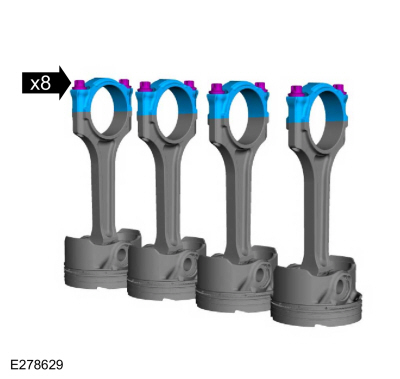
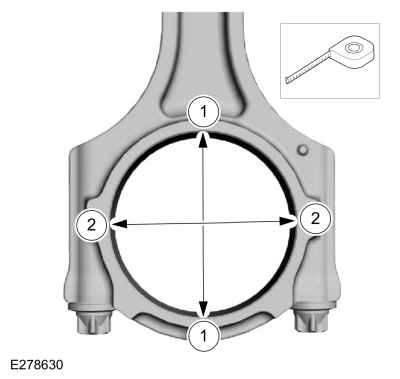
- Measure the length or distance in two directions.
- Record the smallest value for each connecting rod.
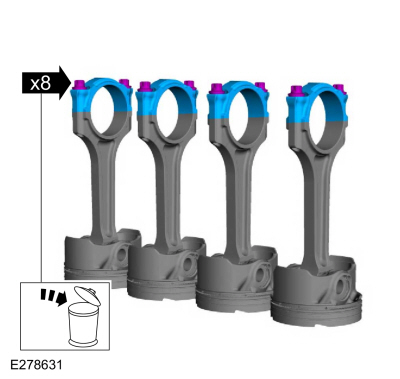
- Remove the connecting rod bolts and caps. Discard the bolts.
- Measure the length or distance in two directions.
- Record the smallest value for each connecting rod journal.
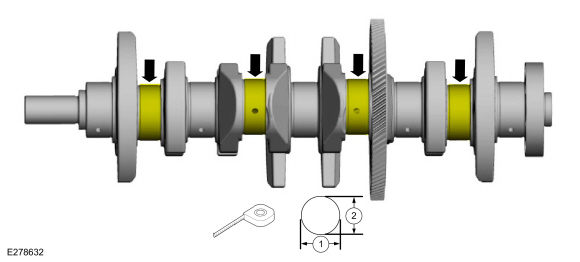
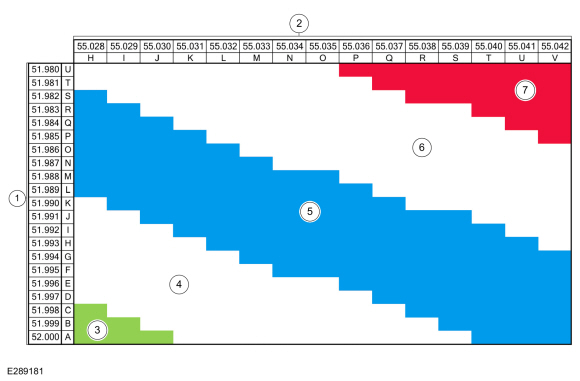
- Using the chart, select the correct class of connecting rod bearings.
- Crankshaft Journal Diameter
- Connecting Rod Journal Diameter
- Green upper bearing: 1 / Green lower bearing: 1
- Upper bearing Green: 1 / Lower bearing Blue: 2
- Blue upper bearing: 2 / Blue lower bearing: 2
- Upper bearing Blue: 2 / Lower bearing Red: 3
- Upper bearing Red: 3 / Lower bearing Red: 3
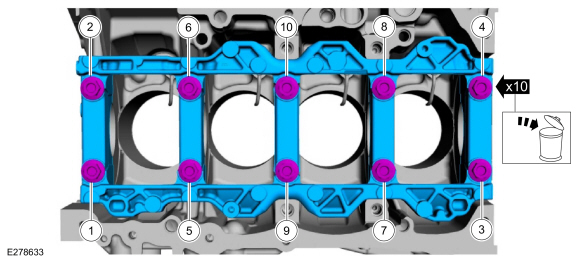
- Remove the bolts in the sequence shown and discard them.
- Remove the main bearing beam.
- Lubricate with clean engine oil and install the crankshaft main bearings.
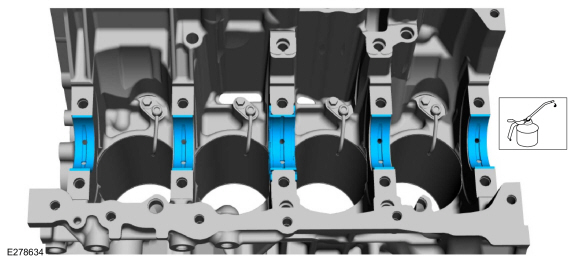
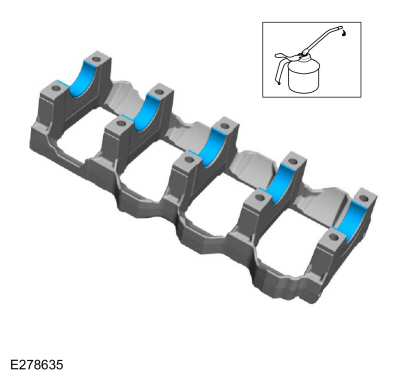
- Lubricate with clean engine oil and install the main bearing beam bearings.
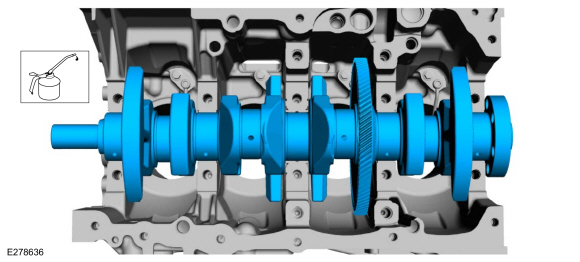
- Lubricate with clean engine oil and install the crankshaft.
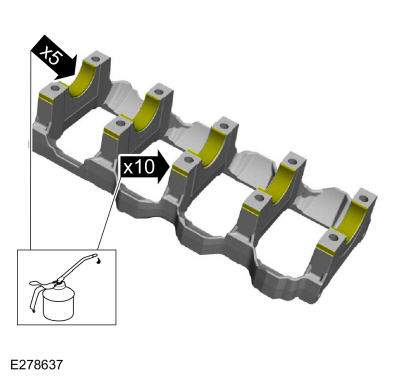
- Lubricate with clean engine oil.
- Using a straightedge, install the main bearing beam flush.
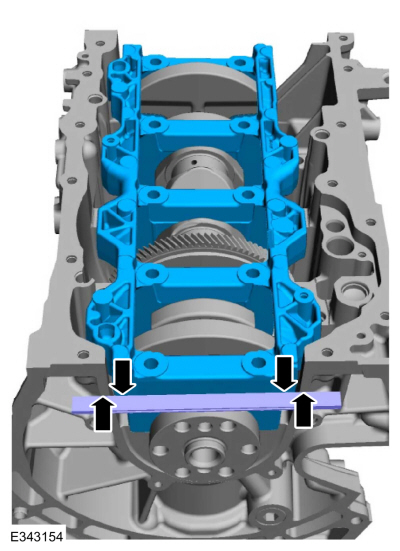
- Using a straightedge, install the bolts and tighten them in the sequence shown.
Torque:
Stage 1: 44 lb-in (5 N·m)
Stage 2: 18 lb-ft (25 N·m)
Stage 3: 90°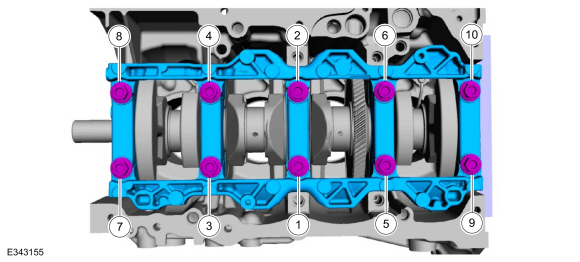
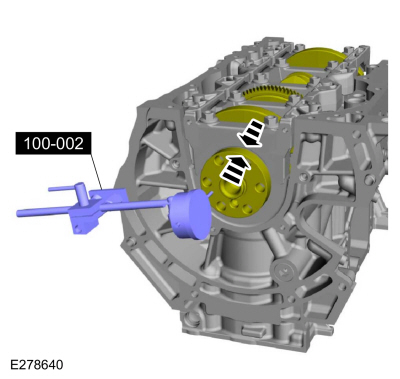
- Position the crankshaft toward the rear of the cylinder block.
- Zero the dial indicator using the holder.
Use Special Service Tool: 100-002 (TOOL-4201-C) Dial indicator holding fixture.
- Move the crankshaft toward the front of the cylinder block. Mark and record the crankshaft end play.
- Crankshaft end play specification is 0.220-0.450 mm (0.0087-0.0177 in). If crankshaft end play exceeds the specified range, install new components as necessary.
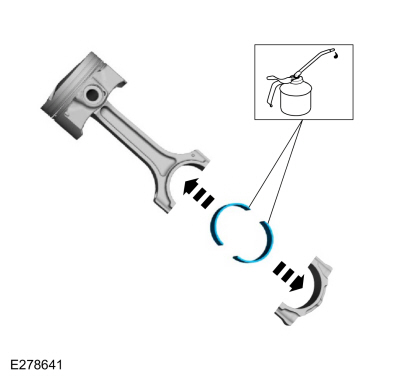
- Lubricate with clean engine oil and install the connecting rod bearings.
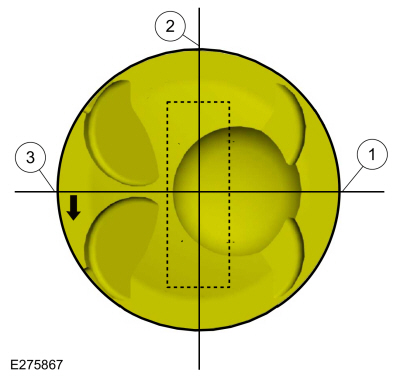
- Upper oil control ring rail gap location.
- Oil control ring spacer gap location.
- Lower oil control ring rail gap location.
NOTICE: Take care not to scratch the cylinder wall or the crankshaft journal with the connecting rod. Push the piston down until the connecting rod bearing seats on the crankshaft journal.
Lubricate with clean engine oil. Using a piston ring compressor, install the pistons.
Use common service equipment: Piston Ring Compressor.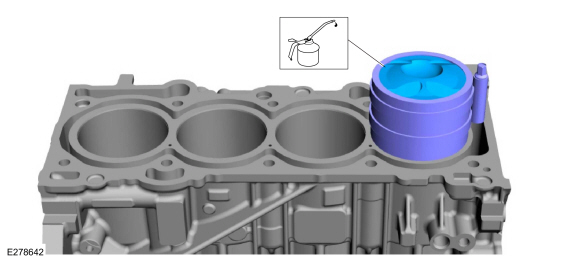
NOTICE: The connecting rod cap must remain in the orientation noted during disassembly, otherwise engine damage may occur.
Install the connecting rod caps and bolts and tighten in 3 stages.
Torque:
Stage 1: 177 lb-in (20 N·m)
Stage 2: 30 lb-ft (40 N·m)
Stage 3: 90°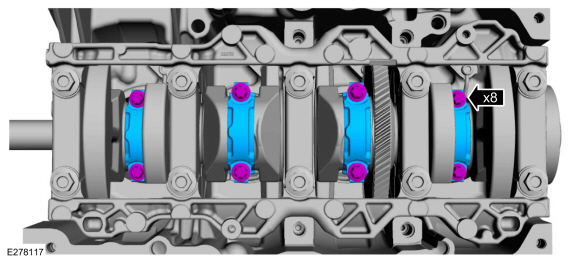
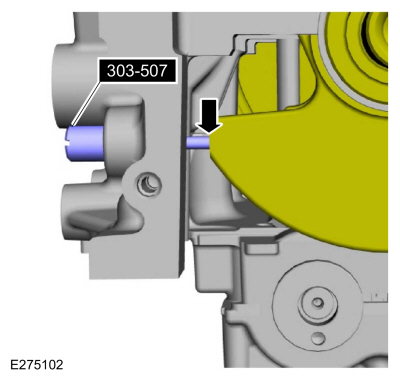
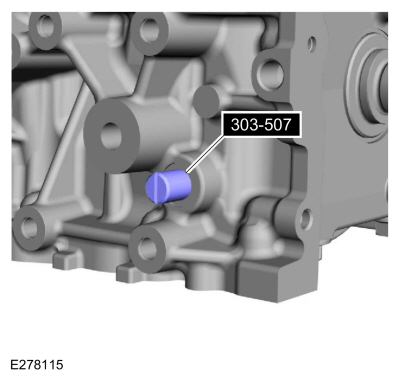
- Install the special service tool: 303-507 Timing Pin, Crankshaft TDC.
- Slowly rotate the crankshaft clockwise until the crankshaft counterweight contacts the special tool. The engine is now at TDC.
- Prime the oil pump. Add 2 tablespoons of clean engine oil to the oil pump and rotate the oil pump by hand.
- Install the shims in their original position on the balance shaft module mounting surfaces. With the balance shaft assembly timing marks at TDC, slowly install the balance shaft module onto the cylinder block to avoid interference between the crankshaft drive gear and the balance shaft driven gear.
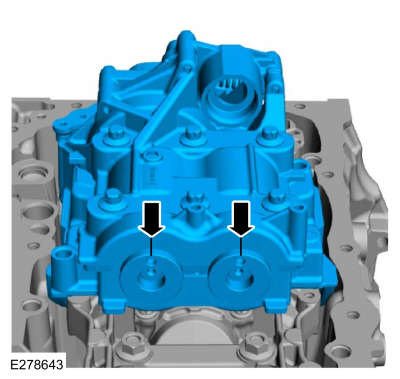
- Install the bolts and tighten in 2 stages.
Torque:
Stage 1: 133 lb-in (15 N·m)
Stage 2: 45°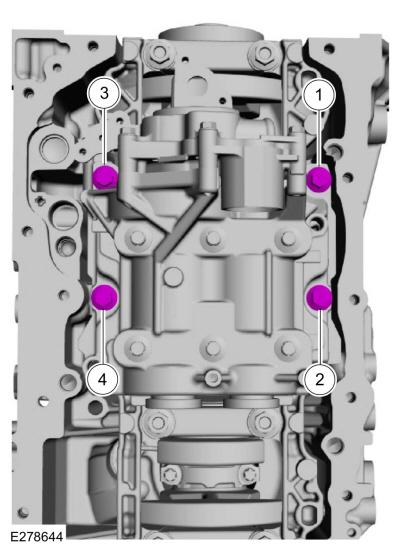
- Remove the special service tool: 303-507 Camshaft/Crankshaft TDC Pin.
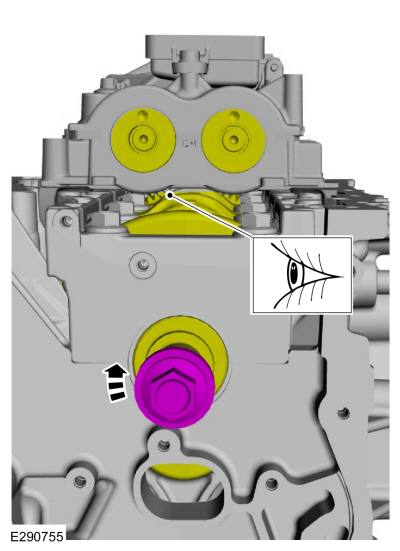
- Install the crankshaft bolt and rotate the crankshaft to make sure there are no meshing problems between the balance shaft gear and the crankshaft gear.
- Lubricate the oil screen and the inlet tube O-ring with clean engine oil.
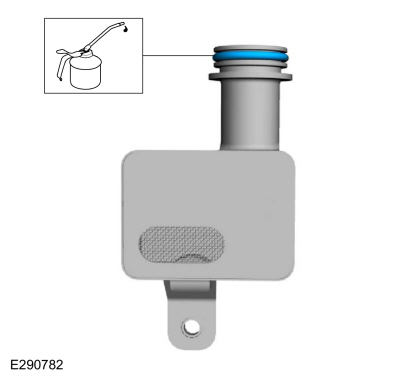
- Install the oil pickup tube, screen and bolt.
Torque: 97 lb-in (11 N·m)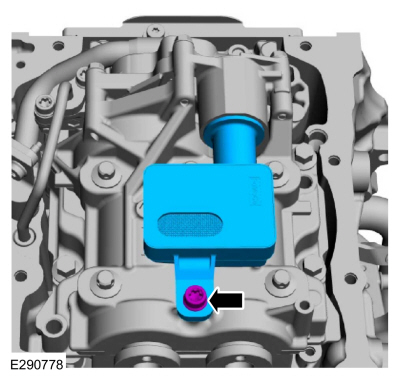
- Install the special service tool: 303-507 Timing Pin, Crankshaft TDC.
- Slowly rotate the crankshaft clockwise until the crankshaft counterweight contacts the special tool. The engine is now at TDC.
- Remove the special service tool: 303-507 Camshaft/Crankshaft TDC Pin.
- Install the 5 mm hex key and tighten the worm clamp as shown.
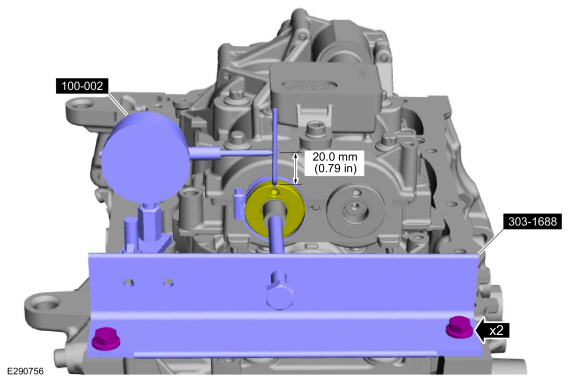
- Mark the hex key with a 20 mm (0.79 inch) file mark above the top surface of the driven gear.
- Install the balance shaft preload tool and bolts as shown.
Use the special service tool: 303-1688 Balance Shaft Preload Tool.
- Install and position the dial indicator with holding fixture on the 20 mm (0.79 inch) hex key as shown.
Use the special service tool: 100-002 (TOOL-4201-C) Dial Indicator Holding Fixture.
- Rotate the crankshaft clockwise and measure the backlash at all of the following 6 positions: 10 degrees, 30 degrees, 100 degrees, 190 degrees, 210 degrees and 280 degrees.
- Balance shaft backlash specification is 0.040 to 0.140 mm (0.00157 to 0.0055 in).
- If backlash exceeds the specified range, perform the balance shaft backlash procedure.
Refer to: Balance Shaft Backlash (303-01A Engine - 2.3 L EcoBoost (201 kW/273 L PS), General Procedures).
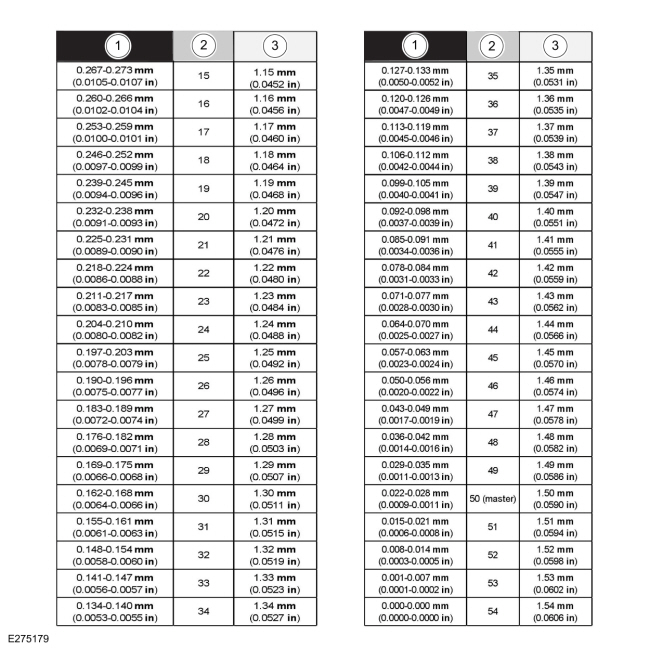
- Using the backlash measurement, select the correct shims from the Shim Selection Chart.
- Play
- Selective Shim (No.)
- Shim Thickness
- Install the special service tool: 303-507 Timing Pin, Crankshaft TDC.
- Slowly rotate the crankshaft clockwise until the crankshaft counterweight contacts the special tool. The engine is now at TDC and must remain at TDC until the timing drive components and crankshaft pulley are installed.
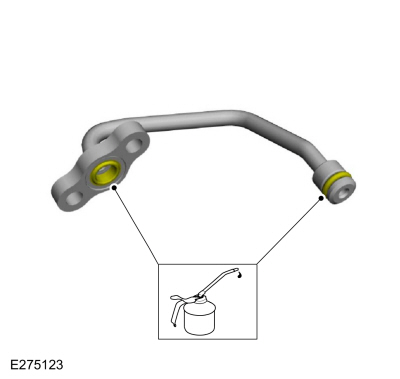
- Lubricate the inlet oil tube O-rings with clean engine oil.
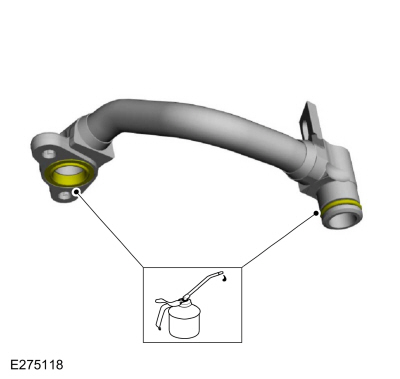
- Install the oil supply tube and bolts.
Torque: 97 lb-in (11 N·m)
- Install the oil supply tube bracket and bolt.
Torque: 97 lb-in (11 N·m)
- Install the bolt securing the oil supply tube to the bracket.
Torque: 97 lb-in (11 N·m)
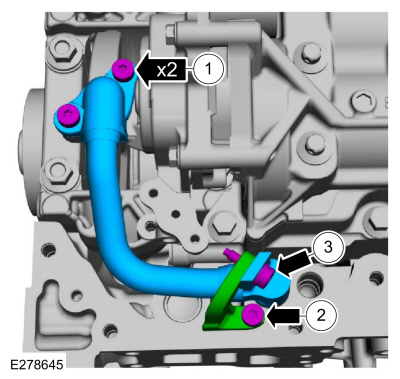
- Install the oil supply tube and bolts.
- Lubricate the outlet oil tube O-rings with clean engine oil.
- Install the oil outlet tube and bolts.
Torque: 97 lb-in (11 N·m)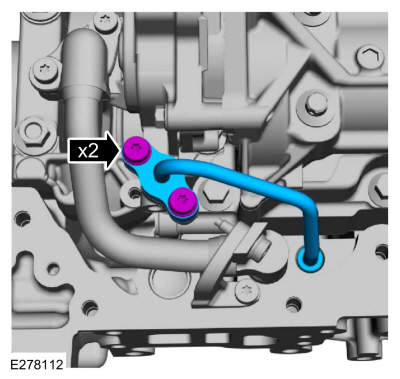
- Install the crankshaft sprocket.
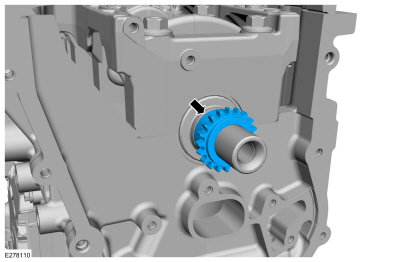
- Using the special service tool, install the rear crankshaft oil seal onto the crankshaft.
Use special service tool: 303-328 (T88P-6701-B1) Replacer, rear oil seal.
- Install the bolts and tighten them in the sequence shown.
Torque: 97 lb-in (11 N·m)
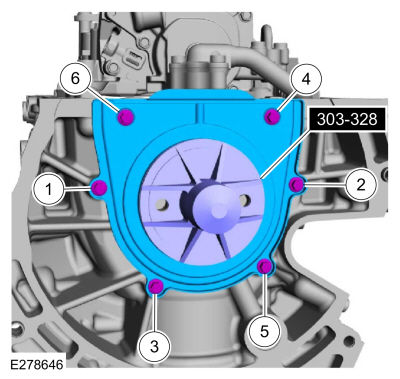
- Using the special service tool, install the rear crankshaft oil seal onto the crankshaft.
- Apply a 5 mm bead of silicone sealant to the chamfer, as shown in the illustration.
Material: Motorcraft® High Performance Engine RTV Silicone / TA-357 (WSS-M4G323-A6)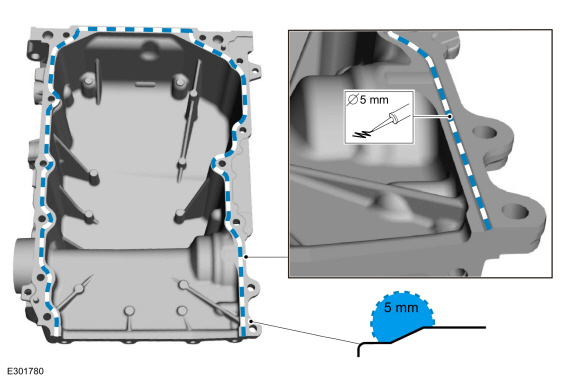
- Install the oil pan and hand-tighten the bolts.
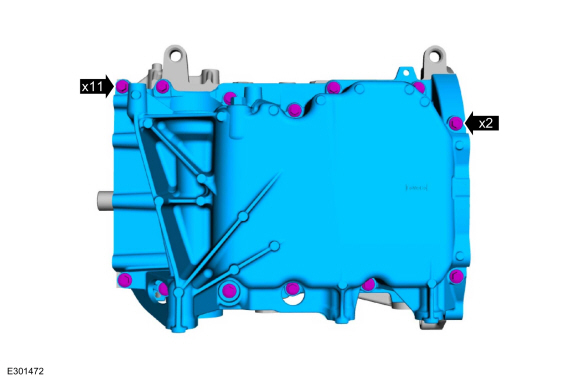
- Tighten the bolts in the sequence shown.
Torque: 18 lb-ft (25 N·m)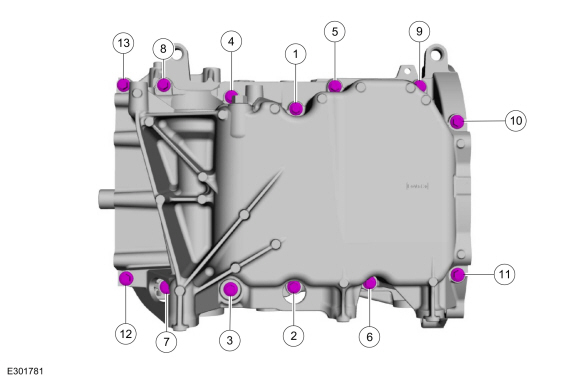
- Install the cylinder block bushings.
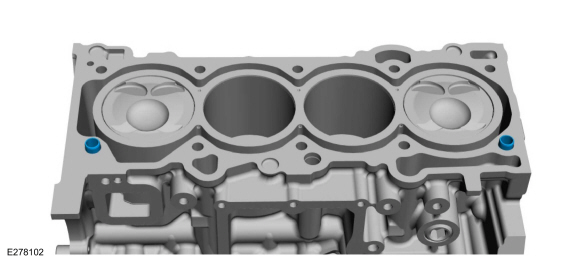
NOTICE: Do not allow silicone sealant to enter or come near the high pressure engine oil supply hole. Any restriction in the high pressure oil supply can cause engine damage.
Apply a 7 mm (0.28 in) bead of silicone sealant to the locations indicated on the cylinder block.
Material: Motorcraft® High Performance Engine RTV Silicone / TA-357 (WSE-M4G323-A6)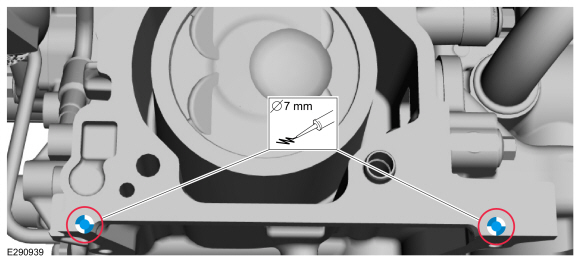
- Install a new cylinder head gasket.
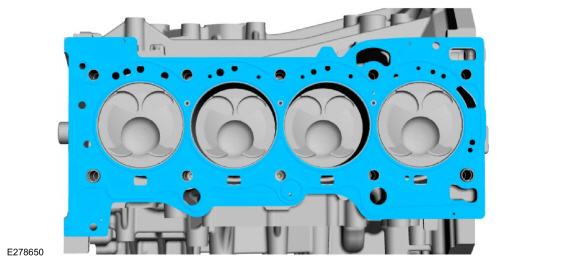
NOTICE: Do not allow silicone sealant to enter or come near the high pressure engine oil supply hole. Any restriction in the high pressure oil supply can cause engine damage.
Apply a 7 mm (0.28 in) bead of silicone sealant to the specified locations.
Material: Motorcraft® High Performance Engine RTV Silicone / TA-357 (WSE-M4G323-A6)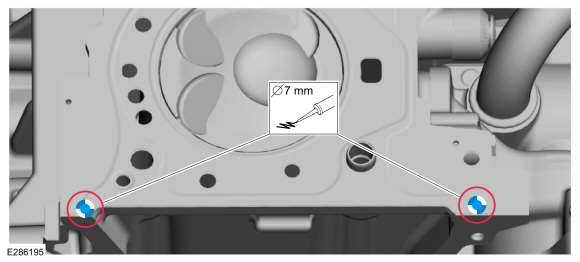
- Install the cylinder head and bolts and tighten in the sequence shown in 5 steps.
Torque:
Step 1: 62 lb-in (7 N·m)
Step 2: 133 lb-in (15 N·m)
Step 3: 41 lb-ft (55 N·m)
Step 4: 90°
Step 5: 90°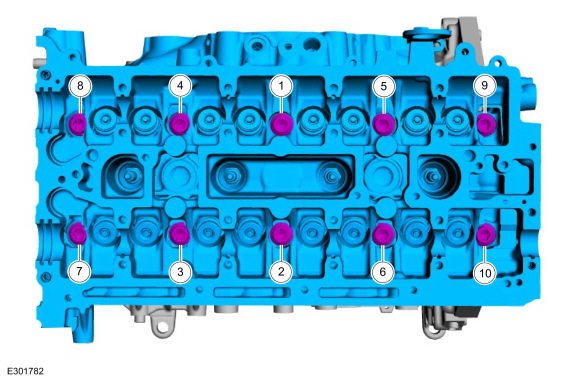
- Install a new cylinder head cover gasket.
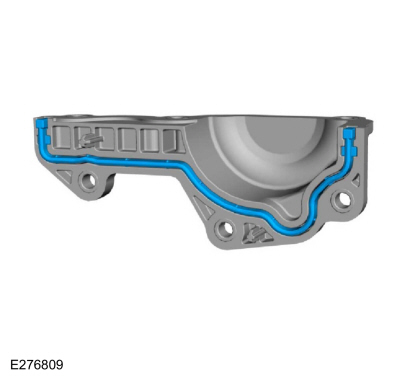
- Install the cylinder head cover, bolts and stud.
Torque: 97 lb-in (11 N·m)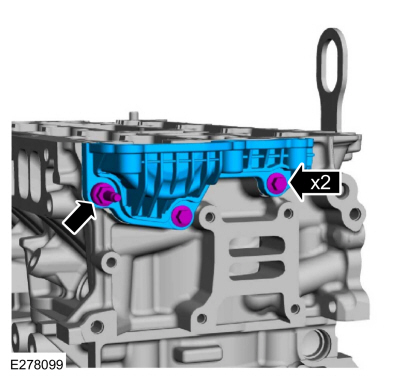
- If equipped, install the block heater.
Torque: 30 lb-ft (40 N·m)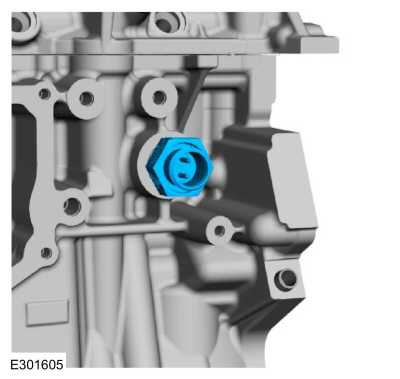
- Lubricate with clean engine oil and install the valve lifters in their original positions.
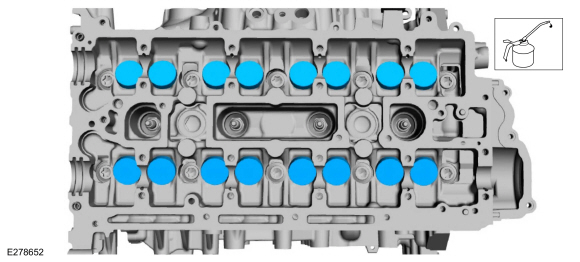
NOTICE: If any new parts (cylinder head, valves, lifters, camshafts) are installed, the valve clearance must be checked. Carefully perform the following 15 steps, otherwise serious engine damage may occur. If original parts are installed, it is not necessary to check the valve clearance, so proceed to step 69.
Install the crankshaft bolt and paint a mark on the crankshaft bolt at the 12 o'clock position.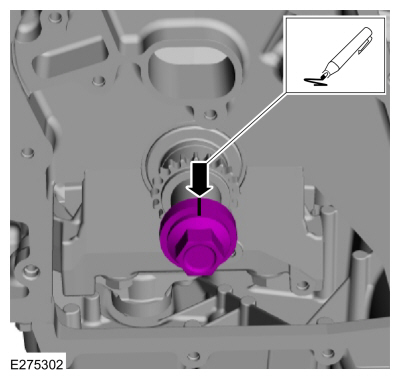
- Remove the special service tool: 303-507 Camshaft/Crankshaft TDC Pin.
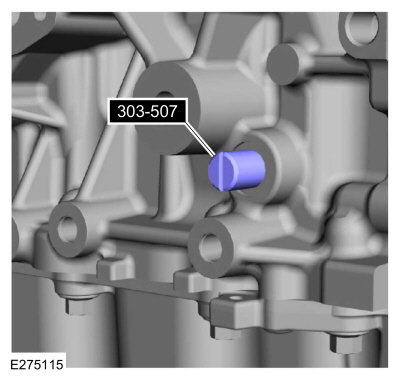
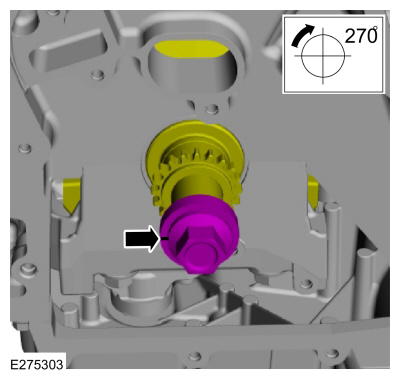
- Using the crankshaft bolt and a washer, rotate the crankshaft clockwise 270 degrees until the paint mark is at the 9 o'clock position.
NOTICE: Failure to follow the camshaft tightening procedure may damage the camshafts.
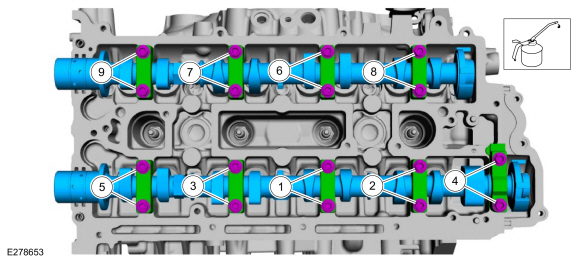
- Lubricate the camshafts and caps with clean engine oil and install the camshafts, caps and bolts.
- Tighten in sequence, 2 turns at a time, in 2 stages.
Torque:
Stage 1: 62 lb-in (7 N·m)
Stage 2: 142 lb-in (16 N·m)
- Lubricate the camshaft journals with clean engine oil and install the front camshaft bearing cap and bolts.
Torque:
Step 1: 62 lb-in (7 N·m)
Step 2: 142 lb-in (16 N·m)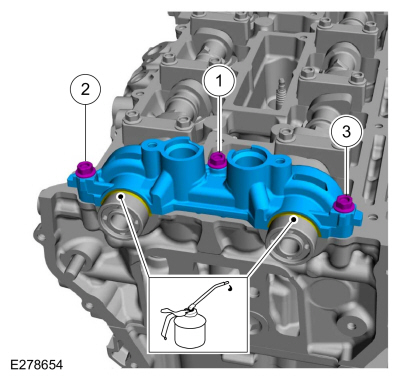
NOTICE: Do not remove the spark plugs when the engine is hot or cold-soaked. This may cause damage to the spark plug threads or the cylinder head. Make sure the engine is warm (touch-warm to the hand) before removing the spark plugs.
NOTICE: Dropping a spark plug may cause internal damage to it. If dropped, the spark plug must be discarded. Using a damaged spark plug may cause cylinder misfire, which can result in engine damage.
Remove the spark plugs.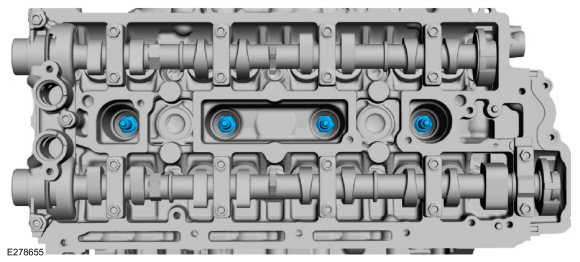
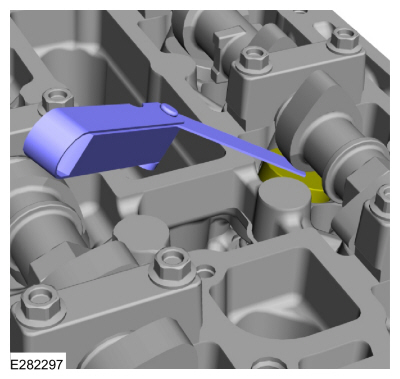
- Using the camshaft flats, rotate the camshaft to place the cam lobe on the base circle so that the lobe points away from the tappet.
- Using a feeler gauge, measure the clearance of each valve and record its position.
Use general equipment: Feeler Gauge
- Repeat to measure all cam/tappet clearances.
- Valve Lifter Assembly Classification Table
- Rating
- Identification Mark
- Thickness (mm)
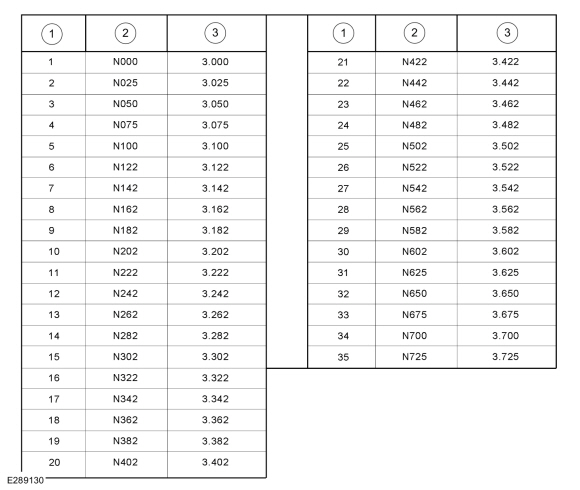
- Intake: 0.25 mm (0.0095 in).
- Exhaust: 0.36 mm (0.0142 in).
- Intake: 0.19-0.31 mm (0.0075-0.0122 in).
- Exhaust: 0.30-0.42 mm (0.0118-0.0165 in).
- Install the spark plugs.
Torque: 106 lb-in (12 N·m) - Remove the bolts and the front camshaft bearing cap.
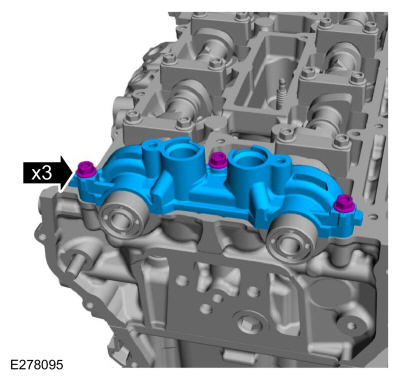
NOTICE: Failure to follow the camshaft loosening procedure may damage the camshafts.
Loosen the camshaft bearing caps sequentially, 2 turns at a time, until all tension is released from the camshaft bearing caps. Remove the bolts, caps and camshafts.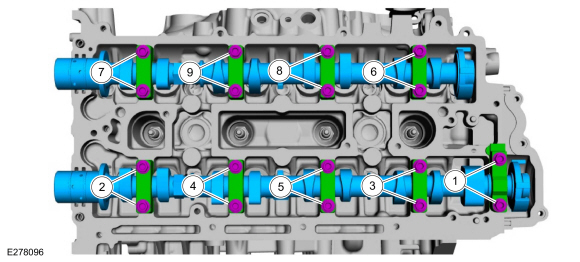
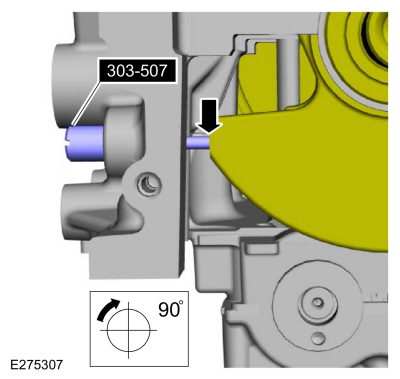
- Install the special service tool: 303-507 Timing Pin, Crankshaft TDC.
- Rotate the crankshaft clockwise 90 degrees until the crankshaft contacts the special tool.
- If necessary, replace all lifters with the correct lifters. Lubricate the lifters selected during valve clearance inspection with clean engine oil.
NOTICE: The camshaft seal gaps must be at the 12 o'clock position, otherwise engine damage may occur.
Inspect and position the camshaft seal gaps at the 12 o'clock position, as shown in the illustration.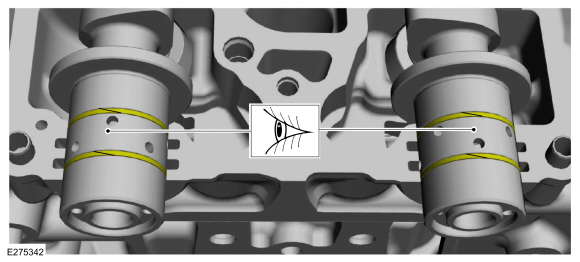
NOTICE: Install the camshafts with the locating slots aligned so the camshaft alignment plate can be installed without rotating the camshafts. Make sure the lobes on the No. 1 cylinder are in the same position as during removal. Rotating the camshafts with the timing chain removed, or installing the camshafts 180 degrees out of position, may cause serious damage to the valves and pistons.
NOTICE: Failure to follow the camshaft tightening procedure may damage the camshafts.
- Lubricate with clean engine oil and install the camshafts, caps and bolts.
- Tighten the camshaft bearing cap bolts by hand, one turn at a time, until seated.
- Tighten in sequence, 2 turns at a time, in 2 stages.
Torque:
Stage 1: 62 lb-in (7 N·m)
Stage 2: 142 lb-in (16 N·m)
- Lubricate the camshaft journals with clean engine oil.
- Install the front camshaft bearing cap and bolts and tighten in 2 steps.
Torque:
Step 1: 62 lb-in (7 N·m)
Step 2: 142 lb-in (16 N·m)
- Install the VCT oil control solenoids and bolts.
Torque: 97 lb-in (11 N·m)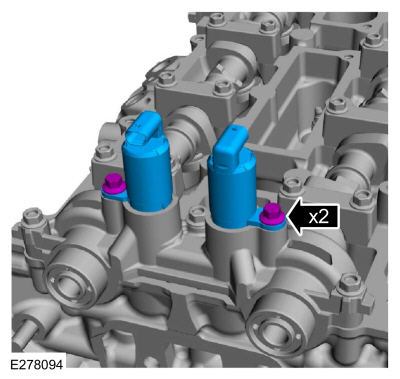
NOTICE: The special tool is only for aligning the camshafts. Using this tool to prevent engine rotation may damage the engine.
Install the special service tool: 303-1685 Camshaft Timing Tool.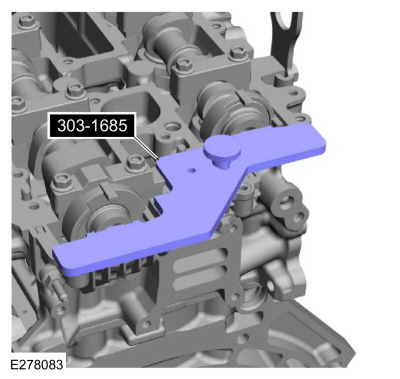
- Install the VCT housings and hand-tighten the new bolts.
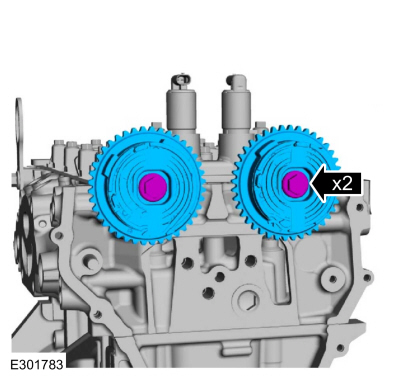
- Install the tensioner arm, timing chain, timing chain guide and bolts.
Torque: 97 lb-in (11 N·m)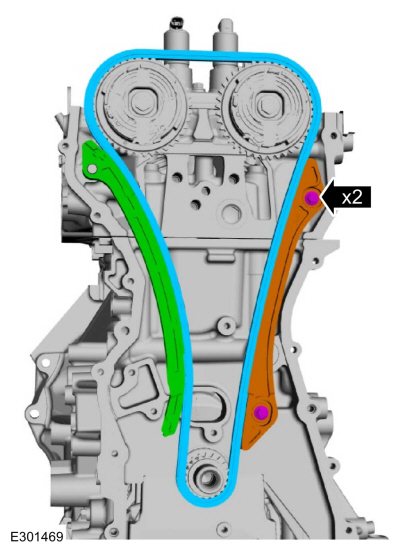
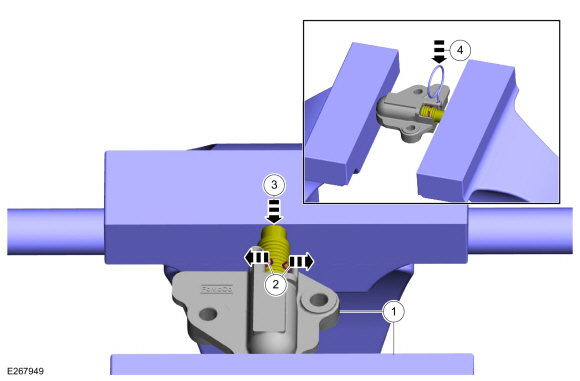
- Reset the timing chain tensioner.
- Install the timing chain tensioner in a vise with soft jaws.
- Spread the ends of the ratchet clip apart.
- Using a vise with soft jaws, compress the piston to its original position.
- Install the locking pin into the 2 holes of the timing chain tensioner housing to hold the plunger in place.
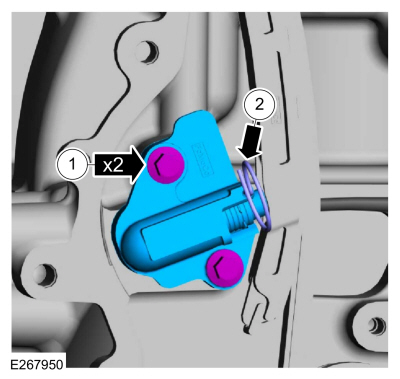
- Install the timing chain tensioner and the bolts.
Torque: 89 lb-in (10 N·m)
- Remove the locking pin.
- Install the timing chain tensioner and the bolts.
NOTICE: Use an open-end wrench to prevent the component from rotating.
Tighten the exhaust VCT housing bolt in 2 steps.
Torque:
Step 1: 26 lb-ft (35 N·m)
Step 2: 135°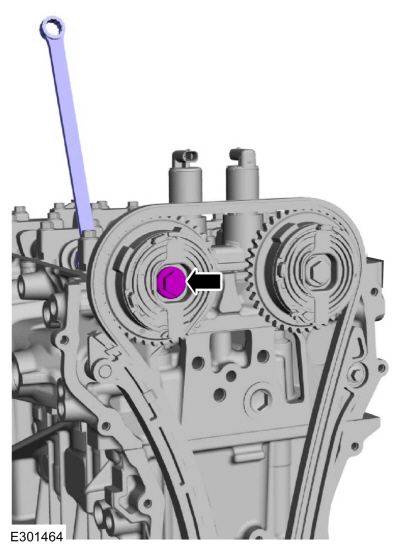
NOTICE: Use an open-end wrench to prevent the component from rotating.
Tighten the intake VCT housing bolt in 2 steps.
Torque:
Step 1: 26 lb-ft (35 N·m)
Step 2: 135°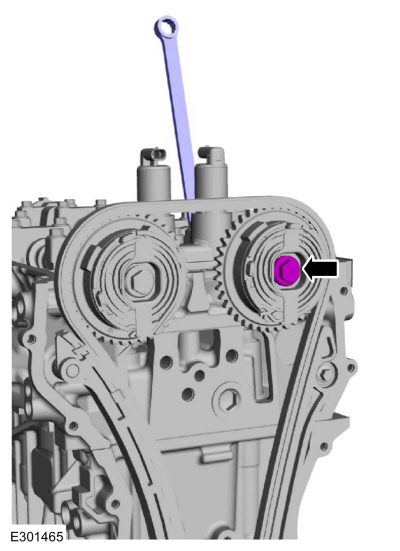
- Apply a 3 mm (0.12 inch) diameter bead of silicone sealant to the 3 upper tabs, as shown in the illustration.
Material: Motorcraft® High Performance Engine RTV Silicone / TA-357 (ALL-M4G323-A6)
- Apply a 4 mm (0.16 inch) diameter bead of silicone sealant to the chamfer on the two lower tabs, as shown in the illustration.
Material: Motorcraft® High Performance Engine RTV Silicone / TA-357 (ALL-M4G323-A6)
- Apply a 5 mm (0.19 inch) diameter bead of silicone sealant to the chamfer, as shown in the illustration.
Material: Motorcraft® High Performance Engine RTV Silicone / TA-357 (ALL-M4G323-A6)
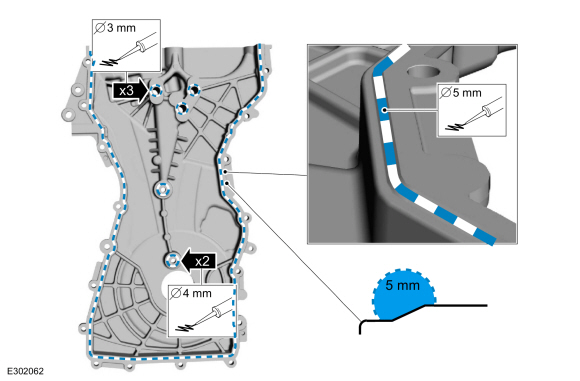
- Apply a 3 mm (0.12 inch) diameter bead of silicone sealant to the 3 upper tabs, as shown in the illustration.
- Apply a 15 mm (0.59 in) diameter drop of silicone sealant to the junction of the cylinder head and cylinder block and the junction of the cylinder block and oil pan area.
Material: Motorcraft® High Performance Engine RTV Silicone / TA-357 (WSE-M4G323-A6)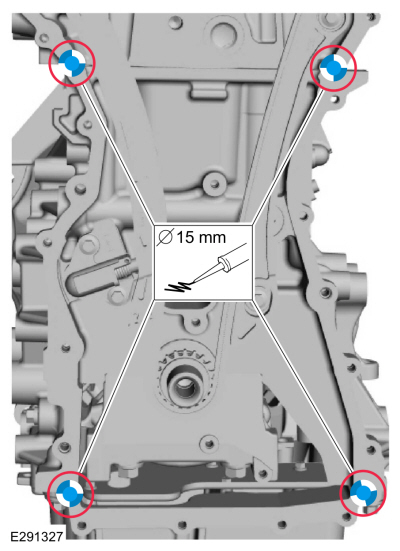
- Install the front engine cover and fasteners and tighten them in the sequence shown.
Torque:
Bolts 1-3: 35 lb-ft (48 N·m)
Bolts 4-22: 97 lb-in (11 N·m)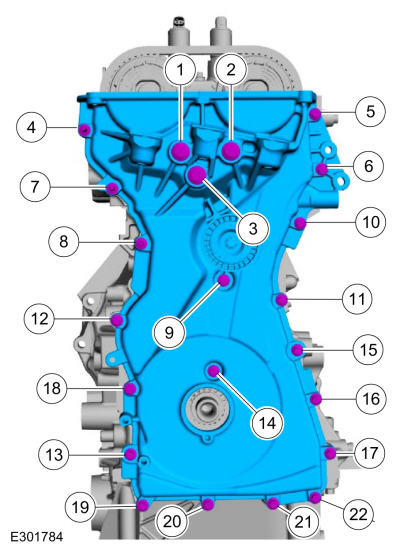
- Lubricate with clean engine oil and install the front crankshaft seal using the special tool.
Use Special Service Tool: 303-096 (T74P-6150-A) Installer, front camshaft seal.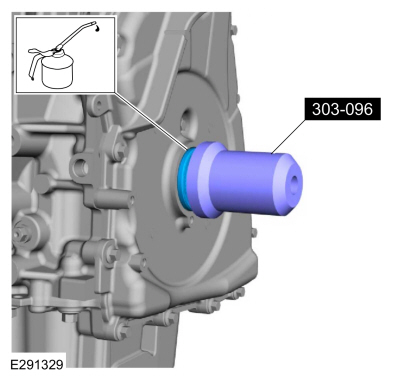
- Lubricate the crankshaft pulley with clean engine oil.
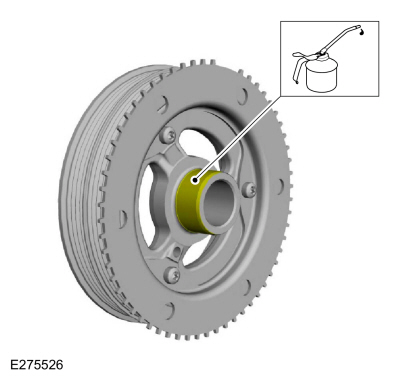
- Install the crankshaft pulley as shown in the illustration.
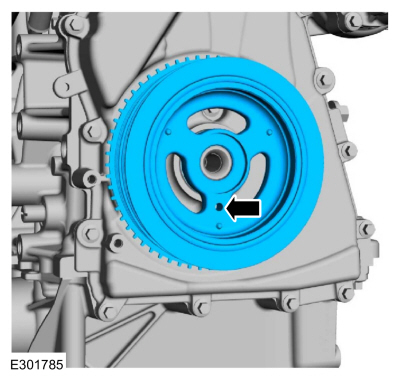
- Install the M6 bolt.
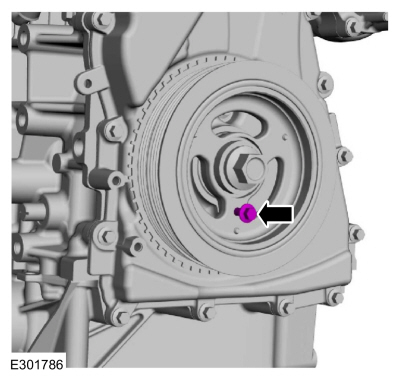
NOTICE: The crankshaft must remain at TDC during pulley bolt installation, or engine damage may occur. Therefore, the crankshaft pulley must be held in place with the crankshaft damper holding tool, and the bolt should be installed using only hand tools.
Using the special tool and a breaker bar, tighten the crankshaft pulley.
Use Special Service Tool: 303-1689 Holding Tool, crankshaft damper.
Use General Equipment: Strap wrench.
Torque:
Step 1: 74 lb-ft (100 N·m)
Step 2: 90°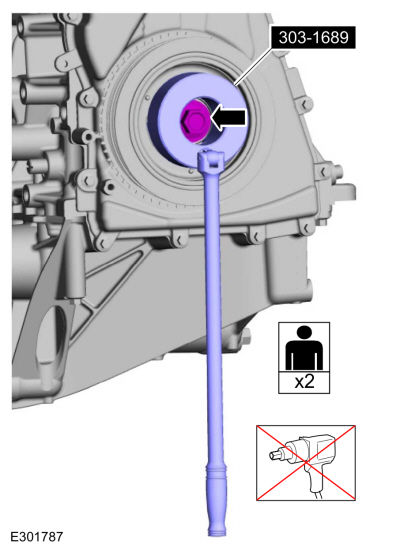
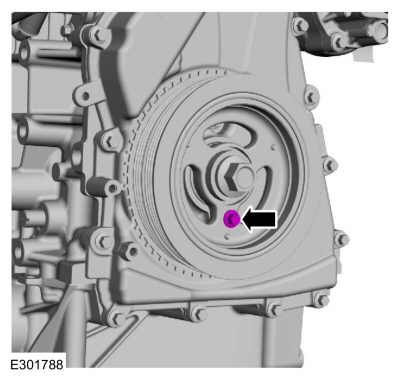
- Remove the M6 bolt.
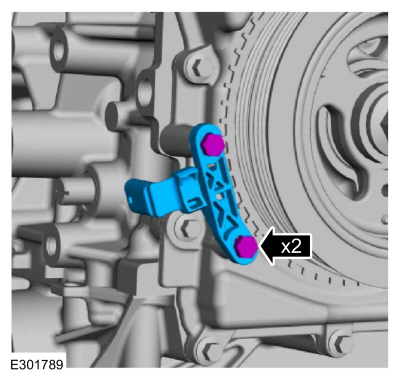
- Install the CKP sensor and hand-tighten the bolts.
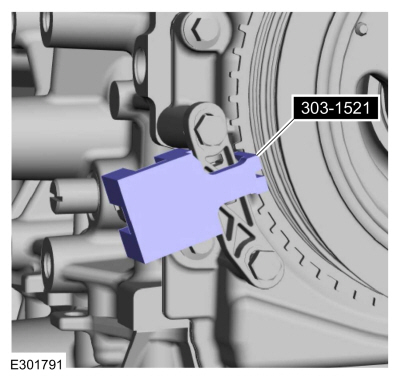
- Install the special tool on the crankshaft position sensor and the crankshaft pulley reluctor ring tooth.
Use Special Service Tool: 303-1521 Alignment Tool, Crankshaft Position Sensor.
Torque: 97 lb-in (11 N·m)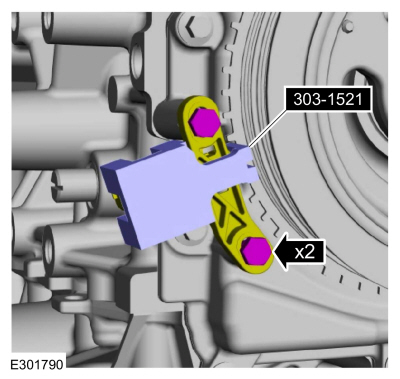
- Remove the special service tool: 303-1521 Crankshaft Position Sensor Alignment Tool.
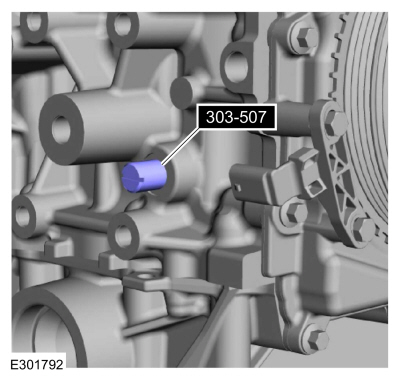
- Remove the special service tool: 303-507 Camshaft/Crankshaft TDC Pin.
- Install the engine plug bolt.
Torque: 177 lb-in (20 N·m)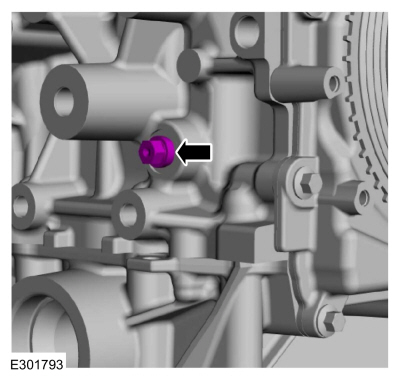
- Special Service Tool Removal: 303-1685 Camshaft Alignment Tool.
- Install the high-pressure fuel pump drive unit and bolts.
Torque: 97 lb-in (11 N·m)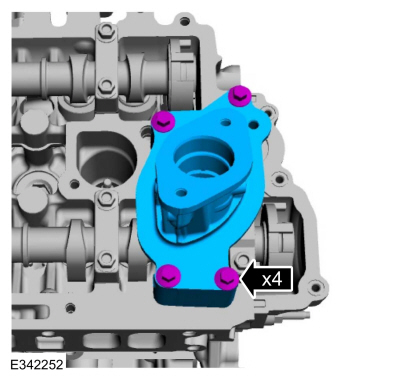
- Install the exhaust manifold heat shield on the new CHT sensor.
- Install the CHT sensor.
Torque: 97 lb-in (11 N·m)
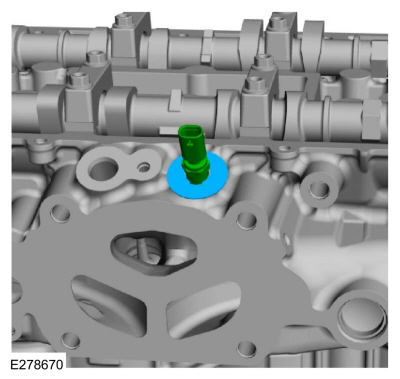
NOTICE: Do not use compressed air or a fuel injector bore brush to clean the fuel injector tips. Failure to follow this instruction may damage the fuel injectors.
Using the special tool, clean the fuel injector bores.
Use special service tool: 310-205 Fuel Injector Bore Brush.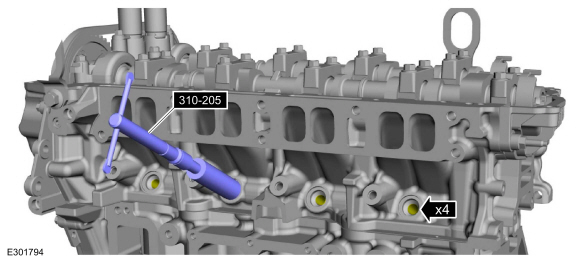
NOTICE: Do not lubricate the new lower Teflon® fuel injector seals.
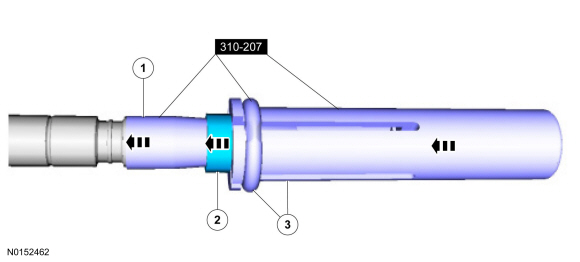
- Install the Teflon® seal guide on the fuel injector tip.
Install special service tool: 310-207 Fuel Injector Seal Assembly Installer.
NOTICE: After installing the Teflon® seal on the Teflon® seal guide, install it on the fuel injector immediately to prevent excessive expansion of the Teflon® seal.
Install the new Teflon® seals on the Teflon® seal guide. Using a pusher, slide the Teflon® seals along the Teflon® guide.
- Using a pusher, slide the Teflon® seals off the Teflon® seal guide and into the groove on the fuel injectors.
- Remove the special tool.
Use special service tool: 310-207 Fuel Injector Seal Assembly Installer.
- Install the Teflon® seal guide on the fuel injector tip.
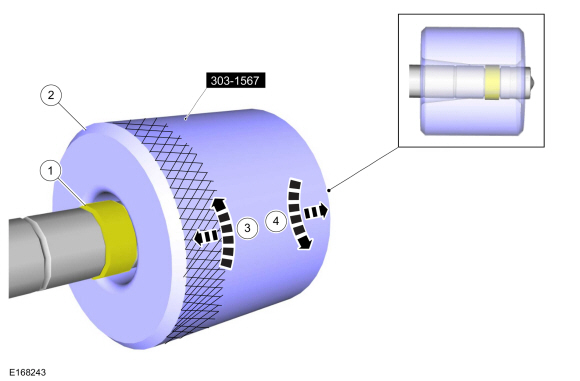
- Massage and warm the Teflon® seal with your fingers before installing the Teflon® seal sizing tool. This will help in installing the Teflon® seal sizing tool.
- Position the Teflon® seal sizing tool with the large opening facing the Teflon® seal. Press and turn the Teflon® seal sizing tool 180 degrees.
Use special service tool: 303-1567 Teflon® Seal Sizer.
- After installing the Teflon® seal sizing tool, check and make sure the Teflon® seal is in the sizing portion of the Teflon® seal sizing tool. After one minute, turn the Teflon® seal sizing tool back 180 degrees and remove it.
- After one minute, turn the Teflon® seal sizing tool back 180 degrees and remove it.
NOTICE: The new fuel injector support rings must be installed with the wide side facing toward the fuel injector sealing rings. Incorrectly installed support rings may cause fuel system leaks.
- Install the new fuel injector support rings.
- Install the new fuel injector sealing rings.
- Install the new fuel injector clips.
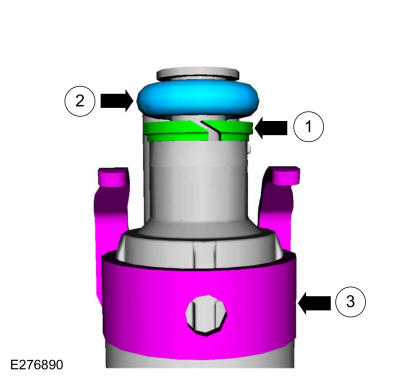
NOTICE: The FRP sensor must be replaced if it has been removed from the fuel rail.
Install the fuel injectors into the fuel rail.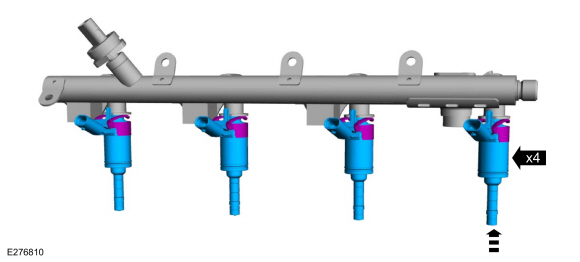
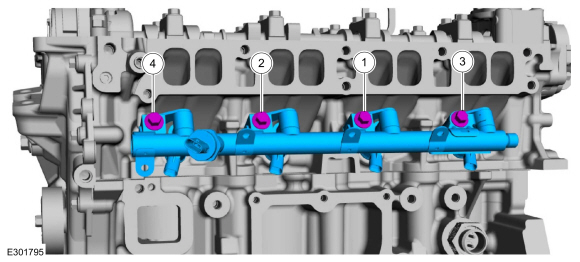
- Install the fuel rail by pressing it down over the injectors.
- Install the bolts and tighten in the sequence shown in 5 steps.
Torque:
Step 1: Tighten to: 89 lb-in (10 N·m)
Step 2: Back off to: 0 lb-in (0 N·m)
Step 3: Wait 5 sec.
Step 4: Tighten to: 124 lb-in (14 N·m)
Step 5: Tighten an additional: 30°
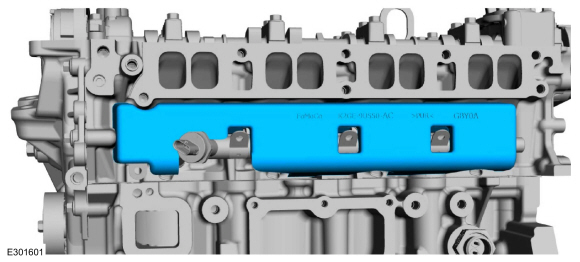
- Install the fuel rail insulator.
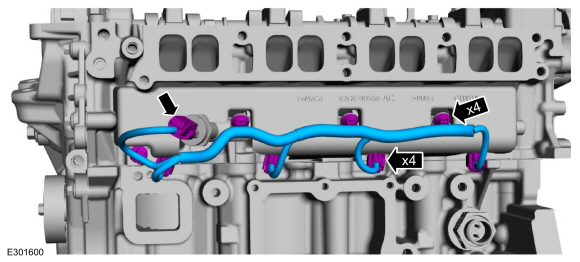
- Install the harness and attach the fuel rail harness clips.
- Connect the fuel rail wiring harness electrical connectors.
- If removed, install the VCT seals using the special tools.
Use Special Service Tools: 205-153 (T80T-4000-W) Handle, 303-1687 Installer, VCT solenoid seal.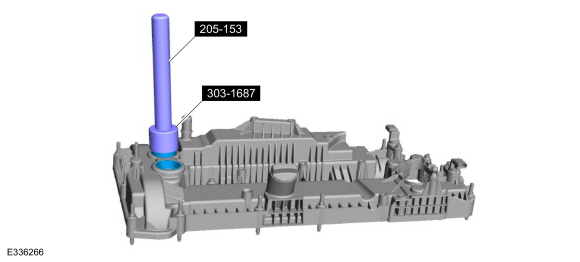
- Install new valve cover gaskets.
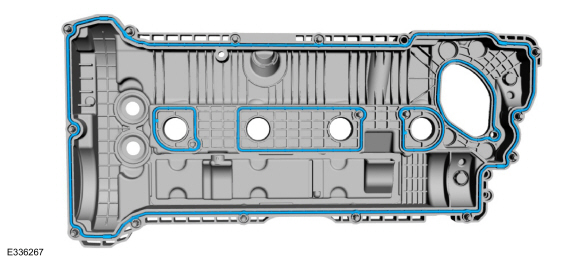
- Apply a 5.5 mm bead of silicone sealant.
Material: Motorcraft® High Performance Engine RTV Silicone / TA-357 (WSE-M4G323-A6)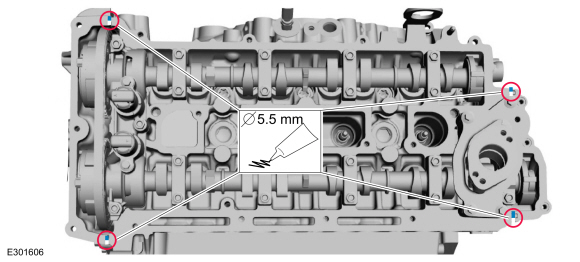
- Install the valve cover and tighten the fasteners in the sequence shown.
Torque: 97 lb-in (11 N·m)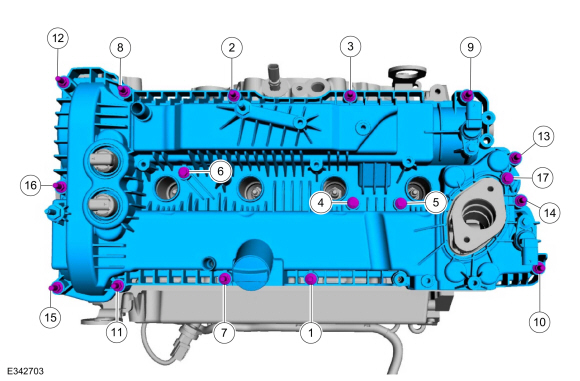
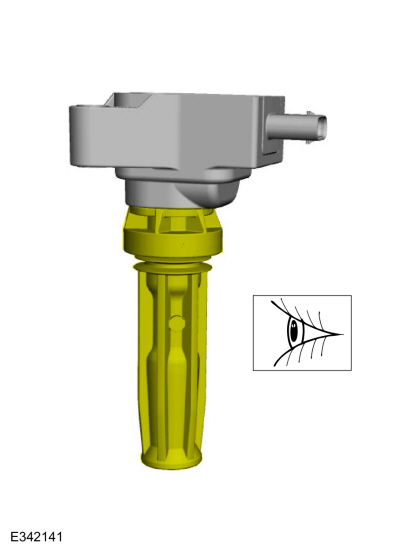
- Inspect and replace all ignition coil boots on the spark plugs that show cracks, tears or splits.
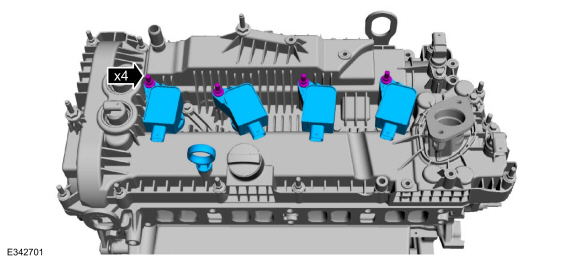
- Install the ignition coils onto the spark plugs and fasteners.
Torque: 97 lb-in (11 N·m)
- Install the oil level indicator.
- Install the ignition coils onto the spark plugs and fasteners.
- Inspect and replace if damaged.
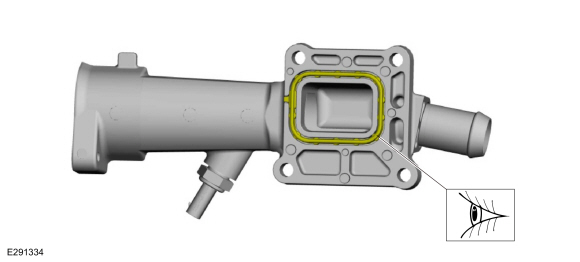
- Install the coolant outlet, stud and bolts.
Torque: 97 lb-in (11 N·m)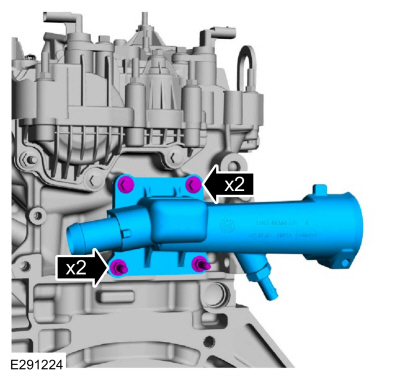
- If removed, install the studs.
Torque: 159 lb-in (18 N·m)
- Install a new gasket.
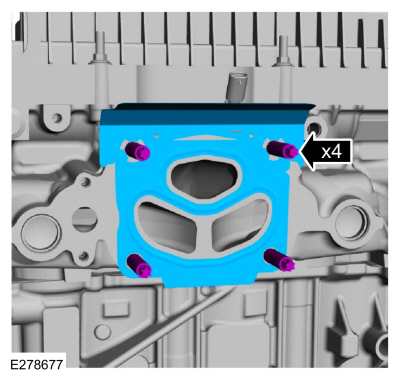
- If removed, install the studs.
- Install the coolant outlet tube seal, O-ring and lubricate with clean engine coolant.
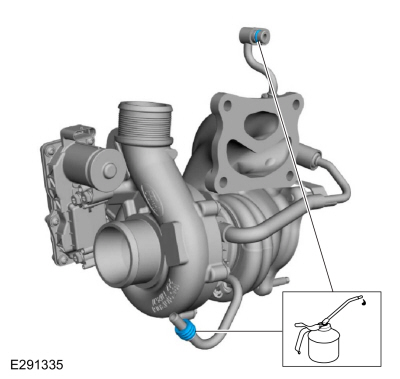
- Install the turbocharger and nuts.
Torque: 39 lb-ft (53 N·m)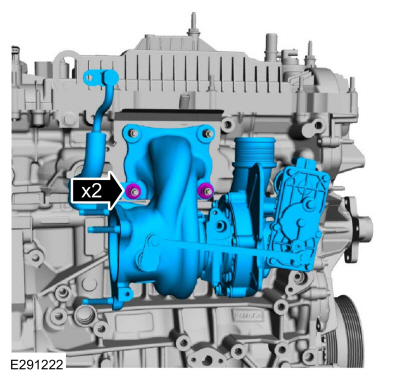
- Install the coolant outlet tube O-ring and lubricate with clean engine oil.
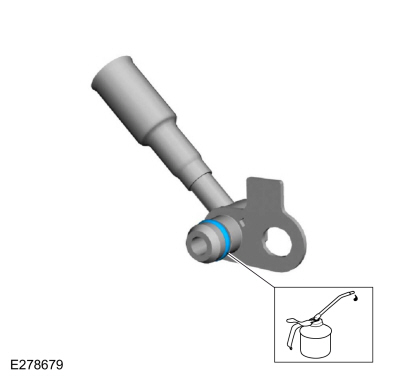
- Install the coolant outlet tube and bolt.
Torque: 35 lb-ft (48 N·m)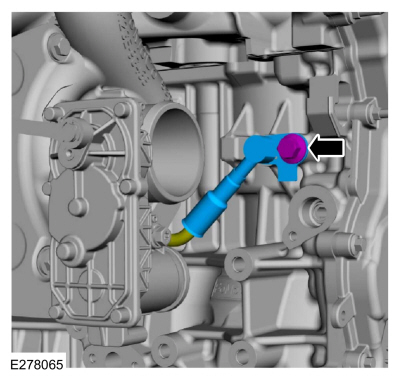
- Install the oil feed filter and O-rings and lubricate the O-rings with clean engine oil.
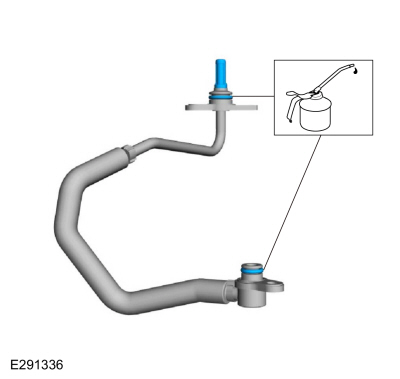
- Install the oil feed tube from the cylinder block to the turbocharger and tighten the bolts.
Torque: 97 lb-in (11 N·m)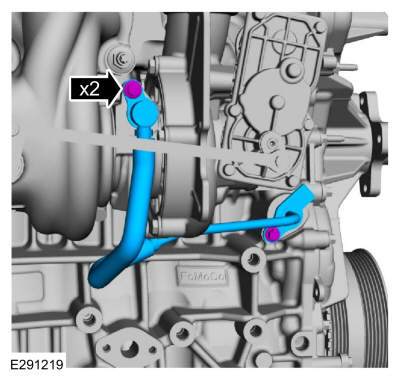
- Install the heat shield, nuts and bolt, hand-tightening them.
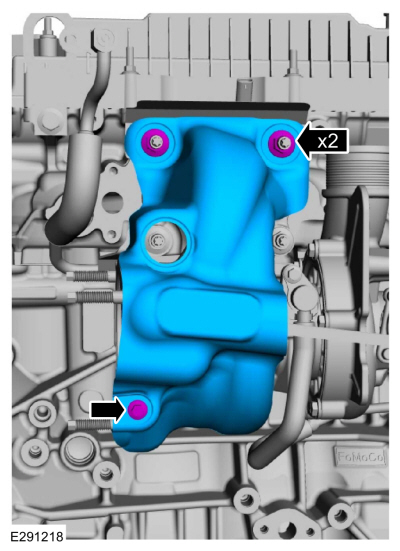
- Tighten.
Torque: 39 lb-ft (53 N·m)
- Tighten.
Torque: 97 lb-in (11 N·m)
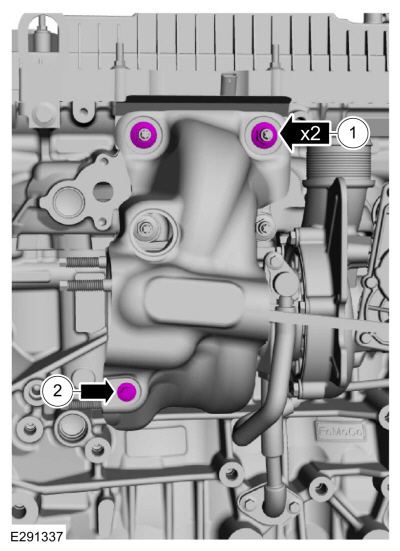
- Tighten.
- Install a new turbocharger O-ring and lubricate it with clean engine oil, then install a new turbocharger gasket.
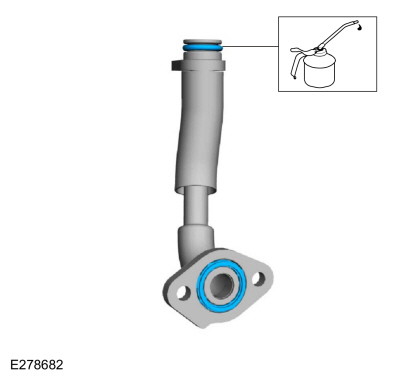
- Install the oil return tube from the turbocharger to the cylinder block and tighten the bolts.
Torque: 97 lb-in (11 N·m)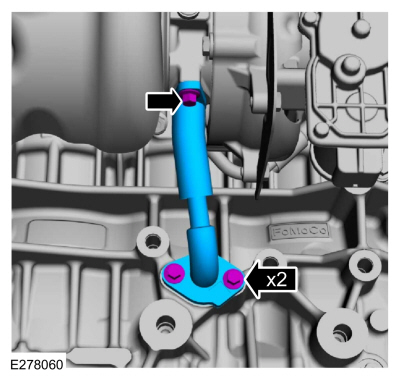
- Install the coolant hose bracket and bolt.
Torque: 97 lb-in (11 N·m)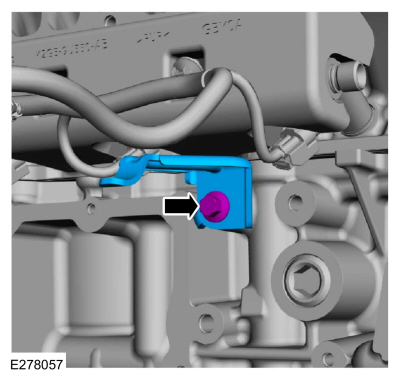
NOTICE: The high-pressure fuel pump tappet cam lobe must be positioned at zero lift before installing the high-pressure fuel pump drive.
Rotate the crankshaft to position the camshaft at zero lift.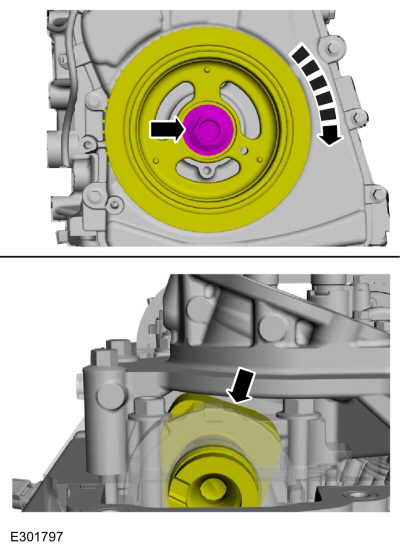
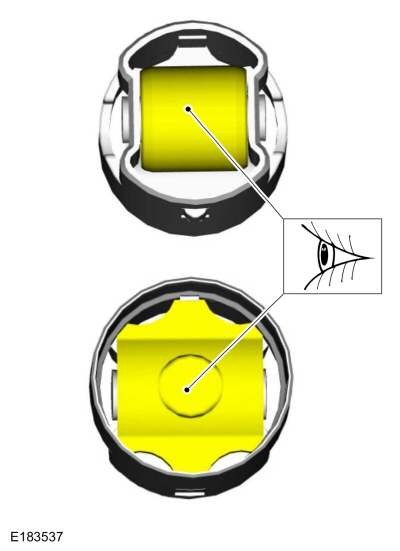
- Inspect the high-pressure fuel pump tappet for flat spots or scoring, especially in the areas indicated. If any damage is found, inspect the high-pressure fuel pump and the high-pressure fuel pump tappet drive cam. Install new components as necessary.
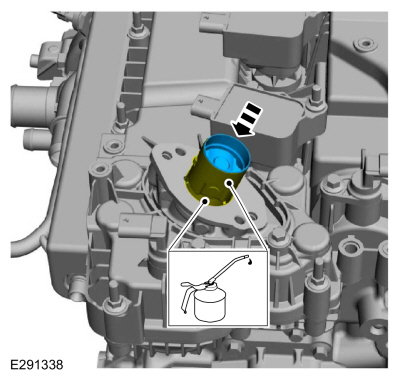
- Lubricate the bore and the high-pressure fuel pump tappet with clean engine oil and install.
- Install a new high-pressure fuel pump O-ring.
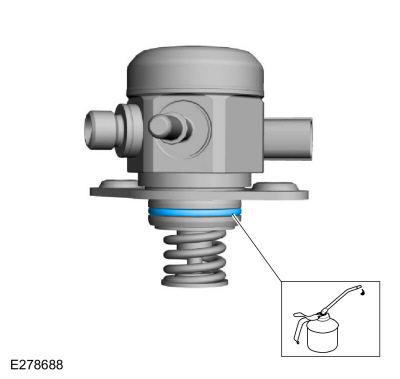
- Install the high-pressure fuel pump, mounting plate and tighten each bolt in sequence, one full turn at a time, until seated in 2 steps.
Torque:
Step 1: 115 lb-in (13 N·m)
Step 2: 45°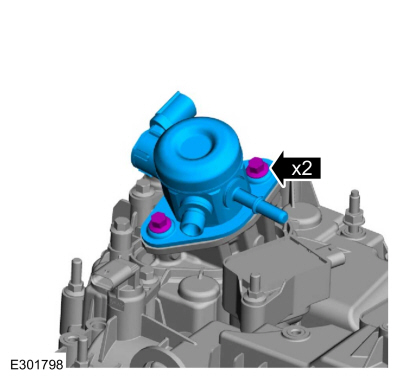
- Install the fuel tube and hand-tighten the bolts.
- Install the flare nuts, tightening them by hand.
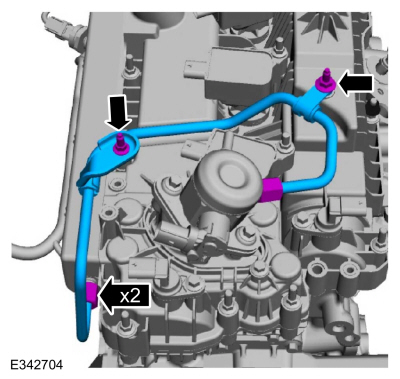
- Tighten the flare nuts in 2 stages.
Torque:
Stage 1: 89 lb-in (10 N·m)
Stage 2: 38°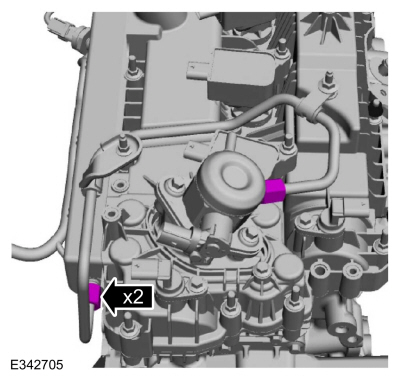
- Tighten the bolts.
Torque: 97 lb-in (11 N·m)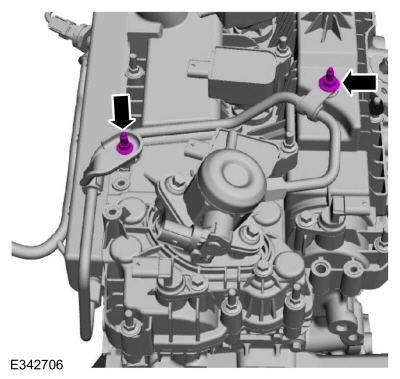
- Install a new coolant pump adapter assembly gasket.
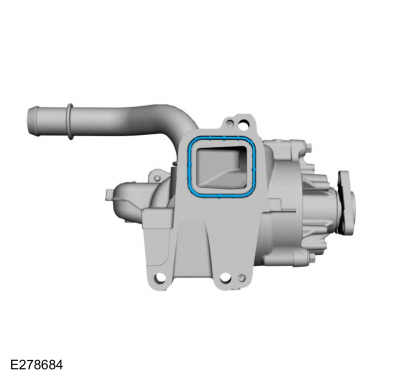
- Install the coolant pump adapter assembly and tighten the bolts.
Torque:
Step 1: 18 lb-ft (25 N·m)
Step 2: 45°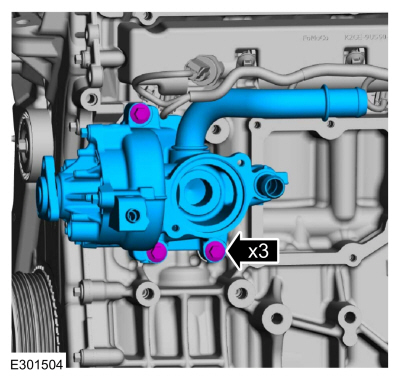
- Inspect and replace the crankcase ventilation separator gasket if damaged.
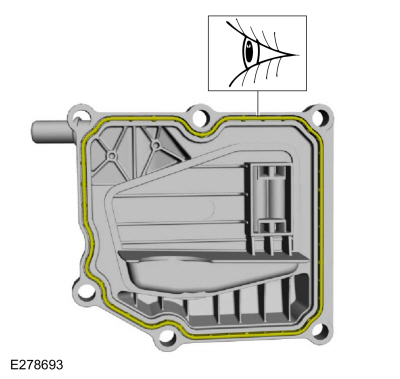
- Install the crankcase ventilation separator and bolts and tighten them in the specified sequence.
Torque: 97 lb-in (11 N·m)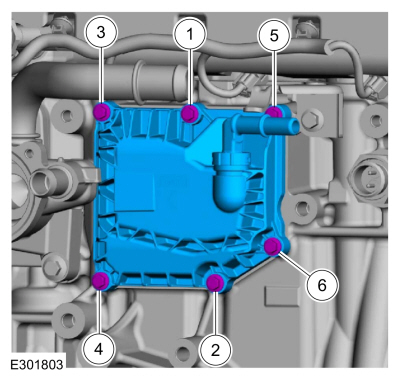
NOTICE: The front camshaft must be positioned at the "5 o'clock" position and the rear camshaft must be positioned at the "3 o'clock" position, as shown in the illustration. Failure to follow these instructions may result in engine damage.
Return the CKP sensor to its original position and install the bolts.
Torque: 18 lb-ft (25 N·m)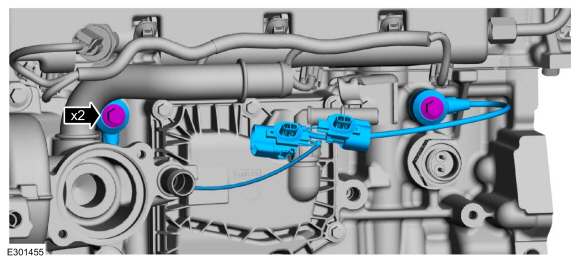
- Connect the crankcase ventilation separator tube.
Refer to: Quick Release Coupling (310-00A Fuel System - General Information - 2.3 L EcoBoost (201 kW/273 L hp), General Procedures).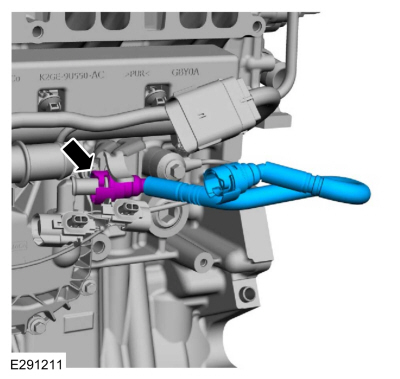
- Install the coolant hose.
Use common equipment: hose clamp removal/installation tool.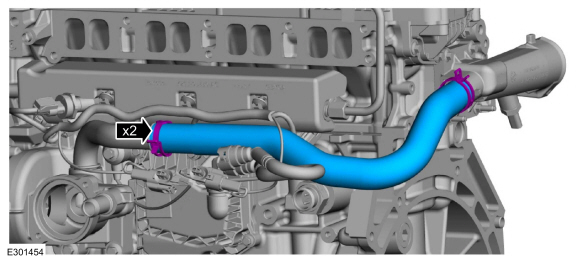
- Install the transmission bolt.
- Install the engine mount stud.
Torque: 35 lb-ft (48 N·m)
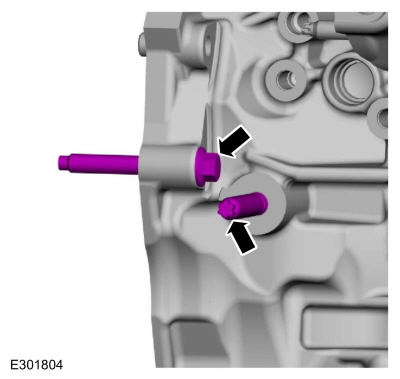
- Inspect the oil filter adapter gasket and replace it if damaged.
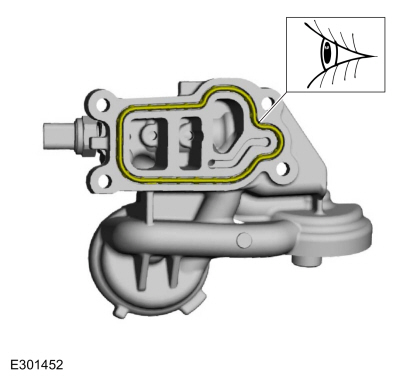
- Install the oil filter adapter assembly and tighten the bolts.
Torque: 18 lb-ft (25 N·m)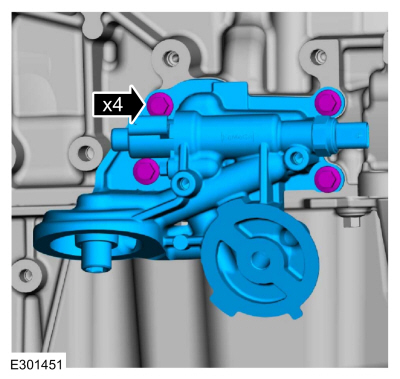
- If equipped, install the oil cooler and bolt.
Torque:
Step 1: 17 lb-ft (22 N·m)
Step 2: 75°
Step 3: Wait 2 s
Step 4: 15°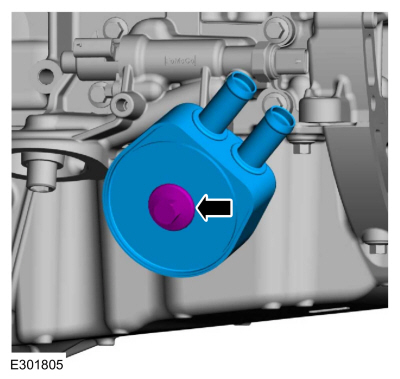
NOTICE: If the engine is being repaired or replaced due to upper engine failure, usually including valve or piston damage, inspect the intake manifold for metal debris. If metal debris is found, install a new intake manifold. Failure to follow these instructions may result in engine damage.
- Visually inspect the intake manifold for metal debris.
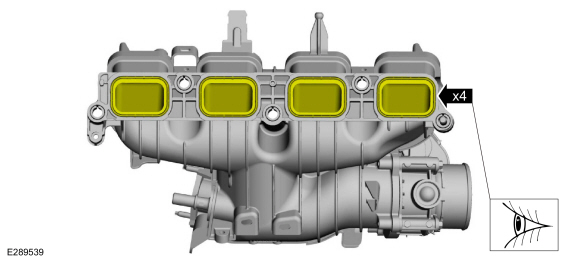
- Visually inspect the intake manifold gaskets for scratches, cuts and abrasions. If these conditions are not present, the gaskets may be reused.
- Clean and inspect all intake manifold sealing surfaces.
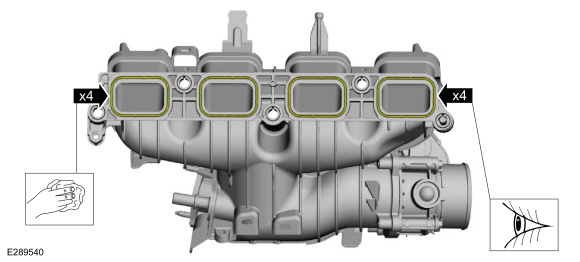
- Install the intake manifold and bolts and tighten them in the specified sequence.
Torque: 18 lb-ft (25 N·m)
- Connect the crankcase ventilation separator tube quick release coupling to the intake manifold.
Refer to: Quick Release Coupling (310-00A Fuel System - General Information - 2.3 L EcoBoost (201 kW/273 L hp), General Procedures).
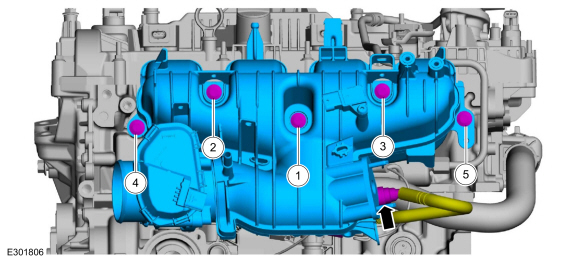
- Install the intake manifold and bolts and tighten them in the specified sequence.
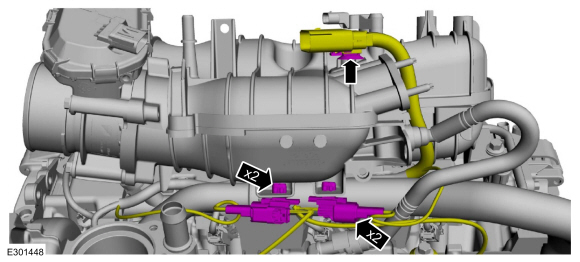
- Connect and secure the CKP sensor electrical connectors.
- Connect the fuel rail harness electrical connector to the intake manifold.
Left Full-Time 4WD
- Install a new front axle seal and lubricate it.
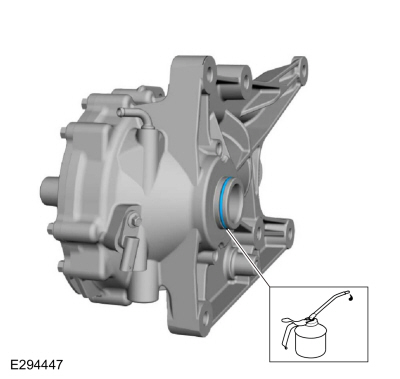
- Install the front axle assembly and bolts.
Torque:
Stage 1: 66 lb-ft (90 N·m)
Stage 2: 90°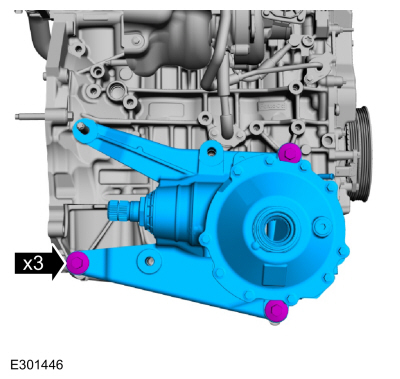
- Install a new axle connector seal and lubricate it.
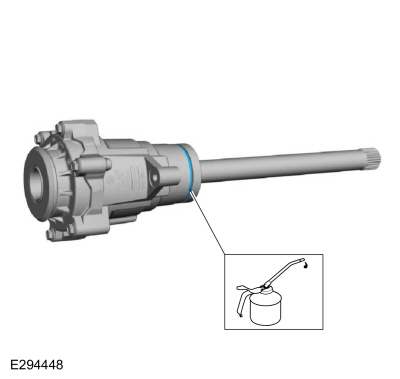
- Install the left axle connector and bolts.
Torque: 26 lb-ft (35 N·m)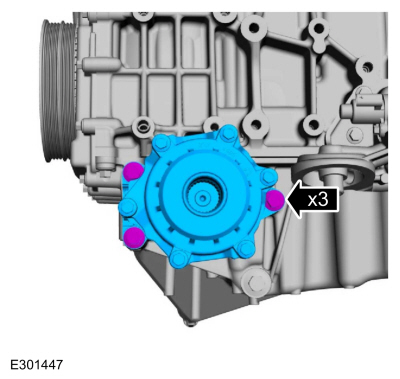
left rear
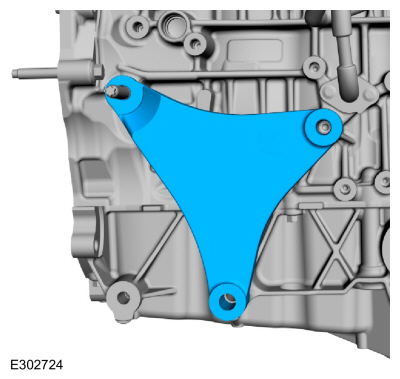
- Install the right engine mount bracket.
 |
Left Full-Time 4WD/Left Rear-Wheel Drive
- Before installation, clean the mating surfaces of the right engine mount bracket and the engine block of dirt or foreign material.
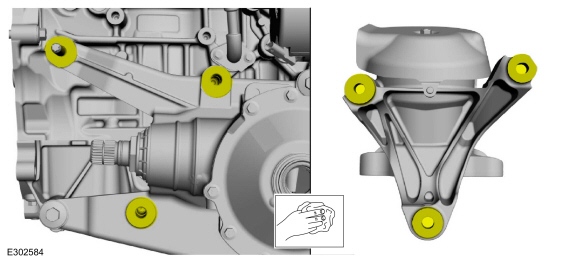
- Install the right engine mount and tighten the new bolts and nuts in the specified sequence.
- Install the air conditioning bracket and bolts.
Torque: 35 lb-ft (48 N·m)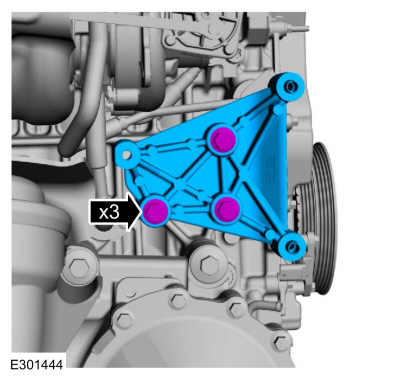
- Install the A/C compressor, bolt and studs.
Torque: 18 lb-ft (25 N·m)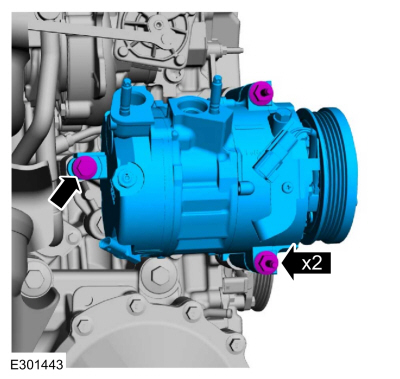
- Install the generator and studs.
Torque: 18 lb-ft (25 N·m)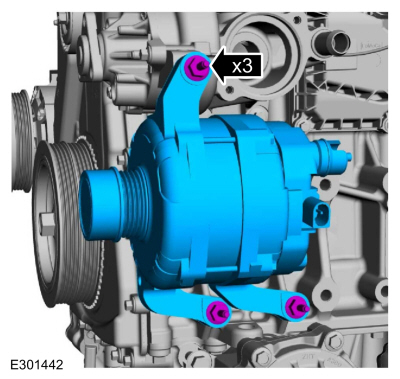
- Install the accessory drive belt tensioner and bolts.
Torque: 18 lb-ft (25 N·m)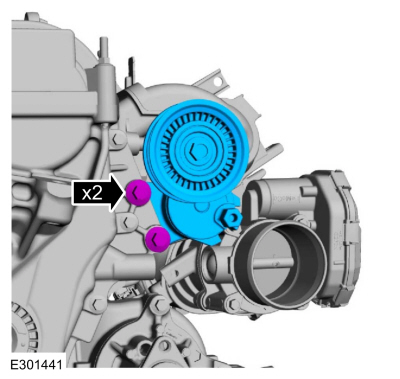
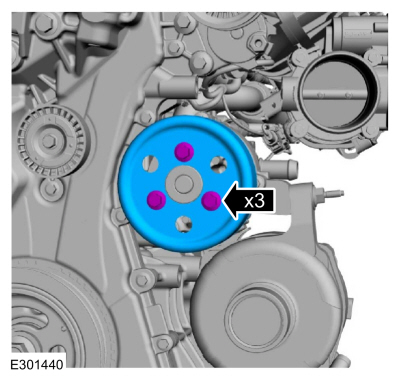
- Install the coolant pump pulley and hand-tighten the bolts.
- Install the air cleaner bracket and bolts.
Torque: 59 lb-ft (80 N·m)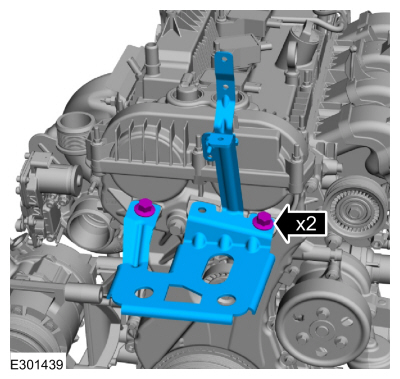
- Install a new EGR tube assembly gasket.
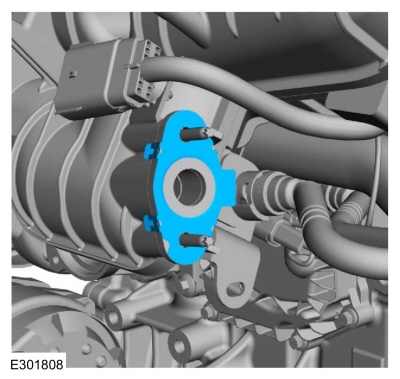
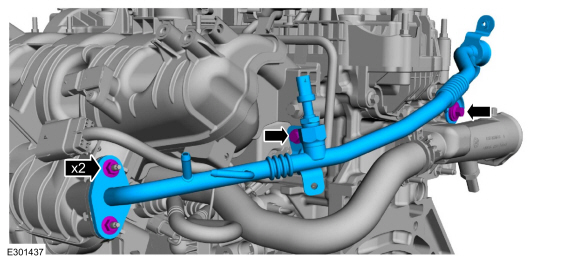
- Install the EGR inlet pipe assembly and hand-tighten the nuts and bolts.
- Install the EGR sensor assembly and bolt.
Torque: 97 lb-in (11 N·m)
- Install the EGR sensor hoses.
Use common equipment: hose clamp removal/installation tool.
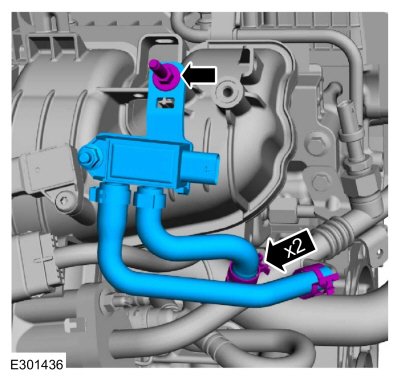
- Install the EGR sensor assembly and bolt.
- Install a new coolant tube O-ring seal and lubricate it with clean engine coolant.
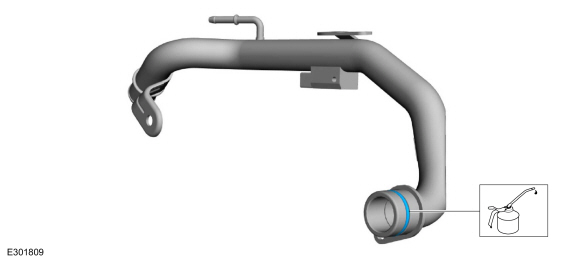
- Install the coolant tube and bolts.
Torque:
Step 1: Tighten bolt 1 to: 35 lb-ft (48 N·m)
Step 2: Tighten bolt 2 to: 97 lb-in (11 N·m)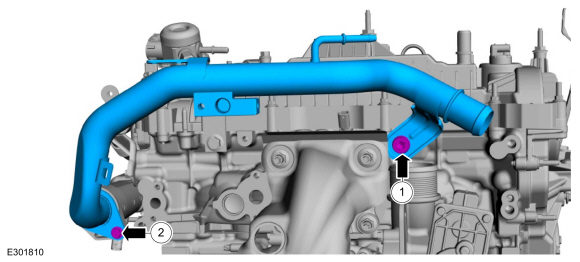
- Install new EGR cooler gaskets.
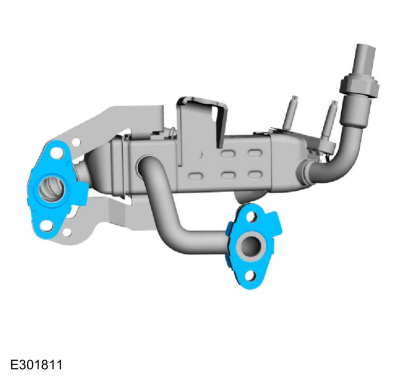
- Install the EGR cooler and hand-tighten the bolts.
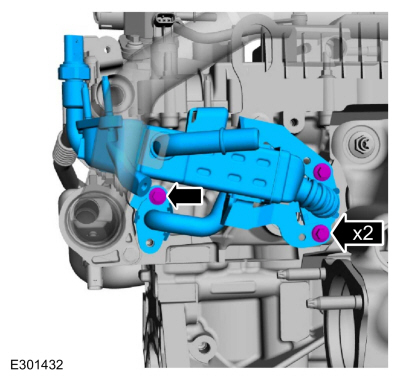
- Install the EGR cooler bracket, hand-tighten the bolt and stud.
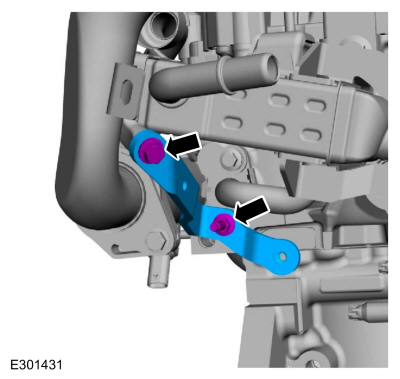
- Install a new EGR valve gasket.
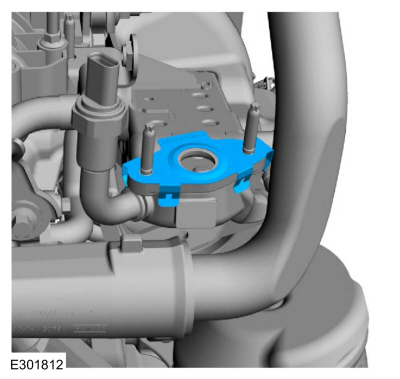
- Install a new EGR valve O-ring and lubricate it with clean engine oil.
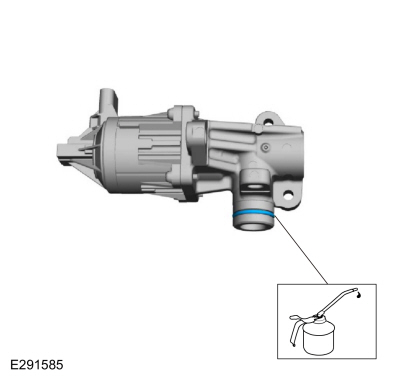
- Install the EGR valve, nuts and bolt, hand-tightening them.
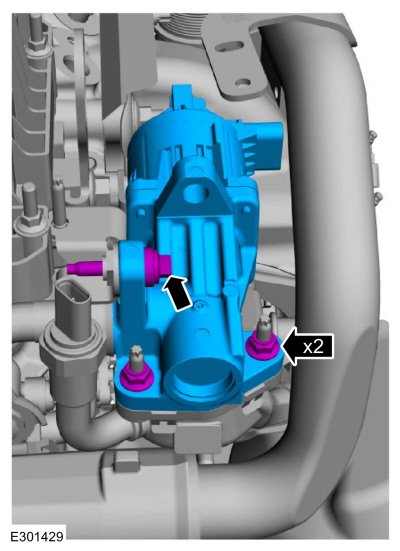
- Lubricate the coolant tube O-ring with clean engine coolant.
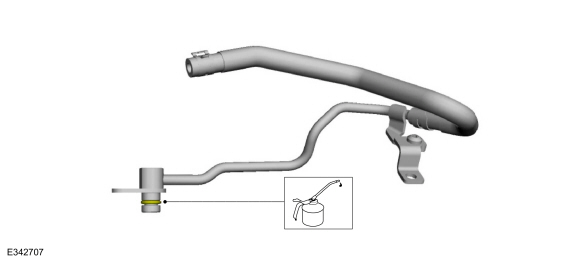
- Install the coolant tube and bolts.
Torque: 97 lb-in (11 N·m)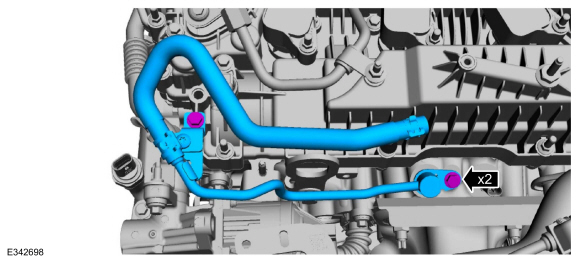
- Install the EGR valve bracket and hand-tighten the nut.
- Hand-tighten the EGR valve bracket mounting bolt.
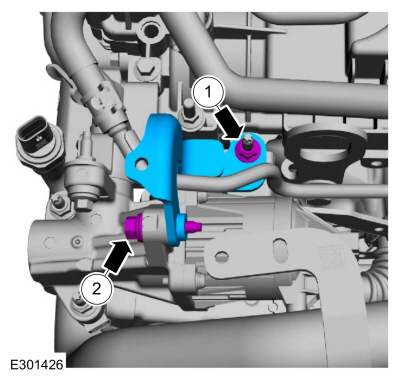
- Tighten the bolts in the specified sequence.
Torque: 97 lb-in (11 N·m)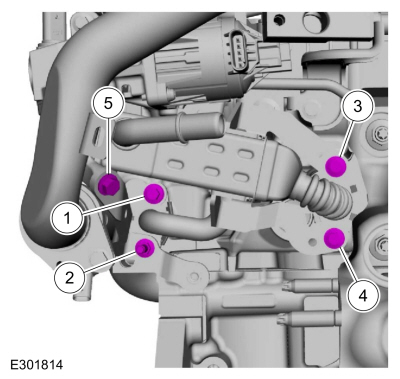
- Tighten the nuts in the specified sequence.
Torque: 97 lb-in (11 N·m)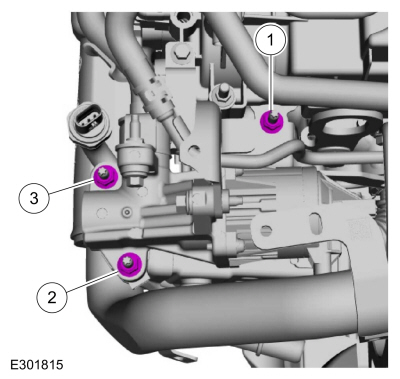
- Tighten the nuts and bolt in the specified sequence.
Torque: 97 lb-in (11 N·m)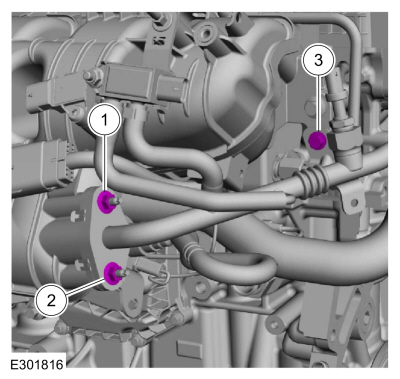
- Tighten the bolts in the specified sequence.
Torque:
Step 1: Tighten bolts 1 and 2 to: 97 lb-in (11 N·m)
Step 2: Tighten bolt 3 to: 18 lb-ft (25 N·m)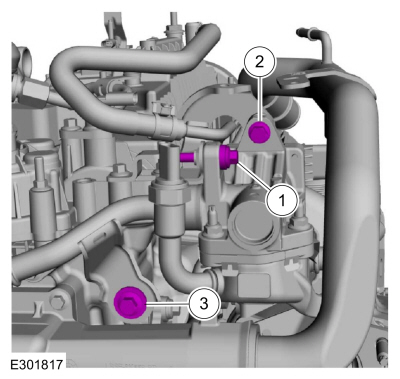
- Install the coolant tube support bracket and bolt.
Torque: 97 lb-in (11 N·m)
- Install the coolant tube support bracket bolt.
Torque: 97 lb-in (11 N·m)
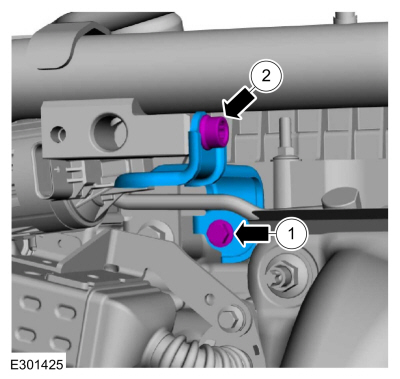
- Install the coolant tube support bracket and bolt.
- Install a new O-ring on the turbocharger coolant tube and lubricate it with clean engine coolant.
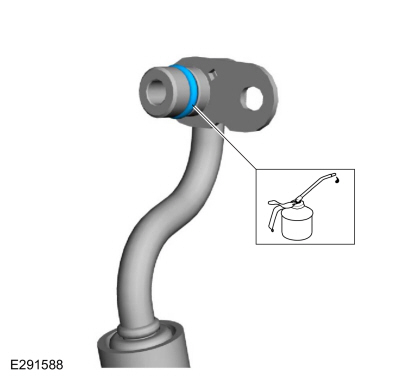
- Position the turbocharger coolant tube and install the bolt.
Torque: 97 lb-in (11 N·m)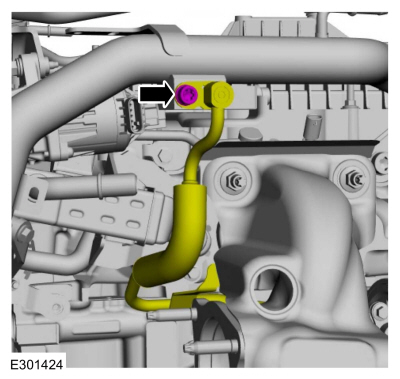
- Install the coolant hose and clamps.
Use common service equipment: hose clamp removal/installation tool.
- Install the coolant hose retainer.
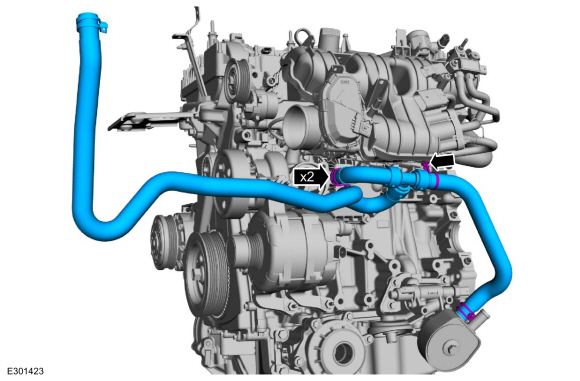
- Install the coolant hose and clamps.
- Install the thermostat housing and bolts.
Torque: 97 lb-in (11 N·m)
- Install the coolant hose retainer and install the nut.
Torque: 80 lb-in (9 N·m)
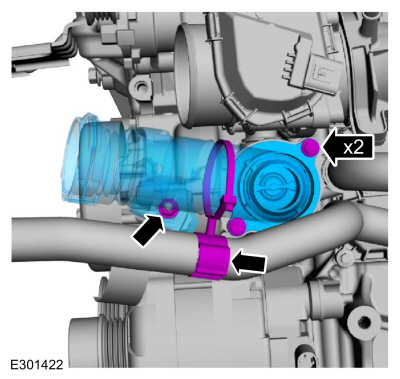
- Install the thermostat housing and bolts.
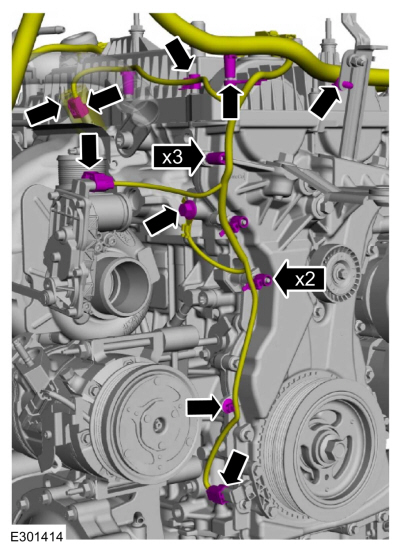
- Install the engine wiring harness and attach the wiring harness clips.
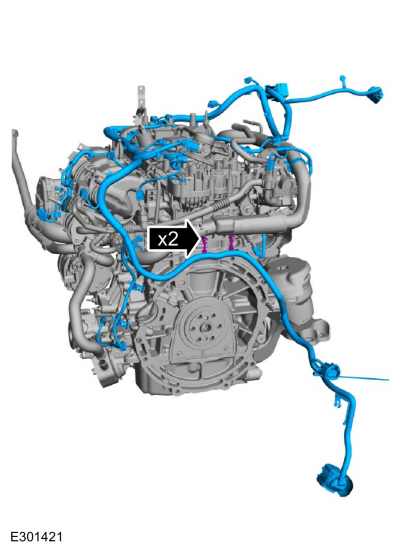
- Attach the wiring harness retainers.
- Connect the wiring harness electrical connectors.
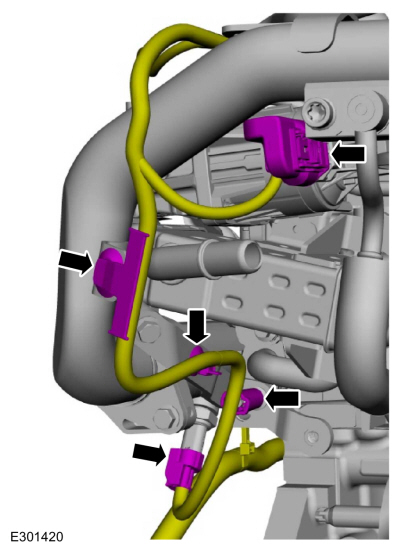
- Attach the wiring harness retainers.
- Connect the wiring harness electrical connectors.
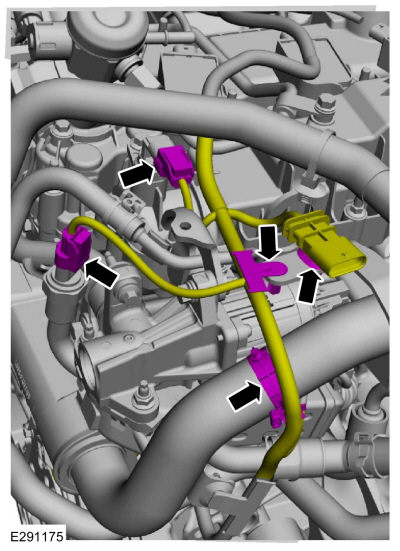
- Attach the wiring harness retainers.
- Connect the wiring harness electrical connectors.
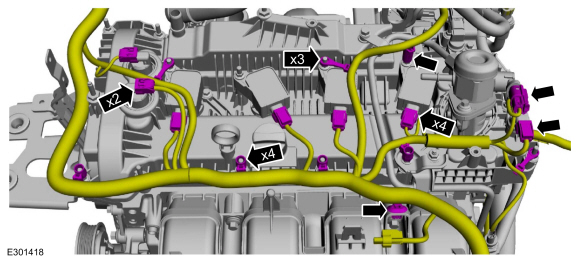
- Attach the wiring harness retainers.
- Connect the wiring harness electrical connectors.
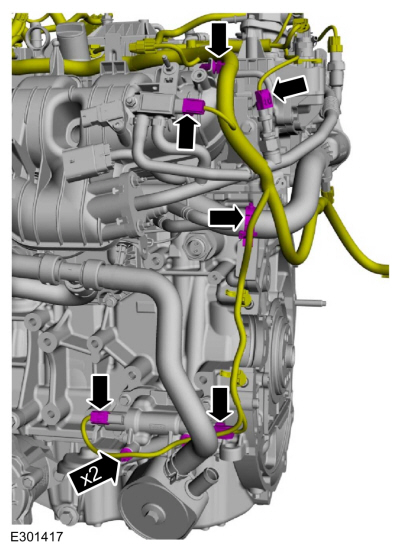
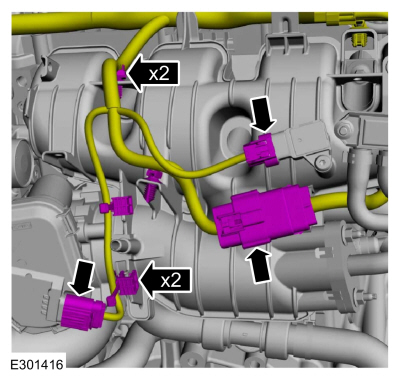
- Attach the wiring harness retainers.
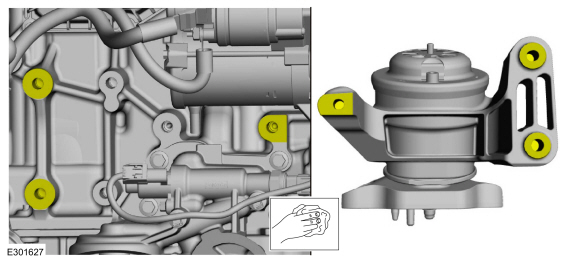
- Connect the wiring harness electrical connectors.
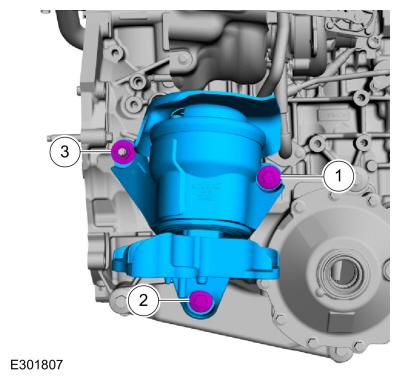
- Before installation, clean the mating surfaces of the left engine mount and the engine block of dirt or foreign material.
- Install the left engine mount and tighten the bolts in the sequence shown.
Torque:
Stage 1: 44 lb-ft (60 N·m)
Stage 2: 90°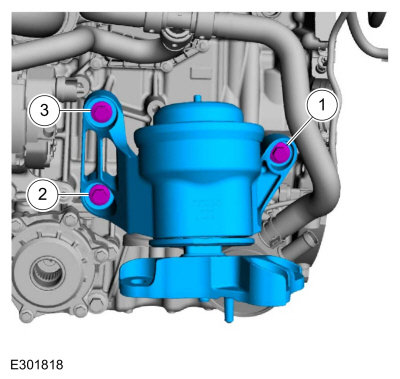
- Attach the wiring harness retainers.
- Connect the wiring harness electrical connectors.
- Install the ground and bolt.
Torque: 177 lb-in (20 N·m)
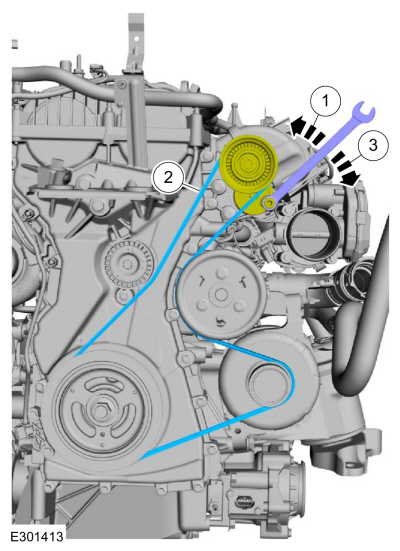
- Install the tool and loosen the accessory drive belt tensioner tension.
- Install the accessory drive belt.
- Release the tool and remove it.
- Tighten the coolant pump pulley bolts.
Torque: 18 lb-ft (25 N·m)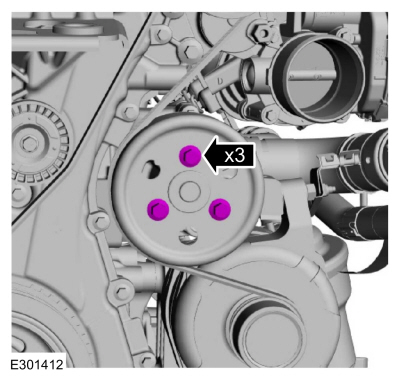
- Position the A/C compressor belt on the compressor pulley and around the Serpentine Belt Installation Tool on the crankshaft pulley. Make sure the belt is engaged with the crankshaft pulley, and rotate the crankshaft clockwise to install the A/C compressor belt.
Use Special Service Tool: 303-1252 Serpentine Belt Removal/Installation Tool.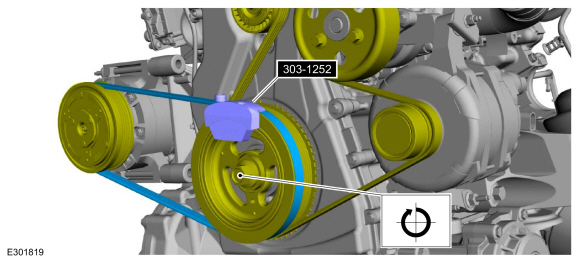
- Install and secure the transmission vent tube.
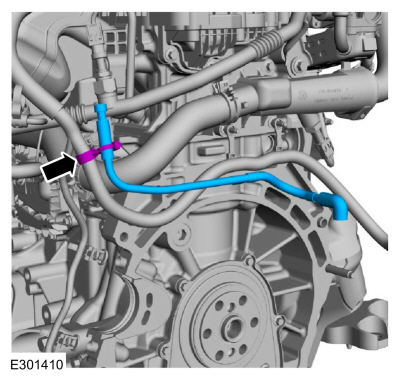
- If equipped, connect the block heater electrical connector and attach the wiring harness clips.
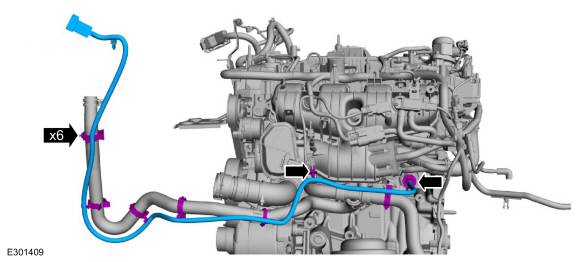
- Using the ground wire bolt, install the special service tool.
Install special service tool: 303-050 (T70P-6000) Engine Lift Bracket.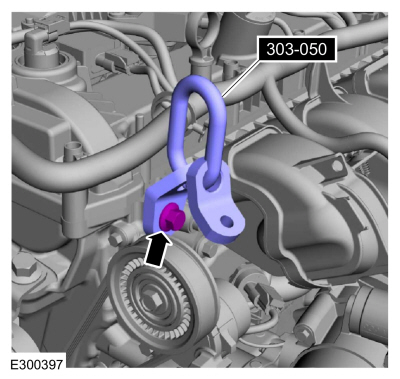
- Install the engine lifting equipment.
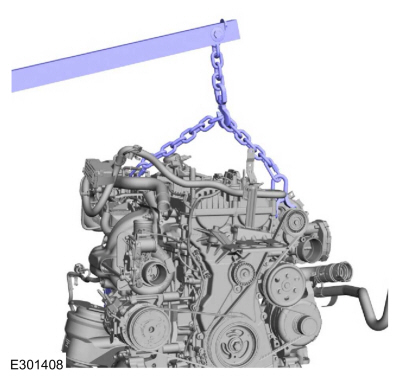
- Remove the engine from the engine stand.
Use common service equipment: Engine Stand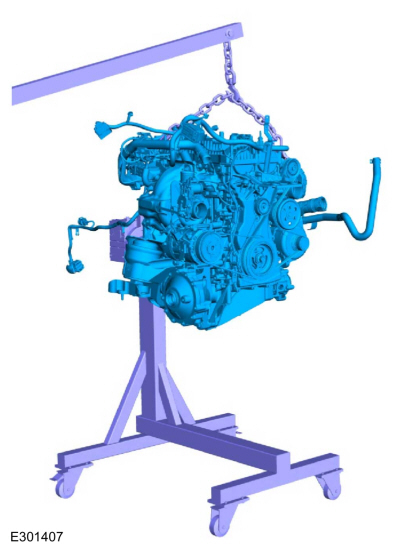
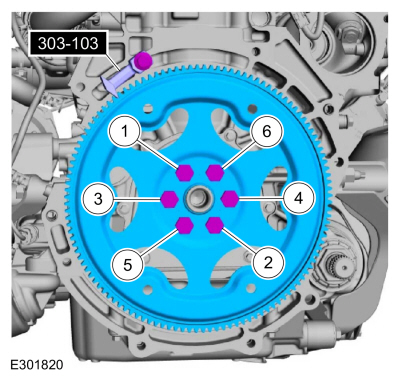
- Install the flexplate and new bolts, hand-tightening them.
Install the Special Service Tool: 303-103 (T74P-6375-A) Holding Tool, Flywheel.
- Tighten the bolts in the sequence shown in 3 stages.
Torque:
Stage 1: 37 lb-ft (50 N·m)
Stage 2: 59 lb-ft (80 N·m)
Stage 3: 83 lb-ft (112 N·m)
Test yourself
A quick Ford Explorer quiz: every answer comes with an explanation and a link to the manual page.