Engine Mechanical System
Cylinder Block Repair Procedures
In this manual: Engine Mechanical System
24steps
~144min
4/5difficulty
Done 0 of 24
Disassembly
|

|
- Remove the engine assembly from the vehicle. (Refer to Engine and Transaxle Assembly - "Engine and Transaxle Assembly")
- Remove the transaxle assembly from the engine assembly. Automatic Transaxle (Refer to Automatic Transaxle System - "Automatic Transaxle")
- Remove the drive plate. (Refer to Cylinder Block - "Drive Plate")
- Remove the rear oil seal. (Refer to Cylinder Block - "Rear Oil Seal")
- Install the engine on an engine stand for disassembly.
- Remove the timing chain. (Refer to Valve Timing System - Timing Chain)
- Remove the water pump assembly. (Refer to Cooling System - "Water Pump")
- Remove the water inlet hose and thermostat assembly. (Refer to Cooling System - "Electric Thermostat (ECT)")
- Remove the intake manifold. (Refer to Intake and Exhaust Systems — Intake Manifold)
- Remove the A/C compressor. (Refer to Heating, Ventilation and Air Conditioning - "Compressor")
- Remove the exhaust manifold. (Refer to Intake and Exhaust System - "Exhaust Manifold")
- Remove the cylinder head assembly. (Refer to Cylinder Head Assembly - "Cylinder Head")
- Remove the oil filter. (Refer to Lubrication System - "Engine Oil")
- Remove the oil screen. (Refer to Lubrication System - "Oil Pan")
- Remove the piston and connecting rod assembly. (Refer to Cylinder Block - Piston and Connecting Rod)
- Remove the crankshaft. (Refer to Cylinder Block - Crankshaft)
- Remove the knock sensor (KS). (Refer to Engine Control/Fuel System - Knock Sensor (KS)).
- Remove the crankshaft position sensor (CKPS). (Refer to Engine Control/Fuel System - Crankshaft Position Sensor (CKPS)).
- Remove the oil pressure switch. (Refer to Lubrication System - Oil Pressure Switch)
Inspection
- Remove the gasket material. Using a gasket scraper, remove all gasket material from the cylinder block upper surface.
- Clean the Cylinder Block. Using a soft brush and solvent, thoroughly clean the cylinder block.
- Inspect the cylinder block upper surface for flatness. Using a precision straightedge and feeler gauge, measure the surface contacting the cylinder head gasket for distortion. Cylinder block gasket surface flatness Standard: Overall less than 0.05 mm (0.0020 in.) Less than 0.02 mm (0.0008 in.) for a 100 mm (3.9370 in.) x 100 mm (3.9370 in.) section
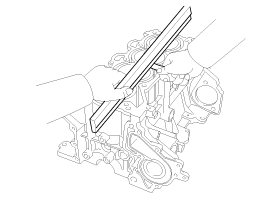
- Inspect the cylinder bore. Visually check the cylinder for vertical scratches. If deep scratches are found, replace the cylinder block.
- Inspect the cylinder bore diameter. Using a cylinder gauge, measure the cylinder bore diameter at the positions in the axial and thrust directions.
Cylinder bore diameter: 81.00 - 81.03 mm (3.1890 - 3.1902 in.)
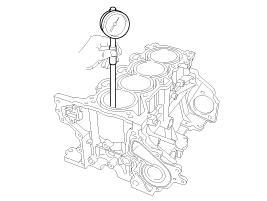

- Measure at the positions (from the top of the cylinder block): 10 mm (0.3937 in.) / 71 mm (2.7953 in.) / 131.5 mm (5.1772 in.)
Installation
- Assemble the remaining components in the reverse order of removal.
|
Test yourself
A quick Hyundai Elantra AD quiz: every answer comes with an explanation and a link to the manual page.
Was this page helpful?