Body Electrical System
Ventilated Seat Repair Procedures
In this manual: Body Electrical System
23steps
~138min
4/5difficulty
Done 0 of 23
Removal
[Front Seat - Seat Ventilation Fan]- Disconnect the battery negative (-) terminal.
- Remove the front seat. (Refer to Body - "Front Seat Assembly")
- Remove the front seat lower cover (A) after loosening the mounting screws.

- Remove the fan (A) after disconnecting the connector and releasing the clip and fastener from the front seat cushion.

- Remove the TED seat cushion (A) after loosening the screws.
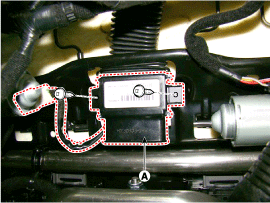
- Remove the front seatback rear panel. (Refer to Body - "Front Seatback".)
- Remove the TED (A) after disconnecting the connector and loosening the screw on the seatback.

- Remove the duct (A) after loosening the screw and removing the clip from the seatback.
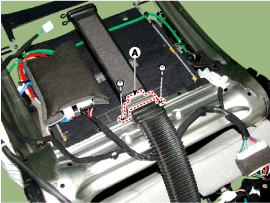
- Remove the TED (A), duct (B), and FAN (C).

- Disconnect the battery negative (-) terminal.
- Remove the front seat. (Refer to Body - "Front Seat Assembly")
- Remove the front seat lower cover (A) after loosening the mounting screws.
- Remove the ventilated seat module (A) after disconnecting the connector and loosening the screws.
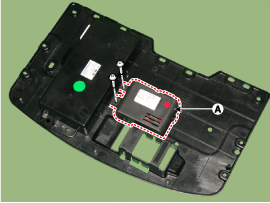
Installation
[Front Seat - Climate Control Seat Ventilation Fan]- Connect the connector, then install the TED and climate control duct on the side of the seatback.
- Install the front seatback.
- Install the blower fan by connecting it to the connector and securing the clip under the front seat cushion.
- Install the TED on the seat cushion.
- Install the front seat cushion.
- Install the front seat.
- Connect the negative (-) battery terminal.
- Install the climate control seat module after connecting the connectors.
- Install the front seat.
- Connect the negative (-) battery terminal.
Inspection
The ventilated seat consists of three parts: the ventilated seat control module, the input switch, and the blower output. How to check- When the indicator lamp flashes to indicate a malfunction, refer to the following table for service. [Front Seat]

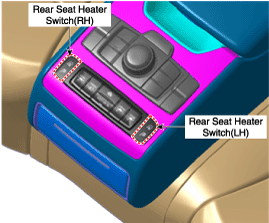


Test yourself
A quick Hyundai Genesis DH quiz: every answer comes with an explanation and a link to the manual page.
Was this page helpful?