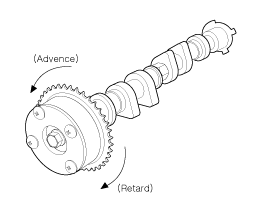
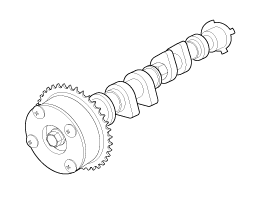
Hold the camshaft in a vise. Be careful not to damage the cam lobes and journals when using the vise.
Make sure the CVVT is locked by rotating it clockwise or counterclockwise. It is normal for the CVVT not to rotate.
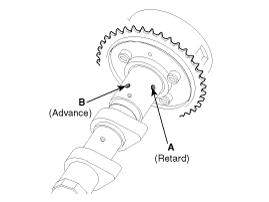
Intake CVVT: Seal one of the two advance holes in the camshaft journal with tape. Exhaust CVVT: Seal one of the two retard holes in the camshaft journal with tape. [Intake][Exhaust]
Intake CVVT: Apply approx. 150 kPa (1.5 kgf/cm², 21 psi) of compressed air to the unsealed supply hole to unlock the lock. Exhaust CVVT: Apply approx. 150 kPa (1.5 kgf/cm², 21 psi) of compressed air to the unsealed retard hole to unlock the lock.
When applying compressed air, cover the oil passages with a cloth to prevent oil from splashing.
Intake CVVT: While applying compressed air, rotate the CVVT in the advance direction (counterclockwise) within its phase range and make sure the CVVT rotates smoothly. Exhaust CVVT: While applying compressed air, rotate the CVVT in the retard direction (clockwise) and make sure the CVVT rotates smoothly. CVVT Phase Range Intake: 25°±0°30' (from most retarded position to most advanced position). Exhaust: 25°±0°30' (from most advanced position to most retarded position).
Intake CVVT: Rotate the CVVT to the most retarded position (clockwise), then make sure the CVVT is locked. Exhaust CVVT: Rotate the CVVT to the most advanced position (counterclockwise), then make sure the CVVT is locked.
Installation
Continuous Variable Valve Timing (CVVT)
Install the Continuous Variable Valve Timing (CVVT) assembly.
Tightening torque: 64.7 – 76 N·m
Install the CVVT assembly locating pin into the intake camshaft. Then be careful not to install the pin into the lubrication hole.
While holding the hexagonal part of the camshaft in a vise, install the bolt and the CVVT assembly.
After connecting the CVVT locating pin to the camshaft or tightening the CVVT bolt, rotate the CVVT assembly housing counterclockwise by hand to set the CVVT assembly locating pin in the correct position.
After connecting the CVVT assembly to the camshaft, make sure that the camshaft does not move when no restraining force is applied to the CVVT assembly housing or sprocket.
After connecting the CVVT assembly to the camshaft, make sure the CVVT assembly is not press-fitted too tightly.
Do not rotate the CVVT assembly when the camshaft is installed on the CVVT assembly locating pin.
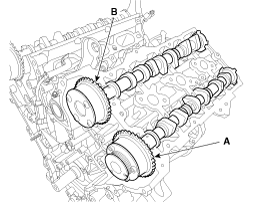
A.
A: Left Exhaust CVVT
B.
B: Left Intake CVVT
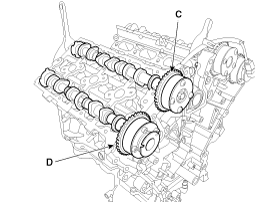
C.
C: Right Intake CVVT
D.
D: Right Exhaust CVVT
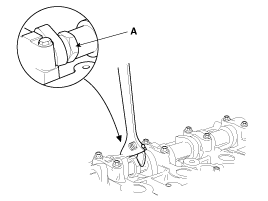
When installing the CVVT assembly bolt, do not allow the camshaft to rotate with a wrench at position (A).
Install the timing chain. (Refer to Timing System - Timing Chain)
?
Test yourself
A quick Hyundai Genesis DH quiz: every answer comes with an explanation and a link to the manual page.