Heating, Ventilation, and Air Conditioning
Receiver-Drier Repair Procedures
In this manual: Heating, Ventilation, and Air Conditioning
6steps
~36min
2/5difficulty
Done 0 of 6
Replacement
- Remove the condenser.
- Remove the cap (B) at the bottom of the condenser using an L-shaped wrench (A).
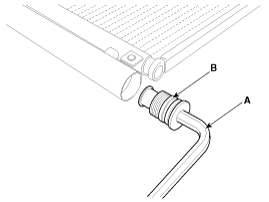
Tightening torque: 9.81 ~ 14.7 N·m
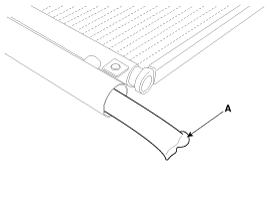
- Remove the receiver-drier (A) from the condenser using long-nose pliers. Check whether the receiver-drier is crumbled and whether the lower cap filter is clogged.
- Apply compressor oil along the O-rings and threads of the new lower cap.
- Insert the new receiver-drier into the receiver-drier tank. The receiver-drier must be sealed in vacuum before exposure to air for use.
- Install the new lower cap on the condenser.

- Always replace the receiver-drier and lower cap at the same time.
- Replace the O-rings with new ones at each fitting and apply a thin coat of refrigerant oil before installation. Be sure to use the correct O-rings for R-134a to prevent leakage.
- Be careful not to damage the radiator and condenser fins when installing the condenser.
- Charge the system and check that it operates properly.
Test yourself
A quick Hyundai Genesis DH quiz: every answer comes with an explanation and a link to the manual page.
Was this page helpful?