Tire Replacement
1. Park on a level surface and firmly apply the parking brake.
2. Place the shift lever in R (Reverse) for a manual transmission, or P (Park) for an automatic transmission.
3. Turn on the hazard warning lights.
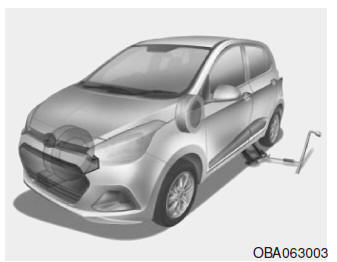
4. Remove the key for the wheel bolts, the jack, the jack handle and the spare tire from the vehicle.
5. Chock the front and rear of the wheel diagonally opposite the jack position.
WARNING - Tire Replacement - To prevent the vehicle from moving while changing a tire, always fully apply the parking brake and always chock the wheel diagonally opposite the wheel being replaced. - It is recommended to chock the vehicle's wheels and that no one remains in a vehicle raised with a jack.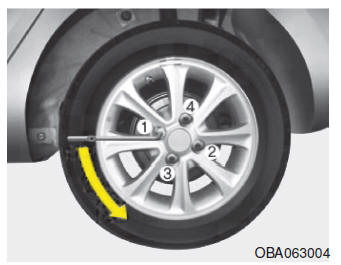
6. Loosen the bolts counterclockwise by one turn each, but do not remove any of them until the wheel has been lifted off the ground.
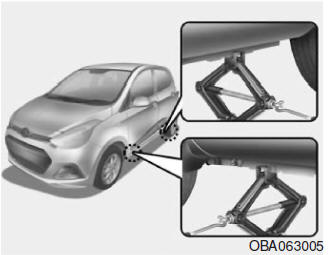
7. Position the jack at the front or rear jacking point nearest to the wheel to be replaced. Place it at the designated points under the body frame. These points are indicated by welded plates on the frame with two tabs and a raised point to align with the jack.
WARNING - Jack Positioning - To reduce the possibility of injury, make sure to use only the jack supplied with the vehicle and position it correctly. Never use another vehicle part as a jacking support.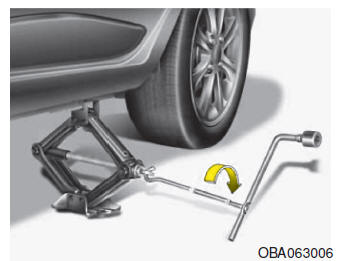
8. Insert the jack handle into the jack and turn it clockwise, raising the vehicle until the wheel is off the ground. This distance is approximately 30 mm. Before removing the bolts, make sure the vehicle is stable and that there is no risk of movement or slipping.
9. Loosen the bolts and remove them by hand. Remove the wheel from the studs and place it flat so that it cannot roll away. To install the wheel on the hub, lift it, align the holes with the studs and slide the wheel on. If this is difficult, tilt the wheel slightly so that the upper hole of the wheel is aligned with the upper stud. Then rock the wheel back and forth until it can be slid over the other studs.
WARNING - Wheels and wheel covers may have sharp edges. Handle them with care to avoid possible injury. - Before mounting the wheel, make sure there is nothing on the hub or wheel (such as mud, tar, gravel, etc.) that could interfere with proper installation of the wheel on the hub. If present, remove this material. If there is not sufficient contact at the mounting surface between the wheel and the hub, the bolts may loosen and cause a wheel to come off. Losing a wheel may cause loss of vehicle control, which may result in serious injury or death.10. To reinstall the wheel, hold it on the studs, place the bolts on the studs and tighten them firmly by hand.
Rock the wheel to make sure it is fully seated, then tighten the bolts by hand again as far as possible.
11. Lower the vehicle by turning the handle counterclockwise.
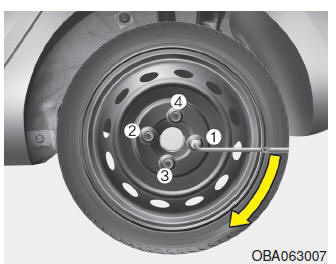
Then position the wrench as shown in the figure and tighten the bolts.
Make sure the wrench head is fully engaged with the bolt. Do not stand on the jack handle or use an extension on the handle.
Tighten the remaining bolts in turn until all are securely tightened. Check the tightness of each bolt again.
After replacing the wheel, it is recommended that the system be checked by an authorized HYUNDAI dealer.
Wheel bolt tightening torque:
Steel and aluminum alloy wheels: 9~11 kg.m (65~79 lb.ft)
If you have a pressure gauge, remove the cap and check the tire pressure. If it is lower than recommended, drive slowly to the nearest service station and inflate to the correct value. If it is too high, adjust to the correct value. Always reinstall the valve cap after checking or adjusting the tire pressure. If the cap is not replaced, air may leak from the tire.
If the valve cap is lost, buy a new one and install it as soon as possible.
After replacing the tire, always stow the flat tire correctly and put the jack and other tools back in their place.
NOTICE The vehicle has metric threads on the wheel studs and bolts. When removing the wheels, make sure to use the same bolts that were removed or installed or, if replaced, bolts with the same metric threads and groove configuration. Installing a non-metric bolt on a metric stud, or vice versa, will not properly secure the wheel to the hub and will damage the stud, requiring its replacement. Note that most bolts are not metric. Use extreme caution when checking the thread type before installing aftermarket bolts or wheels. If in doubt, it is recommended to consult an authorized HYUNDAI dealer. WARNING - Wheel Studs If the studs are damaged, they may lose their ability to retain the wheel. This may lead to loss of wheel control and a collision that may result in serious injury.To prevent the jack, jack handle, wheel wrench and spare wheel from rattling while the vehicle is moving, stow them correctly.
WARNING - Incorrect spare tire pressure. Check the inflation pressure as soon as possible after installing the spare tire. Adjust it to the specified pressure if necessary. Refer to "Wheels and Tires" in section 8.Important: Using the compact spare wheel (if equipped)
The vehicle is equipped with a spare wheel. This spare wheel takes up less space than a standard-size wheel. It is smaller than a normal wheel and is designed for temporary use only.
NOTICE - Drive with caution when using the temporary spare tire. The temporary spare tire must be replaced with a conventional wheel and tire at the first opportunity. - It is not recommended to use this vehicle with more than one temporary spare tire at the same time. WARNING: The temporary spare tire is for emergency use only. Do not drive the vehicle with the temporary spare tire at speeds above 80 km/h. The original wheel must be repaired or replaced as soon as possible to avoid failure of the temporary spare tire, which may result in injury or death.The compact spare wheel must be inflated to 420 kPa (60 psi).
NOTE
Check the inflation pressure after installing the spare wheel.
Adjust to the specified pressure if necessary.
When using a compact spare wheel, observe the following precautions:
- Under no circumstances must 80 km/h be exceeded; higher speed may damage it.
- Make sure to drive appropriately according to road conditions to avoid any danger.
Road hazards such as potholes or debris can seriously damage the compact spare wheel.
- Continued use of the compact spare wheel may cause it to fail, loss of vehicle control and possible personal injury.
- Do not exceed the vehicle's load limit or the load capacity shown on the side surface of the compact spare wheel.
- Avoid driving over obstacles. The diameter of the compact spare wheel is smaller than that of a conventional tyre and reduces ground clearance by approximately 25 mm, which may result in damage to the vehicle.
- Do not take the vehicle through an automatic car wash while the compact spare wheel is in use.
- Do not use snow chains with the compact spare wheel.
Due to its smaller size, the chains will not fit properly.
This may damage the vehicle and cause the chain to come loose.
- The compact spare wheel must not be fitted to the front axle if the vehicle is to be driven on snow or ice.
- Do not use the compact spare wheel on other vehicles, as it has been designed specifically for this vehicle.
- The tread life of the compact spare wheel is shorter than that of a normal wheel.
Inspect the compact spare wheel regularly and replace it if worn with a compact spare wheel of the same size and design, fitted to the same wheel.
- The compact spare wheel must not be used on other wheels, nor should standard wheels, snow wheels, wheel covers or wheel trim rings be used with the compact spare wheel. If such use is attempted, damage to these items or to other vehicle components may occur.
- Do not use more than one compact spare wheel at a time.
- Do not tow a trailer with the compact spare wheel fitted.
Test yourself
A quick Hyundai i10 quiz: every answer comes with an explanation and a link to the manual page.