Braking System
Repair Procedures
In this manual: Braking System
17steps
~102min
4/5difficulty
Done 0 of 17
Inspection
The AEB ON/OFF switch is set in the USM (user setting menu); the factory default is ON. If ALL ON is selected, the ON state is kept as the default and does not reflect driver settings until the next ALL ON. If the ESC function is turned off, the AEB function is deactivated.- The AEB ON/OFF setting is in USM (User Setting Menu) and is enabled by default.
- When ALL is activated, activation remains, however driver settings will not be saved the next time ALL is activated.
- When VDC is turned off, AEB is also turned off.
DEPOSIT
- Turn the ignition switch to the OFF position and disconnect the (-) battery cable.
- Remove the front bumper cover (Body - Refer to "Front Bumper").
- Disconnect the AEB radar connector.
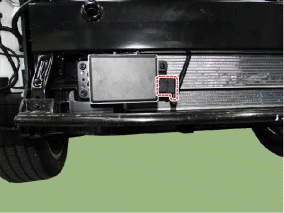
- Remove the AEB radar.
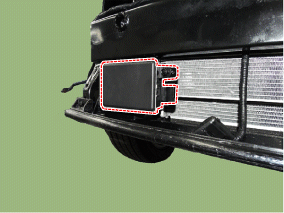
- Disconnect the (-) battery cable.
- Remove the camera. (Refer to Body Electrical System - "Lane Departure Warning System (LDWS)")
REMEDY
AEB Radar- To install, perform the removal procedure in reverse order.
- Perform AEB variant coding.
- Perform AEB radar adjustment.
- To install, perform the removal procedure in reverse order.
- Perform Service Point Target Automatic Calibration (SPTAC). (Refer to Body Electrical System - "Lane Departure Warning System (LDWS)")
Adjust the alignment.
Performing AEB Radar Alignment- Install the radar after removal.
- Install a new part.
- When the sensor or its surrounding area is subjected to a strong impact after a minor collision.
- When detection of the vehicle ahead is not possible while driving.
- Replacing or resetting the steering angle sensor (SAS).
| No. | Procedure | Description |
| 1 | Sensor Installation | • Install the radar sensor in the correct position on the vehicle bumper. (Check the bracket and radar for damage.) |
| 2 | Keep the vehicle stationary. | • Place the vehicle on a lift or on level ground so that it is horizontal relative to the ground. |
| 3 | Vehicle Operation | • Make sure the vehicle interior is empty. (including the luggage compartment). |
| • Check that the front of the radar is clean. | ||
| • Check the suspension and the permissible tire pressure. | ||
| • Check that the radar sensor is installed and connected correctly. | ||
| 4 | Vertical Angle Calibration (with Level Gauge) | • Use a digital inclinometer to measure the alignment. If necessary, adjust the screw to calibrate the angle. (Vertical angle tolerance: ±1.5° or less.) |
| 5 | Horizontal Angle Calibration (Driving) | 1) Turn on the power. (The red light should be on.) |
| 2) Use the GDS diagnostic equipment and start the adjustment. | ||
| 3) After starting, drive the vehicle at a speed of 50 km/h or higher for five minutes. | ||
| 4) If the alignment is completed while driving, the warning lamp on the instrument cluster will go off. | ||
| 6 | Check whether the alignment is complete. | • Alignment is completed by automatic horizontal alignment. (If the warning lamp comes on after alignment is complete, check the bracket and vehicle body for damage.) |
Radar Sensor Adjustment
[Vertical Calibration]
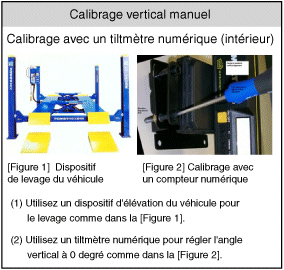
[Horizontal Calibration]
- For horizontal sensor alignment, go to GDS and select AEB with the vehicle power on.
- Select AEB calibration.
- Select C2.
- Before driving, perform driving mode sensor alignment. Check that the red indicator on the console is on.
- When sensor alignment is complete, the warning lamp on the console turns off.
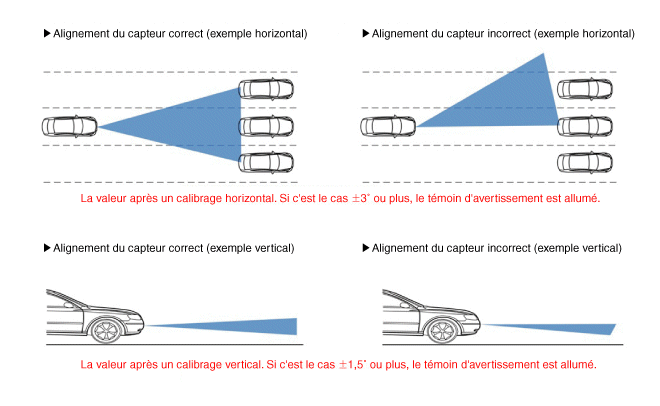
- Check whether the alignment is complete.
Test yourself
A quick Hyundai Tucson quiz: every answer comes with an explanation and a link to the manual page.
Was this page helpful?