Closing the Fuel Filler Door
1. To install the cap, turn it clockwise until it clicks once. This indicates that the cap is securely tightened.
2. Close the fuel filler door and press lightly to make sure it is securely closed.
✽ NOTICE
A intermittent noise may be heard near the fuel filler neck while the engine is idling if the fuel filler cap is not securely closed. This is normally related to the OBD system.
✽ NOTICE
When refueling on an uneven surface, the fuel level gauge may not indicate the F position.
This is not a malfunction. If you drive the vehicle on a level surface, the fuel sender will move to the full position.
Releasing the Emergency Fuel Filler Door
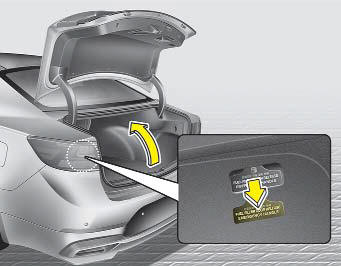
If the fuel filler door does not open using the fuel filler door opener button, you can open it manually. Remove the panel in the cargo area. Gently pull the handle.
CAUTION
Do not pull the handle too hard, otherwise the cargo area trim or the release handle may be damaged.
WARNING - Refueling
Always remove the fuel cap carefully and slowly. If the cap hisses or you hear a hissing sound, wait until the hissing stops before removing the cap completely. If pressurized fuel sprays out, it may cover your clothing or skin and expose you to the risk of fire and burns.
Always make sure the fuel cap is installed securely to prevent fuel spillage in the event of an accident.
✽ NOTICE
Tighten the cap until it clicks once, otherwise the fuel filler cap warning indicator  will illuminate.
WARNING - Fire/Explosion Risk
Read and follow all warnings posted at the fuel station. Failure to follow all warnings may result in serious personal injury, severe burns, or death from fire or explosion.
WARNING! Static Electricity
- Before touching the fuel nozzle, you must discharge any potentially dangerous static electricity by touching another metal part of the vehicle, at a safe distance from the fuel filler neck, nozzle, or other source of gasoline vapor.
- Do not re-enter the vehicle once you have started refueling, as you may generate static electricity by touching, rubbing, or sliding over any object or fabric (polyester, satin, nylon, etc.) capable of generating static electricity. A static discharge may ignite fuel vapors, resulting in a rapid fire. If you must re-enter the vehicle, you must first discharge the potentially dangerous static electricity by touching a metal part of the vehicle away from the fuel filler neck, nozzle, or other source of gasoline.
WARNING - Portable Fuel Container
When using an approved portable fuel container, always place the container on the ground before refueling. A static electricity discharge from the container may ignite fuel vapors and cause a fire. Do not make contact with the vehicle while refueling is in progress. Use only approved portable plastic fuel containers designed to transport and store gasoline.
WARNING - Mobile Phone Fire
Do not use mobile phones while refueling. Electrical current and/or electronic interference from mobile phones can potentially ignite fuel vapors and cause a fire.
WARNING - Smoking
DO NOT use matches or a lighter, DO NOT SMOKE, and do not leave a lit cigarette in the vehicle while at a service station, especially during refueling. Automotive fuel is highly flammable and may ignite, resulting in a fire.
WARNING! Refueling and Vehicle Fires
Always turn the engine off when refueling. Sparks produced by electrical components connected to the engine may ignite fuel vapors and cause a fire. Once refueling is complete, make sure the fuel filler cap and fuel filler door are securely closed before starting the engine.
Be sure to refuel your vehicle in accordance with the "Fuel Requirements" recommended in Chapter 1.
If the fuel filler cap needs to be replaced, use only genuine Kia caps or an equivalent specified for your vehicle. An incorrect fuel filler cap may cause a serious malfunction of the fuel system or emission control system.
CAUTION - Exterior Paint
Do not spill fuel on the exterior surfaces of the vehicle. Any type of fuel spilled on painted surfaces may damage the paint.
Test yourself
A quick Kia Cadenza VG Owner's Manual quiz: every answer comes with an explanation and a link to the manual page.