Piston and Connecting Rod Repair procedures
Disassembly
Shut off the high voltage circuit.
(Refer to Engine Mechanical System - “High Voltage Shut off Procedure”)
Remove the engine assembly from the vehicle.
(Refer to Engine and Transaxle Assembly - “Engine and Transaxle Assembly”)
Remove the dual clutch transmission.
(Refer to Dual Clutch Transmission (DCT) - "Dual Clutch Transmission Assembly")
Install the engine to engine stand for disassembly.
Remove the intake manifold.
(Refer to Intake and Exhaust System - "Intake Manifold")
Remove the exhaust manifold.
(Refer to Intake and Exhaust System - "Exhaust Manifold")
Remove the hybrid starter generator (HSG).
(Refer to Hybrid Motor System (HSG) - "Hybrid Starter Generator (HSG)")
Remove the timing chain.
(Refer to Timing System - “Timing Chain”)
Remove the Cylinder head assembly.
(Refer to Cylinder Head Assembly - "Cylinder Head")
Remove the Fly Wheel.
(Refer to Cylinder Block - "Fly Wheel")
Remove the thermostat.
(Refer to Cooling System - "Thermostat")
Remove the water pump assembly.
(Refer to Cooling System - " Water Pump")
Remove the A/C compressor.
(Refer to Heating, Ventilation Air conditioning -"Compressor")
Remove the oil filter.
(Refer to Lubrication System - "Engine Oil")
Remove the oil screen.
(Refer to Lubrication System - "Oil Pan")
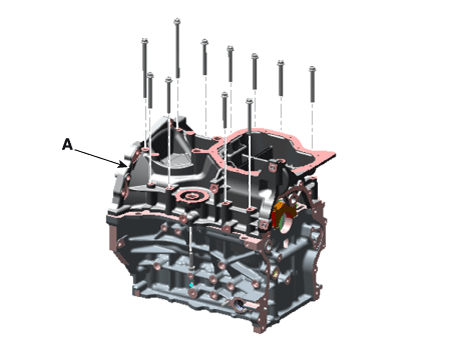
Remove the ladder frame mounting bolt.
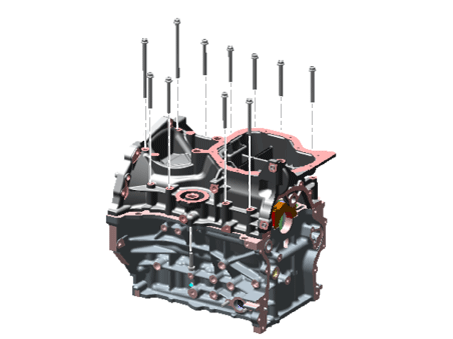
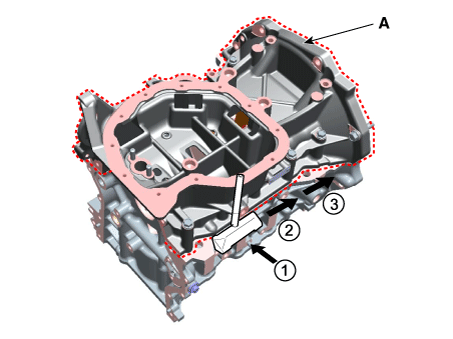
Using the SST (09215-3C000) and remove the ladder frame (A).
Check the connecting rod side clearance.
Check the connecting rod bearing cap oil clearance.
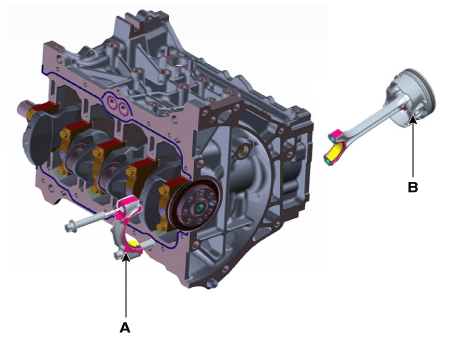
Remove the piston and connecting rod assembly.
Using a ridge reamer, remove all the carbon from the top of the cylinder.
Remove the connecting rod bearing caps (A).
Push the piston and connecting rod assembly (B) with upper bearing through the top of the cylinder block.
Check fit between piston and piston pin.
Try to move the piston back and forth on the piston pin. If any movement is felt, replace the piston and pin as a set.
Disassemble the piston rings.
Using a piston ring expender, remove the two compression rings.
Remove the two side rails and coil spring.
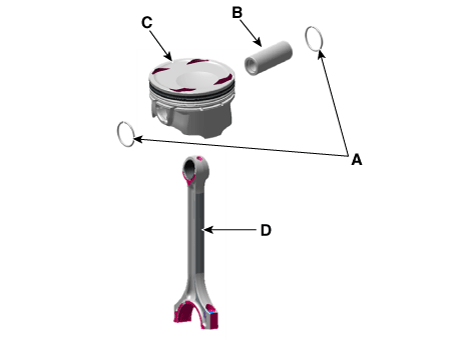
Disassemble the connecting rod from the piston.
Remove the snap ring (A) from the piston.
Remove the piston pin (B) from the piston.
Disassemble the piston (C) and connecting rod (D).
Inspection
Connecting Rod
Check the connecting rod side clearance.
Using a feeler gauge, measure the end play while moving the connecting rod back and forth.
If out-of-tolerance, install a new connecting rod.
If still out-of-tolerance, replace the crankshaft.
Side clearance : Standard: 0.10 - 0.25 mm (0.0039 - 0.0098 in.)
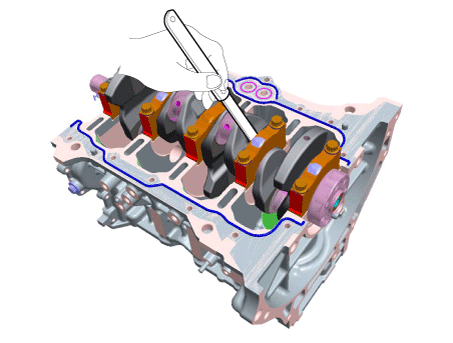
Check the connecting rod bearing oil clearance.
Check that the match marks on the connecting rod and cap are aligned to ensure correct reassembly.
Remove 2 connecting rod cap bolts.
Remove the connecting rod cap and lower bearing.
Clean the crank pin and bearing.
Place a plastigage across the crankshaft pin journal.
Reinstall the lower bearing and cap, and torque the bolts.
Tightening torque :
[10.8 - 14,7 N·m] + [88 - 92°]
Remove the connecting rod cap and lower bearing.
Measure the width of the plastigage at its widest point.
Oil clearance
Standard ;
0.018 - 0.036 mm (0.0007 - 0.0014 in.)
Limit :
0.030 - 0.056 mm (0.0012 - 0.0022 in.)
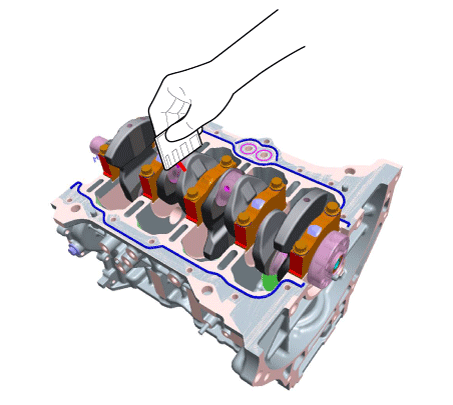
If the measurement from the plastigage is too wide or too narrow, remove the upper and lower bearing and then install new bearings with the same color mark. Recheck the oil clearance.
If the plastigage shows the clearance is still incorrect, try the next larger or smaller bearing. Recheck the oil clearance.
Connecting Rod Identification Mark
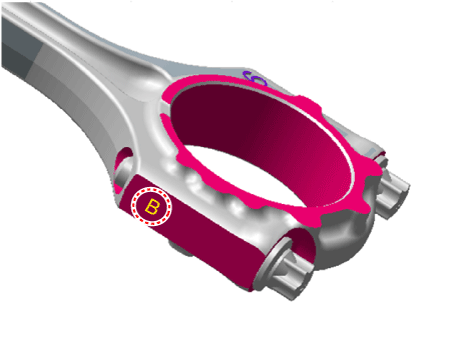
Connecting Rod Specifications
Class Mark Inside Diameter 0 A 42.000 - 42.006 mm
(1.65354 - 1.65378 in.)1 B 42.006 - 42.012 mm
(1.65378 - 1.65402 in.)2 C 42.012 - 42.018 mm
(1.65402 - 1.65425 in.)
Crankshaft Pin Identification Mark
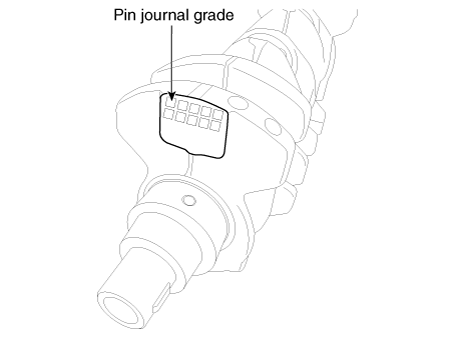
Crankshaft Specifications
Class Mark Outside Diameter Of Pin I 1 38.966 - 38.972 mm
(1.53409 - 1.53433 in.)II 2 38.960 - 38.966 mm
(1.53386 - 1.53409 in.)III 3 38.954 - 38.960 mm
(1.53362 - 1.53386 in.)
Connecting Rod Bearing Identification Mark

Connecting Rod Bearing Specifications
Class Mark Connecting Rod Bearing Thickness A Blue 1.514 - 1.517 mm
(0.0596 - 0.0597 in)B Black 1.511 - 1.514 mm
(0.0595 - 0.0596 in)C None 1.508 - 1.511 mm
(0.0594 - 0.0595 in)D Green 1.505 - 1.508 mm
(0.0593 - 0.0594 in)E Yellow 1.502 - 1.505 mm
(0.0591 - 0.0593 in)Select a connecting rod bearing using selection chart.
Selection Chart For Connecting Rod Bearings
Assembling Classification Of Bearing Connecting Rod Identification Mark 0 (A) 1 (B) 2(C) Crankshaft Identification Mark I (1) E
(Yellow)D (Green) C (None) II (2) D (Green) C (None) B (Black) III (3) C (None) B (Black) A (Blue)
Check the connecting rods.
When reinstalling, make sure that cylinder numbers marked on the connecting rod and cap match during disassembly. When a new connecting rod is installed, make sure that the notches for holding the bearing in place are on the same side.
Replace the connecting rod if it is damaged on the thrust faces at either end. Also if step wear or a severely rough surface of the inside diameter of the small end is apparent, the rod must be replaced as well.
Using a connecting rod aligning tool, check the rod for bend and twist. If the measured value is close to the repair limit, correct the rod by a press. Any connecting rod that has been severely bent or distorted should be replaced.
Allowable bend of connecting rod :
0.05 mm (0.0020 in.) or less for 100 mm (3.94 in.)
Allowable twist of connecting rod :
0.10 mm (0.0039 in.) or less for 100 mm (3.94 in.)
Piston
Clean piston.
Using a gasket scraper, remove the carbon from the piston top.
Using a groove cleaning tool or broken ring, clean the piston ring grooves.
Using solvent and a brush, thoroughly clean the piston.
Check the piston-to-cylinder clearance by calculating the difference between the cylinder bore inner diameter and the piston outer diameter.
Piston-to-cylinder clearance : 0.025 - 0.045 mm (0.0010 - 0.0018 in.)
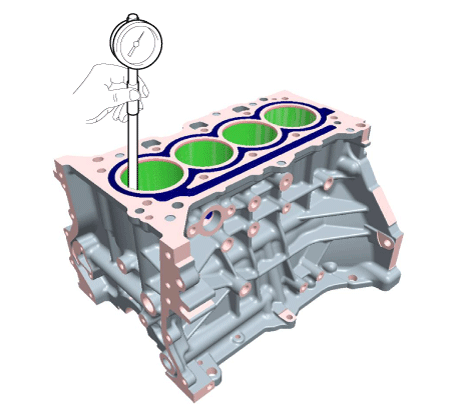
Using a cylinder bore gauge, measure the cylinder bore diameter at position in the thrust and axial direction.
Cylinder bore diameter : 72.00 - 72.03 mm (2.8346 - 2.8358 in.)
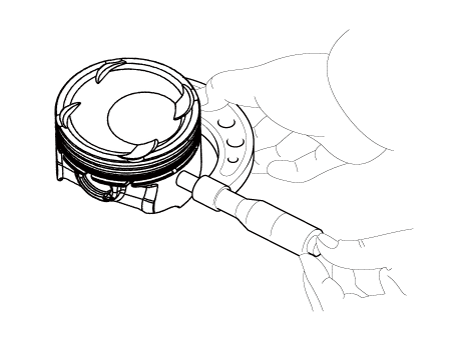
Measure the piston outside diameter at 30 mm (1.1811 in) from top land of the piston.
Piston outside diameter : 71.965 - 71.995 mm (2.8333 - 2.8344 in.)
Select the piston matching with cylinder bore class.
Piston-to-cylinder clearance : 0.025 - 0.045 mm (0.0010 - 0.0018 in.)
Check the cylinder bore size code on the cylinder block side surface.
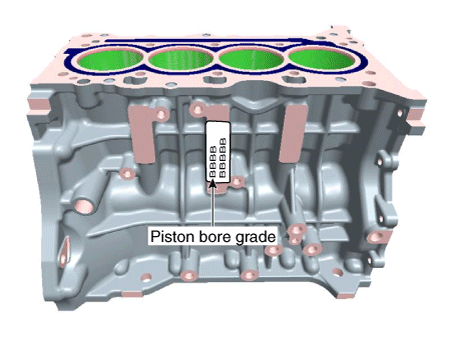
Cylinder Bore Inner Diameter
Size Code Mark Inside Diameter a A 71.00 - 71.01 mm
(2.79528 - 2.79567 in.)b B 71.01 - 71.02 mm
(2.79567 - 2.79606 in.)c C 71.02 - 71.03 mm
(2.79606 - 2.79646 in.)Check the piston size mark on the piston top face.
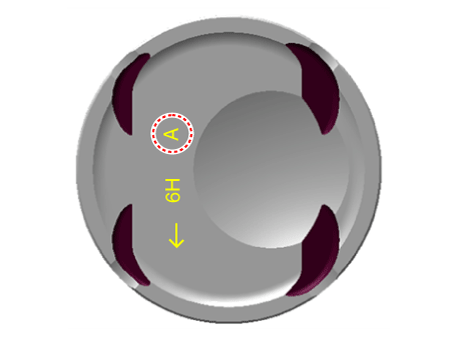
Piston Outer Diameter
Class Inside Diameter a A 70.965 - 70.975 mm
(2.79390 - 2.79429 in.)b B 70.975 - 70.985 mm
(2.79429 - 2.79469 in.)c C 70.985 - 70.995 mm
(2.79469 - 2.79508 in.)
Piston Rings
Inspect the piston ring side clearance.
Using a feeler gauge, measure the clearance between new piston ring and the wall of ring groove.
If the clearance is greater than maximum, replace the piston.
Piston ring side clearance :
[Standard]
No.1 ring :
0.05 - 0.08 mm (0.0020 - 0.0031 in.)
No.2 ring :
0.04 - 0.08 mm (0.0016 - 0.0031 in.)
Oil ring :
0.050 - 0.125 mm (0.0020 - 0.0049 in.)
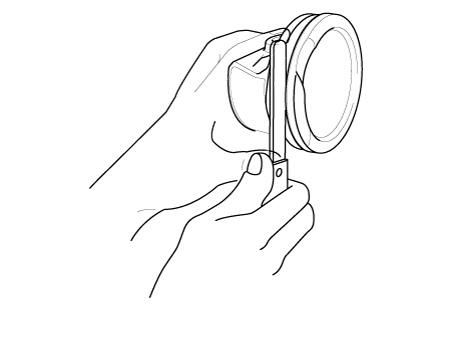
If the clearance is greater than maximum, replace the piston.
Inspect piston ring end gap.
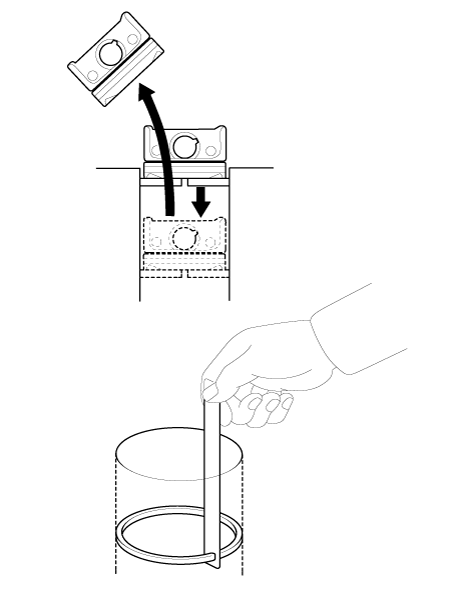
To measure the piston ring end gap, insert a piston ring into the cylinder bore. Position the ring at right angles to the cylinder wall by gently pressing it down with a piston. Measure the gap with a feeler gauge.
If the gap exceeds the service limit, replace the piston rings. If the gap is too large, recheck the cylinder bore inner diameter. If the bore is over the service limit, the cylinder block must be replaced.
Piston ring end gap :
[Standard]
No.1 ring: 0.13 - 0.18 mm (0.0051 - 0.0071 in.)
No.2 ring: 0.25 - 0.40 mm (0.0098 - 0.0157 in.)
Oil ring : 0.10 - 0.40 mm (0.0039 - 0.0157 in.)
Piston Pins
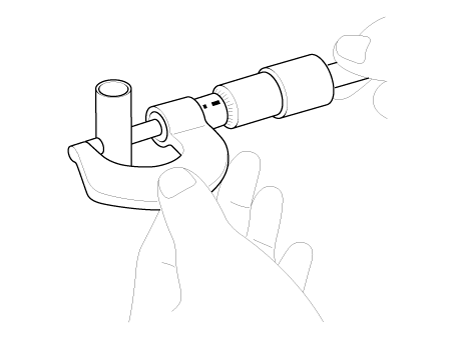
Measure the diameter of the piston pin.
Piston pin diameter : 17.997 - 18.000 mm (0.70854 - 0.70866 in.)
Measure the piston pin-to-piston clearance.
Piston pin-to-piston clearance : 0.005 - 0.012 mm (0.00020 - 0.00047 in.)
Check the clearance between the piston pin outer diameter and the connecting rod small end inner diameter.
Piston pin-to-connecting rod clearance :
0.005 - 0.014 mm (0.00002 - 0.00055 in.)
Reassembly
Assemble the piston and the connecting rod.
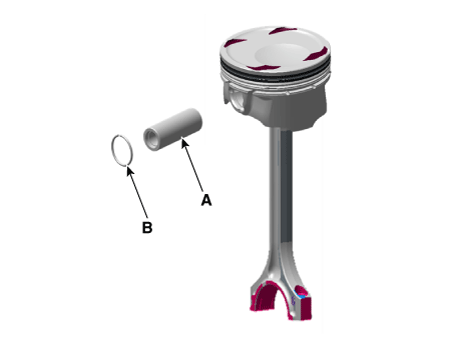
Install the snap ring (A) in one side of the piston pin hole.
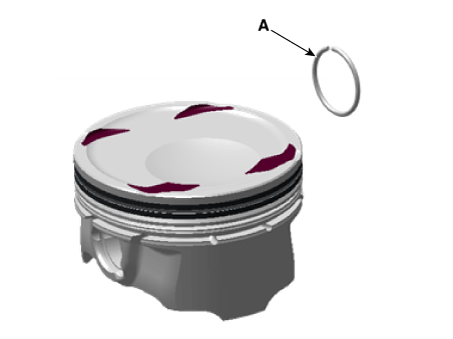
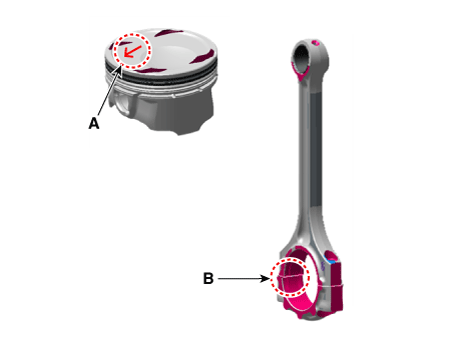
Align the piston front mark (A) and the connecting rod front mark (B).
Insert the piston pin (A) into the piston pin hole and the small end bore of connecting rod.
Install the snap ring (B) to the other side after inserting the piston pin.
Install the piston rings.
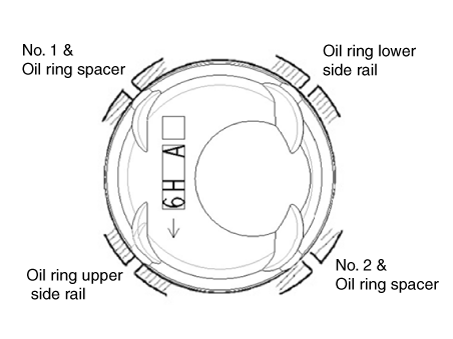
Install the oil ring spacer and 2 side rails by hand.
Using a piston ring expander, install the 2 compression rings with the maker mark facing upward.
Position the piston rings so that the ring ends are as shown. (The No.1 ring should be on the opposite side of the No.2 ring.)
Example)
Install the connecting rod bearings.
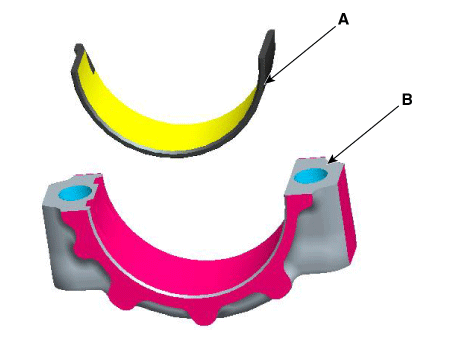
Align the bearing claw with the groove of the connecting rod or connecting rod cap.
Install the bearings (A) in the connecting rod and connecting rod cap (B).
Install the piston and connecting rod assemblies.
Before installing the piston, apply a coat of engine oil to the ring grooves and cylinder bores.
Install the piston and connecting rod assembly with the front marks facing the front of the engine.
Install the ring compressor, check that the rings are securely in place, and then position the piston in the cylinder, and tap it in using the wooden handle of a hammer.
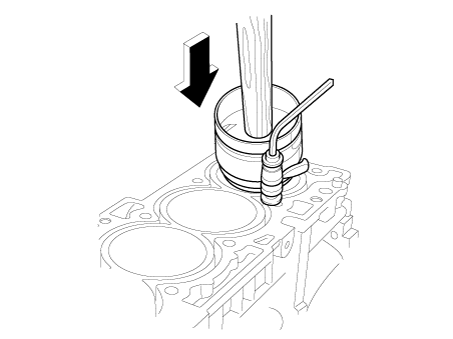
Stop after the ring compressor pops free, and check the connecting rod-to-crank journal alignment before pushing the piston into place.
Apply engine oil to the bolt threads. Install the rod caps with bearings, and tighten the bolts.
Tightening torque :
[10.8 - 14,7 N·m] + [88 - 92°]
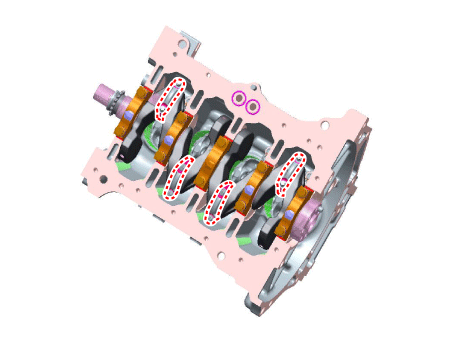
Check the connecting rod end play.
Install the ladder frame.
Clean the sealing face before assembling ladder frame and cylinder block.
Install the new O-ring (A) on the cylinder block.
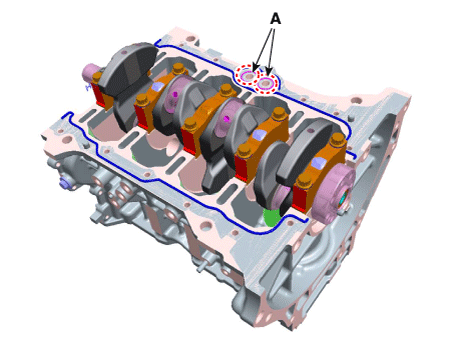
Apply liquid sealant TB 1217H on the oil pan. Assemble the part within 5 minutes of applying sealant.
Bead width : 2.5 mm (0.098 in.) - 3.5 mm (0.138 in.)
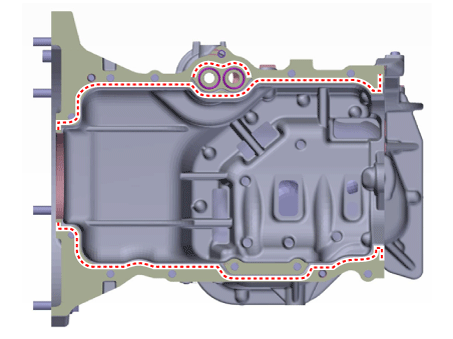
Install the ladder frame (A).
Tightening torque : 18.6 - 24 N·m
Assemble the remaining parts in the reverse order of disassembly.