Power/Volume/Display/Tone Controls
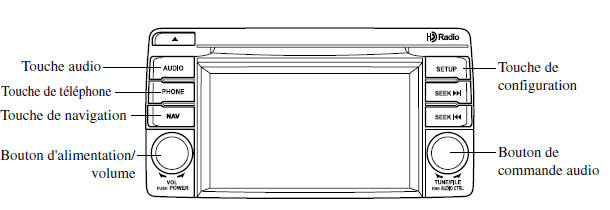
Power On/Off
Turn the ignition switch to ACC or ON.
Press the power/volume button to turn on the audio unit.
Press the power/volume button again to turn off the audio unit.
Volume Adjustment
To adjust the volume, turn the power/volume knob.
Turn the power/volume knob clockwise to increase the volume, and counterclockwise to decrease it.
Display Adjustment
Press the setting button ( ) to display the display adjustment screen.
Briefly press the tab on the screen to select the item you want to change.
Brightness Adjustment
 : To increase brightness
 : To decrease brightness
Contrast Adjustment
 : Higher contrast
 : Lower contrast
Tint Adjustment*1
 : Increase green tint
 : Increase red tint
*1 This adjustment can only be made in the rear view camera mode.
Color Adjustment*1
 : To intensify a color
 : To reduce a color
*1 This adjustment can only be made in the rear view camera mode.
Day/Night Display Adjustment*1
The day or night display can be selected whether the headlights are on or off (when a bright screen is required at night, or a black screen is required during the day).
 : Day display adjustment
 : Night display adjustment
 : Automatically switch the display depending on the headlight on/off condition
*1 This adjustment cannot be made in the rear view camera mode.
Display Off
The display can be turned off. Briefly press the tab on the screen to turn off the display.
The display can be turned back on as follows:
- Press the audio key (
 ) to display the audio screen.
- Press the navigation key (
 ) to display the navigation screen.
- Press the phone key (
 ) to display the Bluetooth dialing screen.
- Press the setting button (
 ) to display the phone dialing settings screen.
- Press the audio control knob to display the sound settings screen.
- Shift to R to change the rear view camera mode.
Shifting to any position other than R returns the display to the off condition.
NOTE
The display can also be turned off using voice recognition.
Refer to Components on page 5-85.
Reset Display Settings
All screen setting values can be reset to their initial settings.
- Briefly press the button
 on the screen.
- Briefly press the button
 on the screen.
Audio Mode Adjustment
Press the audio control knob, or briefly press the tab on the screen to display the sound adjustment screen.
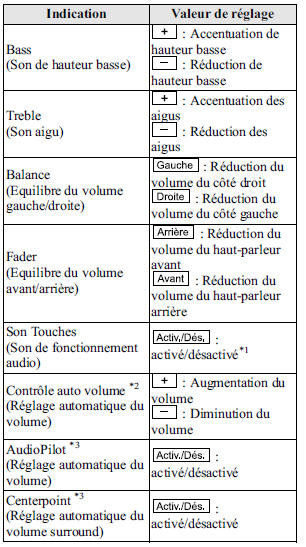
*1 Some functions do not turn off.
*2 Standard audio
*3 Bose audio system
Automatic Level Control (ALC)
Automatic level control is a function that automatically adjusts the volume and sound quality according to vehicle speed. The volume increases as speed increases, and decreases as speed slows.
AudioPilot 2*4
AudioPilot 2 automatically adjusts the volume and sound quality according to the noise level in the cabin while driving. When AudioPilot 2 is active, the system automatically calculates the optimal listening conditions for sounds that might otherwise be hard to hear due to the level of outside noise.
AudioPilot 2 can be turned on or off
*4 AudioPilot 2 is a registered trademark of Bose Corporation.
Centerpoint 2 *5
Centerpoint 2 provides the experience of 5.1-channel surround sound in the vehicle, even with your conventional 2-channel stereo audio. Centerpoint 2 can be turned on or off.
*5 Centerpoint 2 is a registered trademark of Bose Corporation.
NOTE
Centerpoint 2 works best with 2-channel stereo audio. Audio files encoded with high compression can be played, however, their sound quality may be poor.
Reset Sound Settings
The bass, treble, balance, or fader settings can be returned to their initial settings.
- Briefly press the button
 on the screen.
- Briefly press the button
 on the screen.
Test yourself
A quick Mazda 6 quiz: every answer comes with an explanation and a link to the manual page.