Radio Operation

To Turn On the Radio
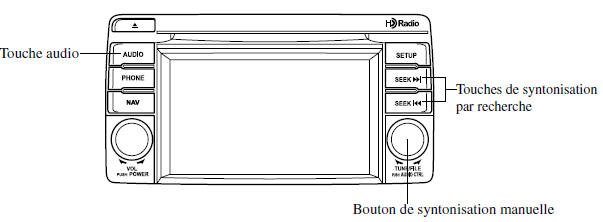
Press the audio key ( ) then briefly press the
 tab on the screen.
Waveband Selection
Briefly press thePress the tab on the screen to change the band as follows:
FM1→FM2→AM
NOTE
 appears when FM1 is selected,
 appears when FM2 is selected, and
 appears when AM is selected.
- If the FM broadcast signal weakens, reception will automatically switch from STEREO to MONAURAL to reduce noise, and the "STEREO" indicator will stop appearing.
Tuning
This unit offers the following tuning methods: manual tuning, seek tuning, scan tuning, preset channel tuning, and automatic memory tuning. The easiest way to tune stations is to assign them to preset channel buttons.
NOTE
If power to the unit is interrupted (blown fuse or disconnected battery), the preset channels will be erased.
Manual Tuning
Turn the manual tuning knob to tune to a lower or higher frequency.
NOTE
When a  broadcast is being received, a receivable multicast channel is also received.
Seek Tuning
If the seek tuning button ( ,
 ) the unit will automatically search for the next available higher or lower frequency.
NOTE
- If you keep pressing and holding the seek tuning key (
 ,
 ), the frequencies will continue to scroll without stopping.
- When a
 broadcast is being received, a receivable multicast channel is also received.
Scan Tuning
You can search for receivable radio stations by briefly pressing the on the screen.
The scan stops on each station for about five seconds.
Briefly press the button on the screen once during reception to continue receiving a radio station.
Preset Channel Tuning
The six preset channels can be used to store six AM stations and twelve FM stations.
- To set a channel, first select AM, FM1 or FM2. Tune to the desired station.
- Touch and hold any preset button on the screen. The reception frequency is stored and displayed on the preset button.
- Repeat this procedure for the other desired stations and wavebands.
When receiving a stored frequency, select AM, FM1 or FM2 and briefly press the button on the screen.
NOTE
The stored frequency is displayed on the preset button.
Automatic Memory Tuning
This function is particularly useful when driving in an area whose stations you do not know. It allows you to store additional AM/FM stations without overwriting the preset channels.
- Briefly press the button
 on the screen. The auto preset memory list is displayed and the previously tuned frequency is received.
- Briefly press the button
 on the screen to display the frequencies of up to ten radio stations in the auto preset memory list.
- Briefly press the desired frequency.
NOTE
Briefly press the button on the screen during auto memory tuning on the main AM/FM screen.
Radio Broadcast Data System (RBDS)
Radio Text Information Display
Up to 64 characters of radio text information transmitted by a radio station are shown in the audio display.
NOTE
Radio text is a feature of FM radio. Text information is not displayed in the following cases:
- During reception

- Not an RBDS broadcast
- During HD Radio reception
- RBDS broadcast, but radio text is not transmitted from the radio station
Genre Seek
Some FM stations transmit genre codes (program types such as Rock, News, etc.). This code makes it possible to quickly find alternative stations broadcasting the same genre code. To select from the genre list, briefly press the on the screen while in FM mode and the desired genre.
(To perform a genre seek scan:)
- Briefly press the genre type you want to select.
- Briefly press the button on the screen.
89.3 is currently received. With Rock selected as the Genre, radio stations broadcasting Rock are at the following frequencies.
98.3*1, 98.7, 104.3*1, 107.1
*1 Radio stations with good reception
Each time the Genre Seek button on the screen is pressed, the frequencies change as follows.
89,3→98,3→104,3→98,3
NOTE
- Only one genre can be selected.
- Briefly press the button
 on the screen to return to the FM1 or FM2 main screen.
- It may be impossible to receive any station, even when Genre Seek is used.
- If a program in the selected genre is not broadcast in an area, reception is not possible even when Genre Seek is used.
- The Genre Seek function searches for the genre (program type) code transmitted by analog FM broadcasts.
 Multicast programs (HD2-HD8) cannot be searched, as they are not broadcast in analog FM modulation.
- If radio stations selected by scan with the Genre Seek function are HD Radio broadcasts
 , they switch from analog broadcasts to
 after a few seconds if reception conditions are good. The genre is displayed after the change, but the genre for analog FM broadcasts may vary.
HD Radio
What is HD Radio technology and how does it work?
HD Radio technology is the digital evolution of analog AM/FM radio. Your radio unit is equipped with a special receiver that allows it to receive digital broadcasts (where available) in addition to the analog broadcasts it already receives. Digital broadcasts have better sound quality than analog broadcasts, because they offer clear, crisp, and noise-free sound. For more information and a guide to available radio stations and programming, please visit: www.hdradio.com.
Benefits of HD Radio technology
(Information) The song title, artist name and genre are displayed on the screen when provided by the radio station.
(Multicasting) On the FM radio frequency, most digital stations have "multiple" or additional programs on each FM station.
Listening with HD Radio technology
If lights up when selecting a radio station that is an HD Radio broadcast
 , the analog broadcast is automatically replaced by a digital broadcast
 after a few seconds, then it is received. For FM,
 , and for AM,
 is displayed and
 lights up in orange.
If the HD Radio broadcast is interrupted and replaced by an analog broadcast, press to turn off
 .
Multicast Channel Selection (FM)
Press the on the screen to switch to the multicast channel for the displayed number.
The number of multicast channels that can be received differs depending on the radio station.
NOTE
- If an analog broadcast is received once and
 is received while HD1 is selected, the audio unit automatically switches to station
 .
- When the
 button is lit, there may be a noticeable difference in sound quality and volume when switching from digital to analog signals. If sound quality and volume become significantly reduced or cut out, touch the HD button to turn off
 (the
 button is not lit).
- Once the analog broadcast is received when HD1 is selected from the preset channels, it automatically switches to
 . If radio reception conditions are poor or
 is turned off, it is not possible to switch to
 broadcasts.
- When an HD specialty channel (HD2 to HD8) is selected from the preset channels, "Acquiring signal" is displayed and no sound is output until
 is received. If radio reception conditions are poor, "Acquiring signal" remains displayed.
- If
 is not on or does not light up orange, information such as song titles from the
 station is received, but the audio output is analog. If the information is no longer received and the no-reception condition persists, the
 and
 keys on the screen disappear.
Satellite Radio Operation
What is satellite radio?
With over 130 stations, SIRIUS satellite radio lets you enjoy everything you love. Receive channels and music channels without advertising, plus sports, news, entertainment and more.
Commercial-free music in virtually every genre, from rock to pop, hip-hop to country, jazz to classical, and more. Including live performances and channels dedicated to artists.
Live sports, game by game, and expert analysis: all NFL games, all NASCAR races, 24/7 sports talk, college sports, and more.
Exclusive entertainment, comedy and talk: the biggest names, engaging discussions, and hilarious comedy.
World-class news, local traffic and weather.
Subscribe to SIRIUS Satellite Radio today!
NOTE
Exclusive to Sirius. If your vehicle is equipped with Sirius, your new Mazda includes a complimentary introductory subscription with a limited-time trial offer. To activate, call 888-539-7474. For more information, visit www.siriusxm.com.
You can subscribe and receive satellite radio in the United States (except Alaska and Hawaii) and Canada. Contact an authorized Mazda dealer for more details.
Satellite radio activation procedure
You must contact SIRIUS to activate the service. Activation is free and takes only a few minutes.
The SIRIUS service uses an identification code to identify your radio. This code is required to activate the SIRIUS service and is also used for reporting problems.
Please prepare the following information:
- SIRIUS ID (12-digit electronic serial number or ESN*1)
- Valid credit card information (may be required for initial registration)
*1 ESN: Electronic Serial Number. Park outdoors with a clear view of the sky. Turn on your radio (in SIRIUS mode, on channel 184). Activation usually takes 2 to 5 minutes.
Displaying the SIRIUS ID (ESN)
Turn the manual tuning knob and select channel 0 to display the 12-digit electronic serial number (ESN) for the SIRIUS tuner.
SIRIUS operation
All satellite radio operations are performed using the audio unit.
Selecting SIRIUS radio mode
Briefly press the tab on the audio screen to receive the previously received SIRIUS station.
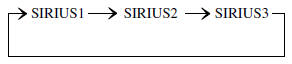
Each time you press the tab on the screen, the band changes in the order shown below.
 NOTE
- SIRIUS1, SIRIUS2 and SIRIUS3: you can store six stations in each bank for convenient access to your favorite stations.
 is displayed when SIRIUS1 is selected,
 is displayed when SIRIUS2 is selected, and
 is displayed when SIRIUS3 is selected.
Operation in initial state
There will be a delay before the equipment starts when it is in the initial state, when there has been a change in the user's subscription status, or when there has been a change in the SIRIUS channel map.
"Updating channels ###%" is displayed when the SIRIUS channel map is changed.
If the content of the user agreement is changed, "Subscription updated" is displayed. When the firmware is updated, "Updating receiver" is displayed.
The update may take up to several minutes to complete, depending on the geographic area. When the unit is in the initialized state, channel 184 is displayed after the "Updating receiver" message appears.
NOTE
Do not perform the following operation while "Updating channels ###%" or "Updating receiver" is displayed. Otherwise, the update procedure will be cancelled.
- Turning off the audio system
- Switching to other modes
- Turn the ignition switch to the OFF position
When SIRIUS mode is switched to another mode, or the power supply is cut off, the channel being received is stored as the last channel.
Channel up
Turn the manual tuning knob to the right or press the seek key up ( ).
Channel down
Turn the manual tuning knob to the left or press the seek key down ( ).
NOTE
The channel changes continuously to the previous or next channel while you keep pressing the seek key ( ,
 ).
Unsubscribed channel
When the subscription to a channel that has not been preset ends, or to a channel currently being listened to, the following message is displayed: "Call 1-888-539-SIRIUS" "to subscribe"
NOTE
When the subscription agreement is cancelled, all channels appear as unsubscribed, including channel 184.
Programming preset channels
- Select the channel you want to program.
- Press and hold any preset key on the screen.
NOTE
You can store six stations in each of the SIRIUS1, SIRIUS2 and SIRIUS3 banks, so that you can easily access your favourite stations.
Selecting a preset channel
Briefly press the preset key on the screen for the channel you want to select.
NOTE
By default, all channels are preset to 184.
Selecting from the channel list
Receivable channels can be displayed on the channel list screen.
You can easily select the channel you want to listen to from the list. Each category can also be displayed.
- Briefly press the button
 on the screen.
- Briefly press the channel you want to listen to in the list.
NOTE
Channels currently available (including channels set by parental lock) are shown in the list.
(Selecting from the category list)
- Briefly press the button
 on the screen on the channel list screen.
- Briefly press the name of the category you want to select in the list.
NOTE
A category can only be set when a channel belonging to a category is currently being received.
Scan Tuning
Briefly press the button on the screen to automatically scan for stations. Scanning stops on each station for about five seconds.
To hold a station, press the on the screen again during this interval.
NOTE
Unsubscribed channels, invalid channels, parental-locked channels and channel 0 are not scanned; therefore, these channels will be skipped automatically.
Displaying the channel number, channel name, category name, artist name, song titles and information
Information about the channel currently being received is displayed.
NOTE
If channels can be received without a subscription, and channels set with parental lock, the channel name, category name, artist name, song title and information are displayed.
Scrolling the Display
If a full title cannot be displayed at once, briefly press the on the screen on the right side of the title. When the last character is displayed, briefly press the
 on the screen to display the first character of the title.
NOTE
The key on the screen is only displayed if a full title cannot be displayed at once.
Instant replay
This function allows you to quickly go back and replay the program you were previously listening to or are currently listening to.
When you briefly press the key on the screen, playback starts from the beginning of the current program.
When you press the key on the screen twice, playback starts from the beginning of the previous program.
Press and hold the key on the screen to go back through the program while the key is held down.
When you briefly press the key on the screen, playback starts from the beginning of the next program.
When you briefly press the If you press the key on the screen while the last program is playing, instant replay mode is cancelled.
Press and hold the key on the screen to fast-forward through the program while the key is held down.
Pressing and holding the key until the end of the program cancels instant replay mode.
Instant replay (PAUSE)
A brief press of the key on the screen switches instant replay mode to the temporarily stopped state (PAUSE).
Briefly press the key on the screen again to resume playback from where it stopped.
Parental lock
You can set parental lock, release parental lock, change the parental lock ID code and reset the parental lock ID code.
NOTE
- Briefly press the button
 on the screen during all settings to return to the previous display.
- Briefly press the button
 on the screen while entering the ID and master codes to delete an entered number.
- If you enter only a four-digit code or master code, you can select the "Done" indication.
- If you have forgotten the registered code, reset the code to [0000] in "Initialize parental code".
Parental lock
If a channel is locked, that channel is muted.
- Turn the manual tuning knob to select the desired channel.
- Briefly press the button
 on the screen to display the settings screen.
- Briefly press the button
 on the screen to display the parental lock settings screen.
- "Enter parental code" is displayed and you can enter the registered ID code. To enter a number, use the numeric keypad.
- After entering the four digits, briefly press the
 on the screen to confirm the four digits.
- If the four digits match the registered code, "Channel ### locked" appears and mute is activated. If they do not match the registered code, "Incorrect code" appears, then "Enter parental code" reappears on the display.
Releasing parental lock
Channels that have been locked using the parental lock function can be unlocked.
- Select the channel to unlock by turning the manual tuning knob.
- Briefly press the button
 on the screen to display the settings screen.
- Briefly press the button
 on the screen to display the parental unlock settings screen.
- "Enter parental code" is displayed and you can enter the registered ID code. To enter a number, use the numeric keypad.
- After entering the four digits, briefly press the
 on the screen to confirm the four digits.
- If the four digits match the registered code, "Channel ### unlocked" appears and mute is cancelled. If they do not match the registered code, "Incorrect code" appears, then "Enter parental code" reappears on the display.
Changing the parental lock code
When changing the code, the new code is only entered once the old code has been entered.
- Briefly press the button
 on the screen to display the settings screen.
- Briefly press the button
 on the screen to display the code change screen.
- "Enter current code" is displayed and you can enter the registered code.
To enter a number, use the numeric keypad.
 on the screen to confirm the four digits.
 on the screen to confirm the four digits.
NOTE
Channels that were locked before the code was changed remain locked after the code has been changed. To unlock a channel, enter the changed code.
Resetting the parental lock code
If the stored code is forgotten, reset the code to the default value [0000].
- Briefly press the button
 on the screen to display the settings screen.
- Briefly press the button
 on the screen to display the initial code screen.
- "Enter master code" is displayed and the stored code can be entered.
NOTE
Master code: The master code is used to initialize or reset the code if the code is not set to [0000] and/or if the personal identifier code is unknown. The initialization operation resets the code to [0000]. The master code can potentially disable the parental lock safety feature if it is found by persons not authorized by the owner to access certain channels.
SIRIUS satellite radio master code: [0913]
- After entering the four digits, briefly press the
 on the screen to confirm the four digits.
- If the four digits match the master code, "Code initialized" is displayed.
Search Alert
Song titles and artist names for the song being played, and team names for sports events being listened to, can be stored as favorites. The user is notified when a program containing stored favorite information starts.
Selecting from the search alert program list
Select the station you want to listen to from the list to receive the program.
Briefly press the button on the screen to return to the reception screen.
Storing song, artist and sports team names
NOTE
- A maximum of 10 song, artist and sports team names can be stored.
- If the song title, artist name or sports team name is not displayed, "No artist info available in this program" is displayed.
- Even if the song title and artist name are displayed on the main screen, it may not be possible to store information for past songs.
- If a song name is stored, the search song function is enabled.
- If an artist name is stored, the search artist function is enabled.
- If a sports team name is stored, the search sports team function is enabled.
- Briefly press the button
 on the screen to display the current song and artist names being received. The sports team name is displayed while a sports program is being received.
- Select the item you want to store from the song title, artist name and sports team name.
- "XXXXX (song, artist or sports team name) stored" is displayed.
NOTE
If there is not enough free space, "Song memory full" or "Artist memory full" or "Team memory full" and "Delete to make space" are displayed. Delete an item from the list.
Search alert setting
The search alert function for song, artist or team can be turned on or off, and stored information can be deleted. Briefly press the key and
 on the screen.
Briefly press the key you want to change from ,
 , or
 .
(Turning on or off) Briefly press the key ,
 , and
 on the screen.
(Deleting)
- Select the song title, artist name or sports team name you want to delete from the list.
- Briefly press the button
 on the screen to display the message "XXXXX (song, artist or sports team name) deleted".
Test yourself
A quick Mazda 6 quiz: every answer comes with an explanation and a link to the manual page.