Audio System (Type A)
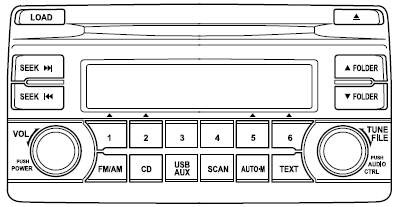
- Power/Volume/Tone Control
- Operating the Compact Disc Player
- Using an AUX Jack/USB Port
- Error Indications
Power/Volume/Tone Control
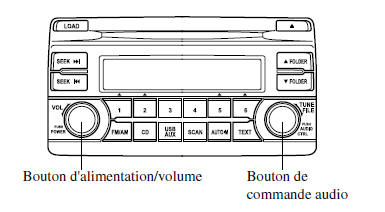
Power On/Off
Turn the ignition switch to ACC or ON.
Press the power/volume button to turn on the audio unit.
Press the power/volume button again to turn off the audio unit.
Volume Adjustment
To adjust the volume, turn the power/volume knob. Turn the power/volume knob clockwise to increase the volume, and counterclockwise to decrease it.
Audio Mode Adjustment
- Press the audio control button to select a function.

NOTE
About 5 seconds after selecting a function, volume control is automatically selected.
To reset bass, treble and fader to normal, press and hold the audio control button for 2 seconds. A beep will sound and "CLEAR" will be displayed.
Automatic Level Control (ALC)
Automatic Level Control (ALC) automatically adjusts the volume according to vehicle speed. The faster the vehicle travels, the higher the volume. ALC has ALC OFF and ALC LEVEL 1 to 7 modes. At ALC LEVEL 7, the volume increase is at its maximum.
Select the mode according to driving conditions.
Radio Operation
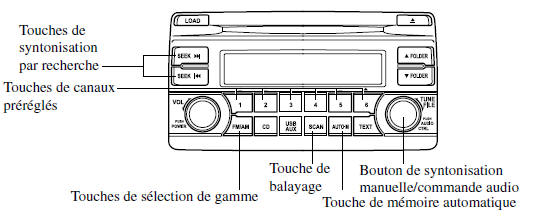
To Turn On the Radio
Press a band select button ( ) to turn on the radio.
Waveband Selection
Press the waveband select button ( )
to select the bands in this order: FM1→FM2→AM.
The selected mode is displayed. If an FM stereo broadcast is received, the "ST" indicator will be displayed.
NOTE
If the FM signal weakens, reception will automatically switch from STEREO to MONAURAL to reduce noise, and the "ST" indicator will turn off.
Tuning
This unit offers the following tuning methods: manual tuning, seek tuning, scan tuning, preset channel tuning, and automatic memory tuning. The easiest way to tune stations is to assign them to preset channel buttons.
NOTE
If power to the unit is interrupted (blown fuse or disconnected battery), the preset channels will be erased.
Manual Tuning
Turn the manual tuning knob to tune to a lower or higher frequency.
Seek Tuning
If the seek tuning button (
, )
is pressed, the unit will automatically seek the next available higher or lower frequency.
NOTE
If the seek tuning button ( ,

) is held down, the frequencies will continue to scan without stopping.
Scan Tuning
Press the scan button ( ) to automatically search for
the strongest stations. Scan stops on each station for about 5 seconds. To keep a station, press the scan button again (
) during this interval.
Preset Channel Tuning
The six preset channels can be used to store 6 AM stations and 12 FM stations.
- To set a channel, first select AM, FM1 or FM2. Tune to the desired station.
- Press a preset channel button for about 2 seconds until a beep is heard.
The preset channel number or station frequency will be displayed. The station is now stored.
Automatic Memory Tuning
This function is particularly useful when driving in an area where you do not know the stations.
Press and hold the automatic memory button ( )
for about 2 seconds, until a beep is heard; the system will automatically search and temporarily store the six strongest stations of each selected waveband in the area.
Once scanning is complete, the unit tunes to the strongest station and displays its frequency. Press and release the automatic memory button ( ) to tune to the stations
stored automatically. One station from memory is selected with each press; its frequency and channel number will be displayed.
NOTE
If a station cannot be tuned after scanning, the letter "A" is displayed.
Operating the Compact Disc Player
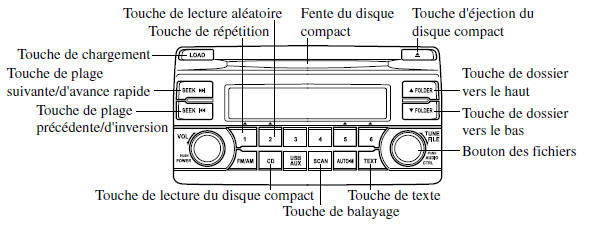

NOTE
If a disc contains music data (CD-DA) and MP3/WMA/AAC files, playback of the two or three file types varies depending on the recording mode of the disc.
Loading the Compact Disc
Insert the compact disc, label side up, into the slot. The automatic loading mechanism will load the disc and start playback.
NOTE
There is a short delay before playback begins while the player reads the digital data on the disc.
Ejecting the Compact Disc
Press the compact disc eject button ( ) to eject the
compact disc.
Playback
Press the compact disc play button ( ) to
start playing the CD when it is loaded. If there is no CD in the unit when the CD play button ( ) is
pressed, "NO DISC" will flash.
NOTE
Press the load button (
) to load and play the CD.
Fast Forward/Reverse
Press and hold the fast forward button ( )
to play the track at high speed.
Press and hold the reverse button (
) to play the track backward at high speed.
Track Search
Press the next track button ( ) or turn the file knob
clockwise once to skip to the beginning of the next track.
Press the previous track button ( ) or turn the
file knob counterclockwise a few seconds after playback starts to skip to the previous track.
Press the previous track button ( ) or turn the
file knob counterclockwise after a few seconds to play from the beginning of the current track.
Folder Search (during MP3/WMA/AAC CD playback)
To go to the previous folder, press the folder search down button ( ), or press the
folder search up button (
) to advance to the next folder.
Scan
During Music CD Playback
This function scans the tracks on a CD and plays 10 seconds of each track so you can find one you want to listen to.
Press the scan button ( ) during playback to
start scanning (the track number will flash). Press the scan button ( ) again to
cancel scanning.
During MP3/WMA/AAC CD Playback
This function scans the tracks in the folder being played and plays 10 seconds of each track so you can find one you want to listen to. Press the scan button ( ) during playback to
start scanning (the track number will flash).
Press the scan button ( ) again to cancel
scanning.
NOTE
If the unit is left in scan mode, normal playback will resume from the track where scanning started.
Repeat Play
During Music CD Playback
Press the repeat button (1) during playback to repeat the current file. "TRACK RPT" is displayed during playback.
Press the repeat button (1) while "TRACK RPT" is displayed to cancel.
During MP3/WMA/AAC CD Playback
(Track Repeat)
Press the repeat button (1) during playback to repeat the current file. "TRACK RPT" is displayed during playback.
Press the repeat button (1) twice while "TRACK RPT" is displayed to cancel.
(Folder Repeat)
Press the repeat button (1) twice during playback to repeat the current track in the folder. "FOLDER RPT" is displayed during playback.
Press the repeat button (1) while "FOLDER RPT" is displayed to cancel.
Random Play
During Music CD Playback
Press the random button (2) during playback to play the tracks on the CD in random order. "DISC RDM" is displayed during playback.
Press the random button (2) while "DISC RDM" is displayed to cancel.
During MP3/WMA/AAC CD Playback
(Folder Random)
Press the random button (2) during playback to play the tracks in the folder in random order.
"FOLDER RDM" is displayed during playback.
Press the random button (2) while "FOLDER RDM" is displayed to cancel.
(Disc Random)
Press the random button (2) twice during playback to play the tracks on the CD in random order. "DISC RDM" is displayed during playback.
Press the random button (2) while "DISC RDM" is displayed to cancel.
Changing the Display
For files with a file name and other recorded information, the display alternates between the file name and the other information each time the text button ( )
is pressed during playback.
Music CDs
 Track Number/Elapsed Time
Track Name
Album Name
Artist Name
MP3/WMA/AAC CDs
File Number/Elapsed Time
Folder Number/File Number
 File Name
Folder Name
Album Name
Track Name
Artist Name
NOTE
- The information shown on the display is only the CD information (such as artist name and song title) that was recorded on the CD.
- This unit cannot display some characters. Characters that cannot be displayed are shown as an asterisk (
 ).
Scrolling the Display
Only 9 characters (file name) or 13 characters (excluding file name) can be displayed at a time. To display the remaining characters of a long title, press and hold the text button ( ) . The next
13 characters scroll across the display.
Press and hold the text button ( ) again after the
last 13 characters have been displayed to return to the beginning of the title.
NOTE
The number of characters that can be displayed is limited.
Message Display
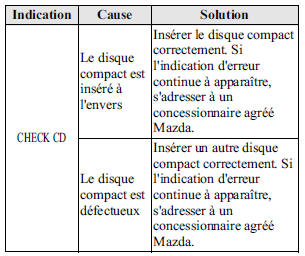
If "CHECK CD" is displayed, this indicates a CD malfunction. Check the CD for damage, dust or stains, then reinsert it correctly. If the message still appears, take the unit to an authorized Mazda dealer for repair.
Using an AUX Jack/USB Port
You can listen to sound through the vehicle speakers by connecting a commercially available portable audio device to the auxiliary jack.
Use a commercially available 3.5 mm stereo mini-plug cable without resistance. See an authorized Mazda dealer for details.
You can also play sound from the vehicle audio system by connecting a USB device or iPod to the USB port.
See AUX/USB/iPod Mode on page 5-65.
Error Indications
If an error indication is displayed, refer to the following table to find the cause. If the error indication cannot be cleared, contact an authorized Mazda dealer.
Test yourself
A quick Mazda 6 quiz: every answer comes with an explanation and a link to the manual page.