Body
Bonded glass
In this manual: Body
~3min read
WINDSHIELD
REMOVAL
- Open:
- the driver's door window.
- the engine hood.
- Disconnect the battery.
- Carefully unclip the drip rails fitted to the windshield pillars.
- Remove the cowl grille (see relevant operation).
- Remove the rain sensor cover.
- Remove the interior rear view mirror.
- Disconnect:
- the rain sensor.
- the light sensor.
- Protect the dashboard.
- Cut the windshield adhesive.
- Remove the windshield using suction cups.
PREPARATION
- Prepare the body flange for fitting the windshield.
- Prepare the windshield for refitting.
- Replace the spacer rubbers on the body flange.
- Adjust the windshield in its frame (Fig. 1):
- place the windshield (1) on the spacer rubbers.
- set the gap 'a = 4 mm' between the upper edge of the windshield (1) and the front edge of the roof (2).
- apply adhesive tape in two places between the upper edge of the windshield (1) and the front edge of the roof (2).
- cut the adhesive tapes on the upper edge of the windshield (1) without removing them.
- remove the windshield.
- Apply a bead of adhesive (3) approx. 13 mm wide to the body flange.
INSTALLATION
- Center and refit the windshield.
- Adjust the windshield in its frame, aligning it with the two adhesive tapes cut previously.
REAR WINDOW
REMOVAL
- Open the driver's door window.
- Disconnect the battery.
- Remove:
- the tailgate trim panels.
- the third brake light.
- Disconnect the various connectors and the earth from the tailgate.
- Cut the rear window adhesive.
- Remove the rear window using suction cups.
PREPARATION
- Prepare the body flange for fitting the rear window.
- Replace the spacer rubbers on the body flange.
- Prepare the rear window for refitting.
INSTALLATION
- Apply a bead of adhesive approx. 13 mm wide to the body flange.
- Refit the rear window, observing the gaps between the frame and the rear window (Fig. 2).
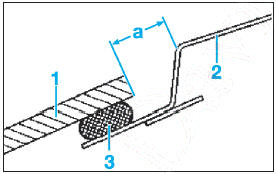
Fig. 1
 Observe the curing time specified by the supplier.
- Refitting is carried out in the reverse order of removal.
QUARTER LIGHT
REMOVAL
- Open the driver's door window.
- Disconnect the battery.
- If equipped, remove the rear side airbag (see the relevant operation).
- Remove the trim around the quarter light.
- Cut the quarter light adhesive.
- Remove the quarter light using suction cups.
PREPARATION
- Prepare the body flange for fitting the quarter light.
- Prepare the quarter light for refitting.
- Apply a bead of adhesive approx. 13 mm wide to the body flange.
INSTALLATION
- Center and refit the quarter light.
- Hold the quarter light in place with adhesive tape.
Observe the curing time specified by the supplier.- Refitting is carried out in the reverse order of removal.
REAR WINDOW
REMOVAL
- Open the driver's door window.
- Disconnect the battery.
- Remove:
- the tailgate trim panels.
- the third brake light.
- Disconnect the various connectors and the earth from the tailgate.
- Cut the rear window adhesive.
- Remove the rear window using suction cups.
PREPARATION
- Prepare the body flange for fitting the rear window.
- Replace the spacer rubbers on the body flange.
- Prepare the rear window for refitting.
INSTALLATION
- Apply a bead of adhesive approx. 13 mm wide to the body flange.
- Refit the rear window, observing the gaps between the frame and the rear window (Fig. 2).
Observe the curing time specified by the supplier.- Refitting is carried out in the reverse order of removal.
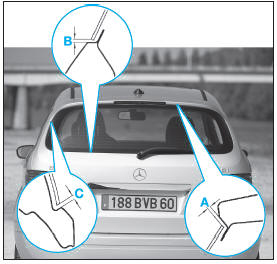
Fig. 2
Test yourself
A quick Mercedes-Benz B-Class quiz: every answer comes with an explanation and a link to the manual page.
Was this page helpful?