Body
Removal and installation of louvred sunroof
In this manual: Body
8steps
~48min
2/5difficulty
Done 0 of 8
LOUVRED SUNROOF
REMOVAL
- Remove the headliner (see corresponding operation).
- Fit a clamp (1) on each of the left and right sides of the sunroof frame (2) (Fig.55).
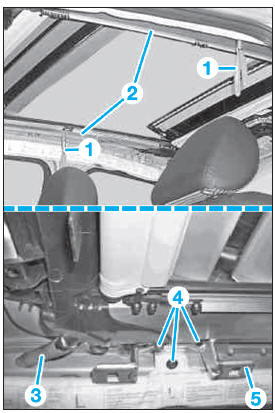
Fig. 55
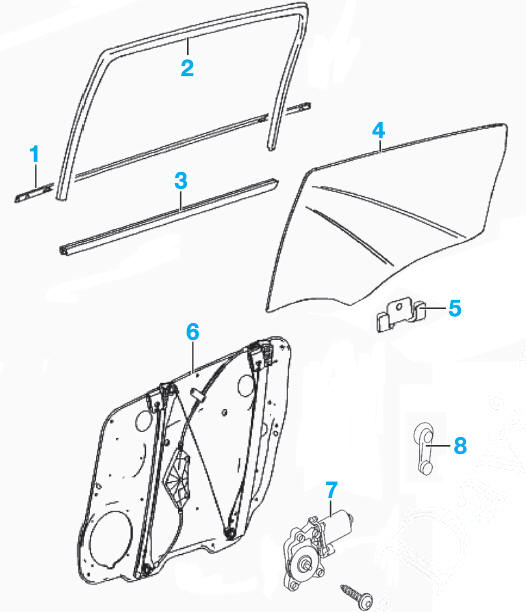
Rear door glass with regulator
- Outer window seal
- Door frame seal
- Inner window seal
- Window
- Bracket
- Mounting plate with window regulator mechanism
- Motor (with electric window regulator)
- Winder handle (without electric window regulator).
- Disconnect the drain hoses (3) at the four corners of the sunroof frame (2).
- Position the drain hoses (3) beside the sunroof frame (2) on the vehicle roof.
- Disconnect the electrical connector from the sunroof motor.
- On each side, remove the screws (4) and the rear mounting of the grab handle (5).
- Loosen the screws (6) until the threaded connections are separated (Fig.56).
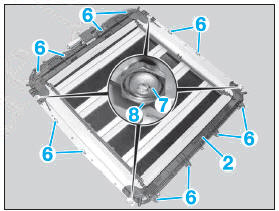
Fig. 56
- Loosen the screws (7) until the threaded connections are separated.
 Do not bend the spacer screws (8), otherwise the adjustment of the sunroof frame (2) will change.
- With the help of a second person, remove the clamps (1), detach the sunroof and lift it out to the rear through a rear door.
- If the sunroof is not being replaced, pull the secondary seal (9) completely out of the sunroof frame (2), remove all sealant residue from the sunroof frame (2) and carefully clean the mating surface (Fig.57).
- Remove all sealant residue from the mating surface on the vehicle roof and clean it.
INSTALLATION
- Stick a new secondary seal (9) directly against the bead (10) on the sunroof frame (2).
- Bond the butt joint of the new secondary seal (9).
 The butt joint of the new secondary seal (9) must be at the centre of the rear section of the sunroof frame (2).
- Apply a bead of sealant (11) onto the secondary seal (9).
Diameter of the sealant bead (11): approx. 3 mm.- Fit a clamp (1) on each of the left and right sides of the sunroof frame (2) (Fig.55).
- With the help of a second person, first place the sunroof on one side of the vehicle roof and hold it with a clamp, then secure the other side of the sunroof with another clamp.
Once the sunroof is fitted and before it is held by the clamps, its position must not be changed, otherwise the sealant bead (11) will stick to the vehicle roof. If the sunroof position is changed, the sealant bead (11) will no longer perform its function.- Check the position of the secondary seal (9), particularly at the corners of the sunroof frame (2).
- Refit the screws (6) to the frame (2) until they seat.
- Refit and tighten the screws (7) on the frame (2).
 Do not bend the spacer screws (8), otherwise the adjustment of the sunroof frame (2) will change.
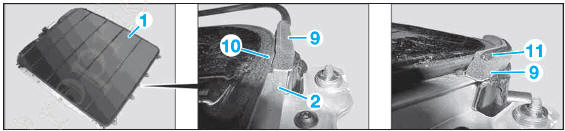
Fig. 57
- Tighten the screws (6).
- Remove the clamps.
- The rest of the installation is carried out in the reverse order of removal.
- Check the adjustment of the roof louvres, then the sunroof, and adjust them if necessary.
- Check the sunroof for leaks.
CHECKING AND ADJUSTMENT
Roof louvres
 The louvres can be adjusted separately.
- Using a set of feeler gauges, check the clearances at (A), (B) and (C) (Fig.58).
 The clearances at (A), (B) and (C) must not tend to narrow, otherwise the louvred roof may be damaged when opening and closing.
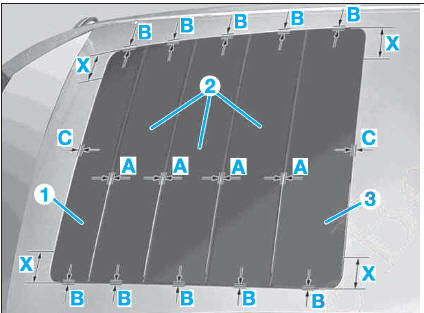
Fig. 58
Adjustment clearances
A. 3 to 4 mm
B. 4 to 5 mm
C. 4 to 5 mm
X. approx. 80 mm.
The reference dimension of the measuring point (X) for checking clearance (C) is approx. 80 mm.- On each side, remove the screws of the deflector louvre (1), replace them with new ones and tighten them so that the deflector louvre (1) can still be moved.
- Carry out the same procedure for the centre louvres (2) and the rear louvre (3).
- Close the sunroof.
- Adjust the clearances at (A), (B) and (C) by moving the louvres (1), (2) and (3).
- Tighten the louvre screws (1), (2) and (3).
- Close the sunroof.
- Check the clearances at (A), (B) and (C) again.
Sunroof
To adjust the sunroof, the headliner must be removed (see corresponding operation).- Check the height adjustment (arrows) of the sunroof at the deflector louvre (1) and the rear louvre (2) (Fig.59).
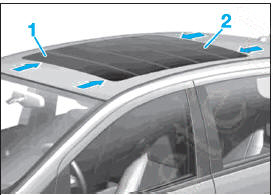
Fig. 59
Height adjustment
Deflector louvre (1) 0.2 mm lower than the outer roof surface. Rear louvre (2) 0.2 mm higher than the outer roof surface.
- Adjust the height of the roof (3) by turning the spacer screws (4) accordingly (Fig.60).
Do not bend the screws (5).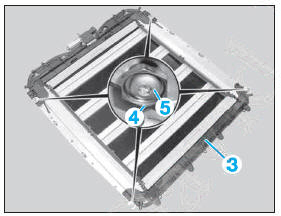
Fig. 60
Test yourself
A quick Mercedes-Benz B-Class quiz: every answer comes with an explanation and a link to the manual page.
Was this page helpful?