Calibrating Camera Image (around View Monitor)
3d Fixed View
Work Procedure
Calibration must be performed after removing/replacing the cameras, removing parts (e.g. front grille, door mirror, and others) mounted on the cameras, or replacing the around view monitor control unit.
The use of CONSULT is required to perform calibration or writing of calibration results to the around view monitor control unit.
Align the white lines on the road near the vehicle at the boundary of each camera image by this camera calibration. The white lines far from the vehicle may not be aligned at the boundary of each camera image. The farther the line, the greater the difference is.
Following the flowchart shown in the figure, perform the calibration.
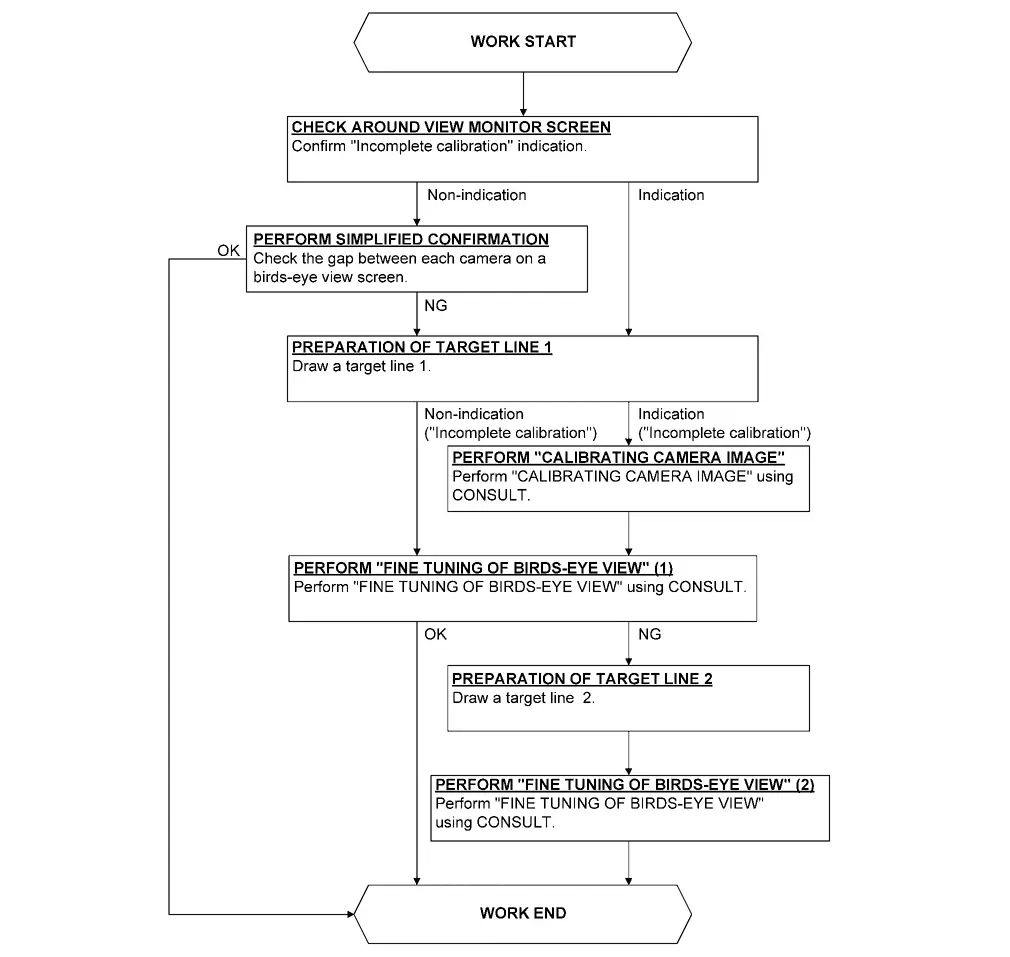
CHECK AROUND VIEW MONITOR SCREEN
Check that there is no indication of “Incomplete calibration”.
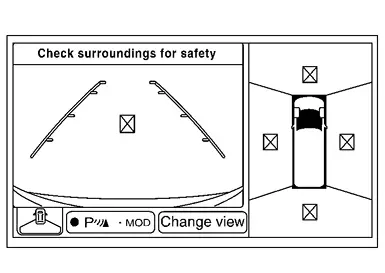
Is the “Incomplete calibration” display visible?
YES>>GO TO 3.
NO>>GO TO 2.
PERFORM SIMPLIFIED CONFIRMATION BY BIRDS-EYE VIEW SCREEN
Check the gap between each camera image on a birds-eye view screen.
Is the gap between each camera image exist?
YES>>GO TO 3.
NO>>WORK END
PREPARATION OF TARGET LINE 1
Preparation of target line 1
Hang a string with a weight as shown in the figure. Put the points FM0, RM0 (mark) on the ground at the center of the vehicle front end and rear end with white packing tape or a pen.
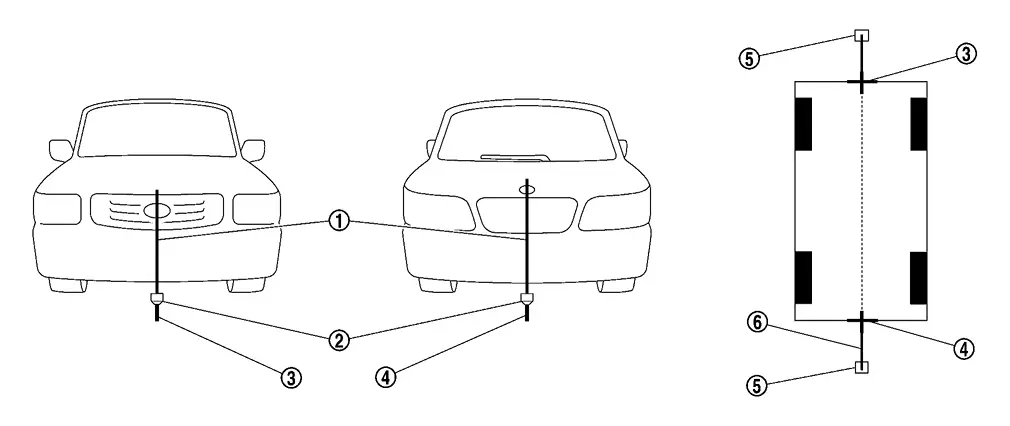

Thread 
Weight 
Point FM0 (mark) 
Point RM0 (mark) 
Packing tape (to fix the vinyl string) 
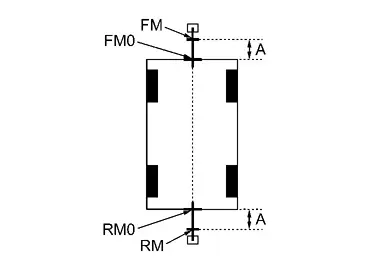
Vinyl string Route the vinyl string under the vehicle, and then pull and fix it on the point approximately 1.0 m (39.9 in) to the front and rear of the vehicle through the points FM0 and RM0 using packing tape.
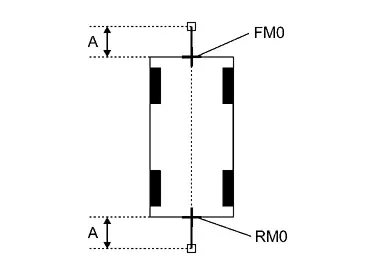
A : Approx.1.0 m (39.9 in) Put the points FM and RM (mark) 75 cm (29.5 in) from the points FM0 and RM0 individually.
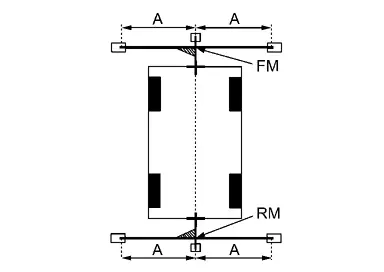
A : Approx. 75 cm (29.5 in) Route the vinyl string through the points FM and RM using a triangle scale, and then fix it at approximately 1.5 m (59.0 in) on both sides with packing tape.
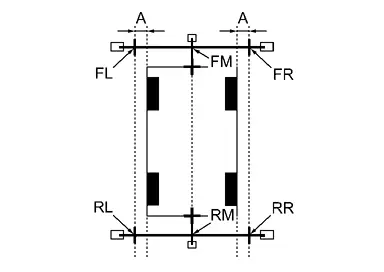
A : Approx. 1.5 m (59.0 in) Put the points FL, FR, RL, and RR (mark) to both right and left [vehicle width / 2 + 30 cm (11.8 in)] from the points FM and RM.
A : Approx. 30 cm (11.8 in) Draw the lines of the points FL – RL and FR – RR with vinyl string, and fix it with packing tape.
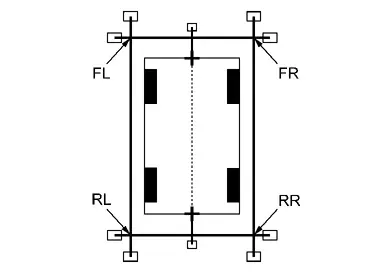
Put a mark on the center of each axle
, draw vertical lines to the lines of the points FL – RL and FR – RR from the marks on the center of the axle using a triangle scale, and then fix the lines using packing tape.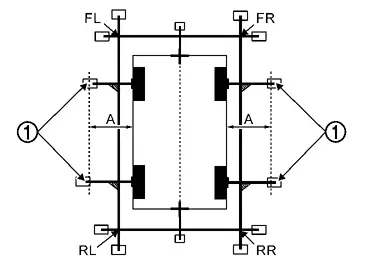
A : Approx. 60 cm (23.6 in)
Is the “Incomplete calibration” display visible?
YES>>GO TO 4.
NO>>GO TO 5.
PERFORM “CALIBRATING CAMERA IMAGE”
With CONSULT
Select “CALIBRATING CAMERA IMAGE” in “Work Support” mode of “AROUND VIEW MONITOR” using CONSULT.
Front camera: “CALIBRATING CAMERA IMAGE (FRONT CAMERA)”
Passenger side camera: “CALIBRATING CAMERA IMAGE (PASS-SIDE CAMERA)”
Driver side camera: “CALIBRATING CAMERA IMAGE (DR-SIDE CAMERA)”
Rear camera: “CALIBRATING CAMERA IMAGE (REAR CAMERA)”
Perform “CALIBRATING CAMERA IMAGE” as per the following procedure.
On the adjustment screen of each camera, adjust the parameter by touching the “AXIS X”, “AXIS Y”, and “ROTATE” to place the calibration marker shown on the camera screen on the target line drawn on the ground.
On the adjustment screen of each camera, operate “+” and “-” of “Magnify/Reduce”, so that images on screen of target line and calibration maker are aligned.
Touch “APPLY” on the CONSULT screen. “Writing...” is displayed and adjustment results are shown on the camera screen.
Touch “OK” on the CONSULT screen. “Writing...” is displayed and adjustment results are written to the around view monitor control unit
GO TO 5.
PERFORM “FINE TUNING OF BIRDS-EYE VIEW” (1)
With CONSULT
Select “FINE TUNING OF BIRDS-EYE VIEW” in “Work Support” mode of “AROUND VIEW MONITOR” using CONSULT.
Perform “FINE TURNING OF BIRDS-EYE VIEW” as per the following procedure.
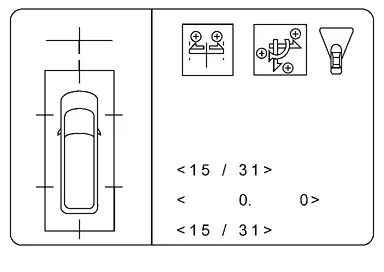
Operate “+” and “–” of “AXIS X”, “AXIS Y”, and “ROTATE”, so that images on screen of target line on the ground and marker are aligned between each camera.
Operate “+” and “–” of “Magnify/Reduce”, so that images on screen of target line on the ground and marker are aligned between each camera.
Touch “APPLY” on the CONSULT screen. “Writing...” is displayed and adjustment results are shown on the camera screen.
Touch “OK” on the CONSULT screen. “Writing...” is displayed and adjustment results are written to the around view monitor control unit.
Is the gap between the each camera image normal?
YES>>WORK END
NO>>GO TO 6.
PREPARATION OF TARGET LINE 2
Draw target line 2 at the position of the approximately 1.0 m (39.9 in) outside from target line 1 which established by procedure 2.
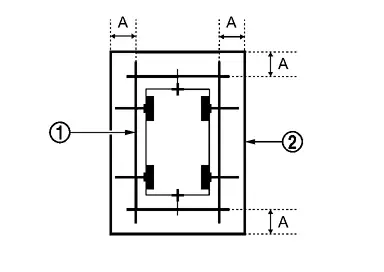
| A | : Approx.1.0 m (39.9 in) |
GO TO 7.
“PERFORM “FINE TUNING OF BIRDS-EYE VIEW” (2)
With CONSULT
Select “FINE TUNING OF BIRDS-EYE VIEW” in “Work Support” mode of “AROUND VIEW MONITOR” using CONSULT.
Perform “FINE TURNING OF BIRDS-EYE VIEW” as per the following procedure.
Confirm the gap of the boundary of target line 2 between the camera image and operate “+” and “–” of “AXIS X”, “AXIS Y”, “ROTATE” and “Magnify/Reduce”, and adjust the gap of the target line 2 boundary.
Touch “APPLY” on the CONSULT screen. “Writing...” is displayed and adjustment results are shown on the camera screen.
Touch “OK” on the CONSULT screen. “Writing...” is displayed and adjustment results are written to the around view monitor control unit.
WORK END
3d View Rotation
Work Procedure
Perform camera calibration and perform writing to the around view monitor control unit, after removal/installation or replacement of each camera or camera mounting parts (front bumper molding center, door mirror, or others), or replacement of around view monitor control unit.
| Parts name | Operation | Operation | |
| Replacement | Removal | ||
| Front camera | x | x | Camera calibration |
| Front bumper molding center | x | x | |
| Side camera | x | x | |
| Door mirror ASSY | x | x | |
| Rear camera | x | x | |
| Back door ASSY | x | x | |
PREPARATION
PERFORM SELF-DIAGNOSIS
Perform self diagnosis of AROUND VIEW MONITOR using CONSULT.
Is DTC detected?
YES-1>>Detecting DTC other than B2A04-51: Perform a corresponding diagnosis from the DTC list first. Refer to DTC Index.
YES-2>>Detected DTC B2A04-51. GO TO 2.
NO>>GO TO 3.
CHECK REPLACED PARTS
Check replaced parts.
Is only around view monitor C/U replaced?
YES>>Select "Work support", "CALIBRATING CAMERA IMAGE" and write camera calibration data.
NO>>GO TO 3.
CAMERA CALIBRATION PREPARATION
Check tire pressure and adjust to regular pressure.
vehicle in no-load condition.
Empty the vehicle.
Select shift position P and release parking brake.
Open door mirror.
Clean each cameras.
Secure work space for calibration according to the camera.


Driver camera calibration
L: 5000 mm
W: 3000 mm
Passenger side camera calibration
L: 5000 mm
W: 3000 mm
Front camera calibration
L: 3000 mm
W: 5000 mm
Rear camera calibration
L: 3000 mm
W: 5000 mm
GO TO 4.
PREPARATION OF CALIBRATION TARGET
Prepare fourteen sheets of white paper and black paper, respectively, with dimensions of 200 mm (7.87 in) X 200 mm (7.87 in) to create a left target and right target.
Tape two sheets of black paper and two sheets of white paper together to make a target of 400 mm (15.75 in) X 400 mm (15.75 in).

L : 200 mm W : 200 mm Following step 2, create 6 targets (7 targets required).

L1 : 200 mm L2 : 400 mm W1 : 200 mm W2 : 400 mm
GO TO PERFORM CALIBRATION
PERFORM CALIBRATION
AXLE CENTER MEASUREMENT
Prepare laser leveler (KV 991 20 000).
Turn ON.
Check air bubbles and adjust the level of laser leveler.
Irradiate laser
vertically to become through center of front wheel hub.
Laser Apply masking tape on front fender, and put a mark on laser
 .

Apply tape on the ground, and make a line along with laser
.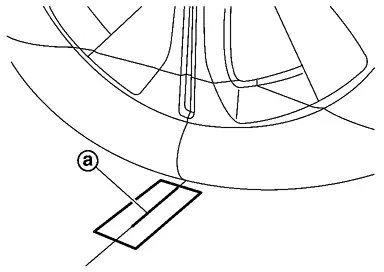
Move laser leveler 45 degrees
as shown in the figure.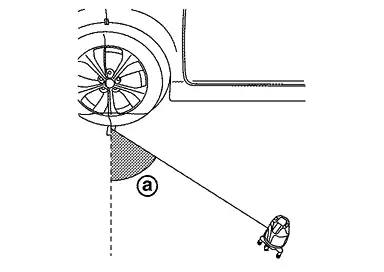
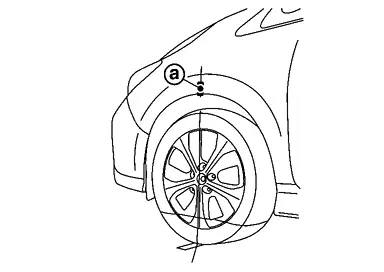
Align the laser beam irradiation position through the marked position on the fender
.
Draw a line
 along the laser light irradiation line through the tape attached to the ground.

Make sure there are two lines
and crossing on the tape attached on the ground. The point  where the lines on the tape intersect is the axle center point vertically lowered from the fender.
Perform same operation for remaining three axle center position.
GO TO 2.
CHECK CAMERA
Check the camera to be calibrated.
Left side camera or right side camera.>>GO TO 3.
Front or rear camera.>>GO TO 4.
PREPARATION OF AIMING ADJUSTMENT JIG (Driver side or passenger side)
Mark the position of 500 mm (19.69 in) (L) from the center point of the front axle.
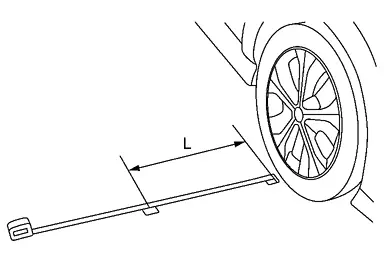
Perform same operation for rear side. Mark the position of 500 mm (19.69 in) (L) from the center point of the rear axle.
Extend the measure 4000 mm (157.48 in) and install it so that it passes the marked position on the front and rear side.
Adjust the position of measure (A) so that the marking position of 500 mm (19.69 in) from the center point of the front axle is 1000 mm (39.37 in) (L2) from the end.

Front marking position Rear marking positon L1 : 500 mm (19.69 in) L2 1000 mm (39.37 in) A Measure Set the target center on measure (A) position 1000 mm (39.37 in). One of the black part of target must be located on left depth side from camera.

A Measure Set the target center on measure (A) position 0 mm. One of the black part of target must be located on left depth side from camera.
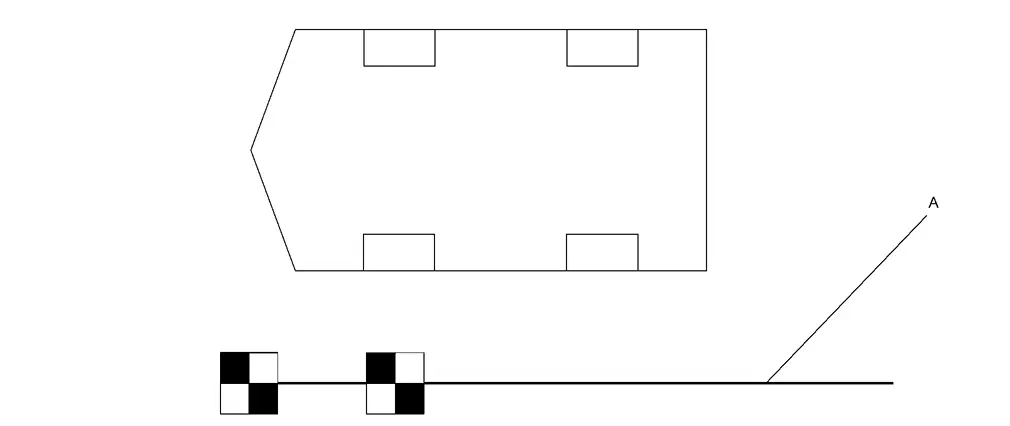
A Measure Set the remaining three targets at the interval of 1000 mm (39.37 in). One of the black part of target must be located on left depth side from camera.
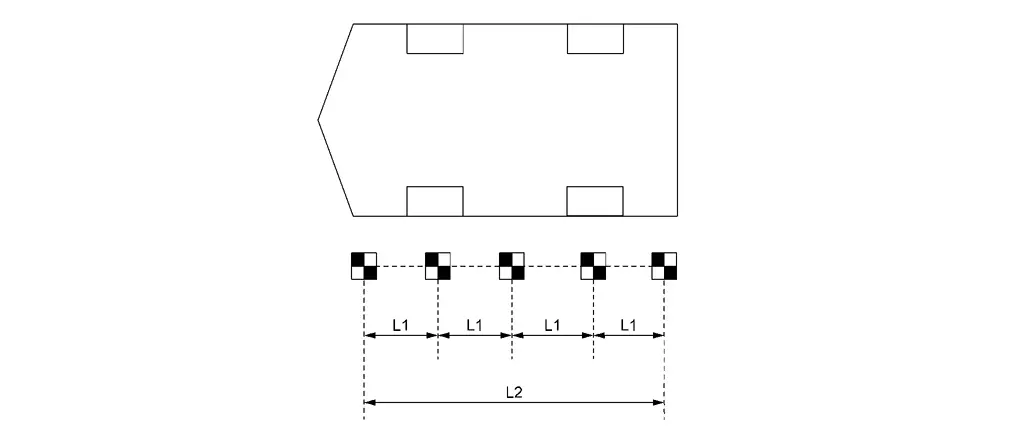
L1 : 1000 mm (39.37 in) (tolerance ± 10 mm (0.39 in)) L2 : 4000 mm (157.48 in) (tolerance ± 10 mm (0.39 in)) Set the target on the position 2000 mm (78.74 in) from the front and rear end of target. One of the black part of target must be located on left depth side from camera.
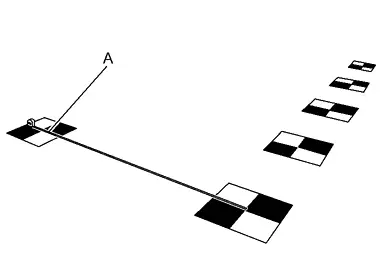
A : Measure Move the target approx 45 degrees so that the black part of target be located on left depth side from camera.
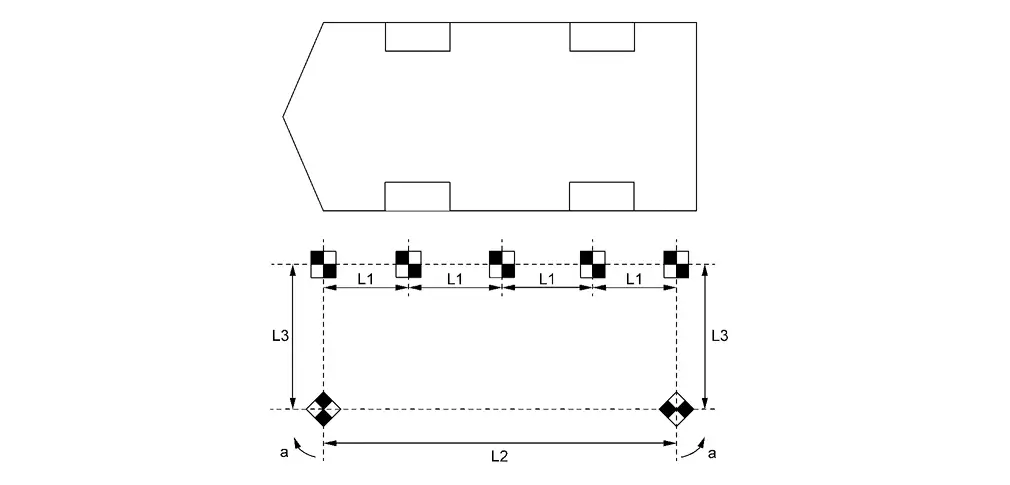
L1 : 1000 mm (39.37 in) (tolerance ± 10 mm (0.39 in)) L2 4000 mm (157.48 in) (tolerance ± 10 mm (0.39 in)) L3 : 2000 mm (78.74 in) (tolerance ± 10 mm (0.39 in)) a : approx. 45 degrees
GO TO 5.
PREPARATION OF AIMING ADJUSTMENT JIG (Front or Rear)
Prepare laser leveler (KV 991 20 000).
Turn ON.
Check air bubbles and adjust the level of laser leveler.
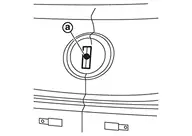
Irradiate laser
in the vertical direction to through the center part of the front emblem.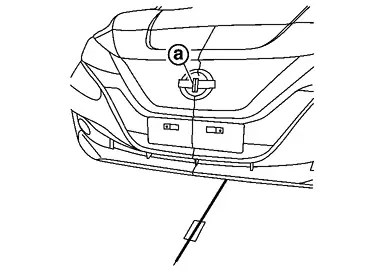
Apply masking tape on front emblem, and put a mark on laser line
.
Draw a line
along the laser light irradiation line through the tape attached to the ground.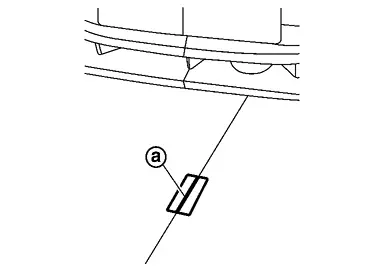
Move laser leveler 45 degrees as shown in the figure.
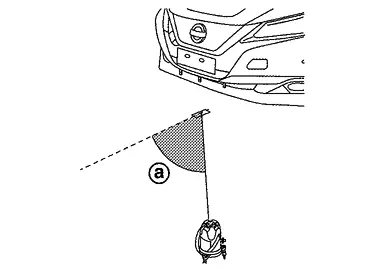
Align the laser beam irradiation position through the marked position on the front emblem
.Draw line
along the laser light irradiation line through the tape attached to the ground.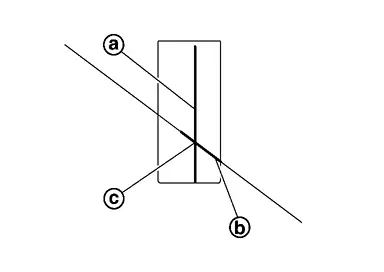
Make sure there are two lines
and crossing on the tape attached on the ground. The point where the lines on the tape intersect is the axle center point vertically lowered from the fender.Perform same operation for rear side.
Extend the measure and install it through the marked position on the front and rear side.
Mark the position
of 500 mm (L) from the front emblem center point.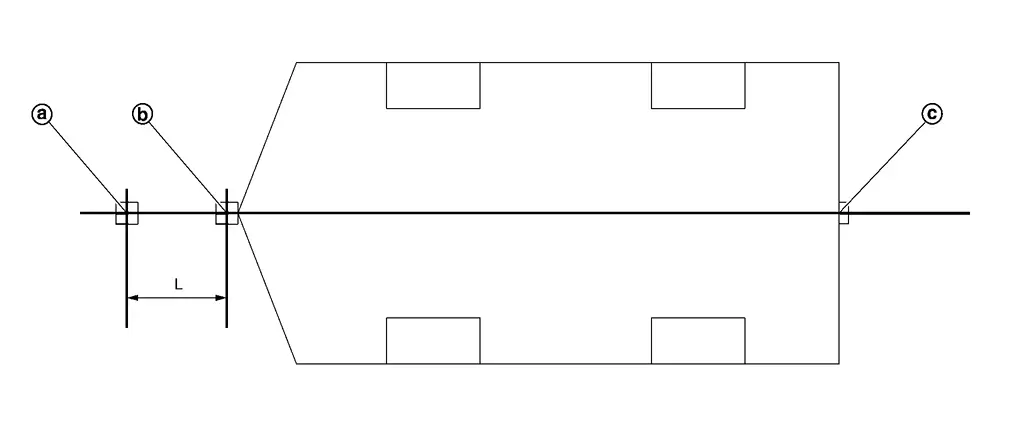
: Position of 500 mm (19.69 in) from front emblem Center position of front emblem : Center position of rear emblem L : 500 mm (19.69 in) Set the target on the position 500 mm (19.69 in) (L) from center of front emblem. One of the black part of target must be located on left depth side from camera.

A Measure Set the remaining four targets at the interval of 1000 mm (39.37 in). One of the black part of target must be located on left depth side from camera.
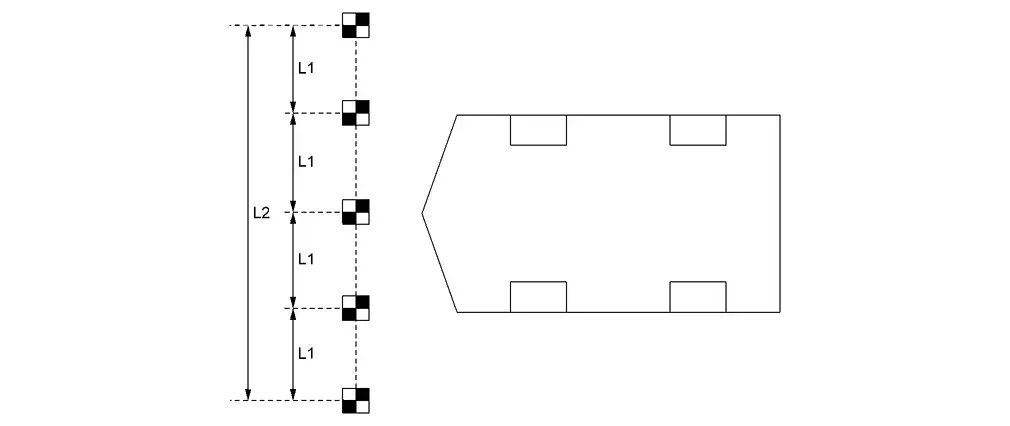
L1 : 1000 mm (39.37 in) (tolerance ± 10 mm (0.39 in)) L2 : 4000 mm (157.48 in) (tolerance ± 10 mm (0.39 in)) Set the target on the position 2000 mm (78.74 in) from the left and right end of target. One of the black part of target must be located on left depth side from camera.
A Measure Move the target approx 45 degrees so that the black part of target be located on left depth side from camera.

L1 : 1000 mm (39.37 in) (tolerance ± 10 mm (0.39 in)) L2 : 4000 mm (157.48 in) (tolerance ± 10 mm (0.39 in)) L3 : 2000 mm (78.74 in) (tolerance ± 10 mm (0.39 in)) a approx. 45 degrees
GO TO 5.
TARGET RECOGNITION OPERATION
Select "AROUND VIEW MONITOR", "Work support" and ”Camera calibration".
Select camera to be calibrated.
Status Outline Countermeasure Normal Normal status When remove camera or camera installed parts (front bumper molding, door mirror, or other), calibrate removed camera.
When replace only around view monitor, writing of calibration data from the camera is completed Calibration data was written, operation complete Processing Camera is processing a data If the status is not changed, replace corresponding camera and calibrate. Camera disconnected Camera is not connected Check camera connecting condition
If camera connecting condition is proper, replace camera and calibrate
Different version of camera When the camera version recognized by the around view monitor C/U differs from the actual camera version Replace camera and calibrate Calibration data not existing Calibration has not been done Calibrate camera Recognize the target to around view monitor C/U by CONSULT.
Recognition result is displayed in the navigation display.
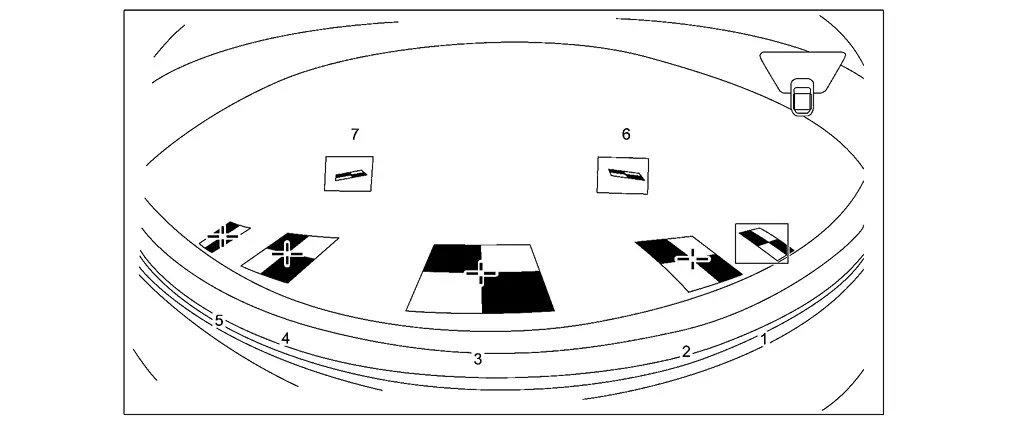
Touch the number displayed in CONSULT and check all the targets in the enlarged display.
Checking the screen of the enlarged target, use the larger arrow button displayed on the CONSULT to adjust the cross mark to approach the target center.
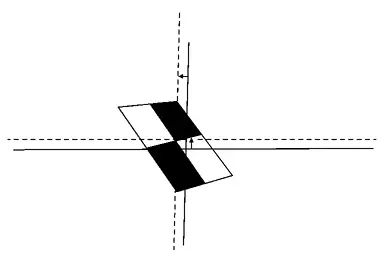
Move the cross line to center using the big arrow button. Adjust the cross line using the small arrow button until it is matched to the center of target.
Also check the enlarged screen for the automatically recognizable target, and adjust it if the cross mark and the target center are not aligned.
Adjust the approximate position with the arrow buttons of the bigger movements and make fine adjustments with the arrow buttons of the smaller movements to easily match the cross mark to the center of the target.
Check the condition of target (checked by check mark) and selected mm unit. And then touch next.
GO TO 6.
TARGET DISTANCE MEASUREMENT
Move the vehicle to the place where do not hinder calibration operation.
Measure the distance from the specified axle center point to the target in the order of L1 to L8.
Driver side camera
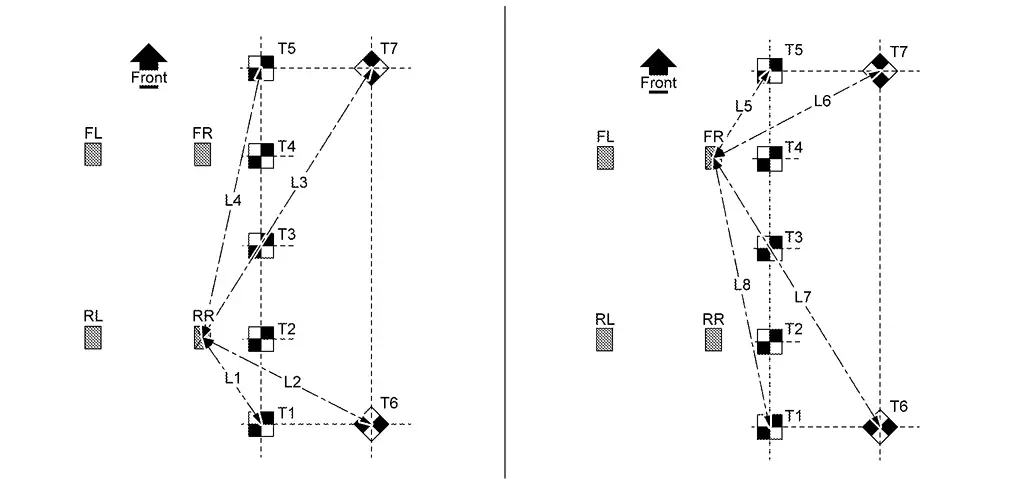
L1 Distance from right rear axle center marking to target T1 L2 Distance from right rear axle center marking to target T6 L3 Distance from right rear axle center marking to target T7 L4 Distance from right rear axle center marking to target T5 L5 Distance from right front axle center marking to target T5 L6 Distance from right front axle center marking to target T7 L7 Distance from right front axle center marking to target T6 L8 Distance from right front axle center marking to target T1 Passenger side camera

L1 Distance from left front axle center marking to target T1 L2 Distance from left front axle center marking to target T6 L3 Distance from left front axle center marking to target T7 L4 Distance from left front axle center marking to target T5 L5 Distance from left rear axle center marking to target T5 L6 Distance from left rear axle center marking to target T7 L7 Distance from left rear axle center marking to target T6 L8 Distance from left rear axle center marking to target T1 Front camera
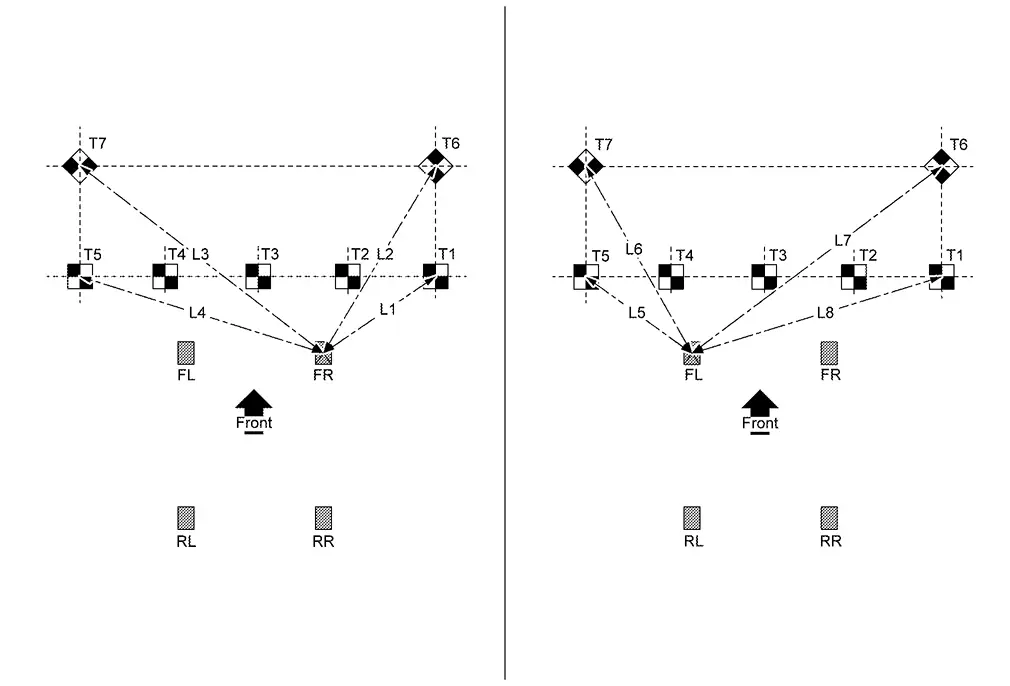
L1 Distance from right front axle center marking to target T1 L2 Distance from right front axle center marking to target T6 L3 Distance from right front axle center marking to target T7 L4 Distance from right front axle center marking to target T5 L5 Distance from left front axle center marking to target T5 L6 Distance from left front axle center marking to target T7 L7 Distance from left front axle center marking to target T6 L8 Distance from left front axle center marking to target T1 Rear camera

L1 Distance from left rear axle center marking to target T1 L2 Distance from left rear axle center marking to target T6 L3 Distance from left rear axle center marking to target T7 L4 Distance from left rear axle center marking to target T5 L5 Distance from right rear axle center marking to target T5 L6 Distance from right rear axle center marking to target T7 L7 Distance from right rear axle center marking to target T6 L8 Distance from right rear axle center marking to target T1
GO TO 7.
AXLE CENTER AND TARGET HEIGHT MEASUREMENT
Prepare laser leveler (KV 991 20 000).
Set laser leveler according with following camera position.
Left side camera: place radius 200 mm (7.87 in) from right front axle center position.
Right side camera: place radius 200 mm (7.87 in) from left front axle center position.
Front camera: place radius 200 mm (7.87 in) from front emblem center position.
Turn ON.
Check air bubbles and adjust the level of laser leveler.
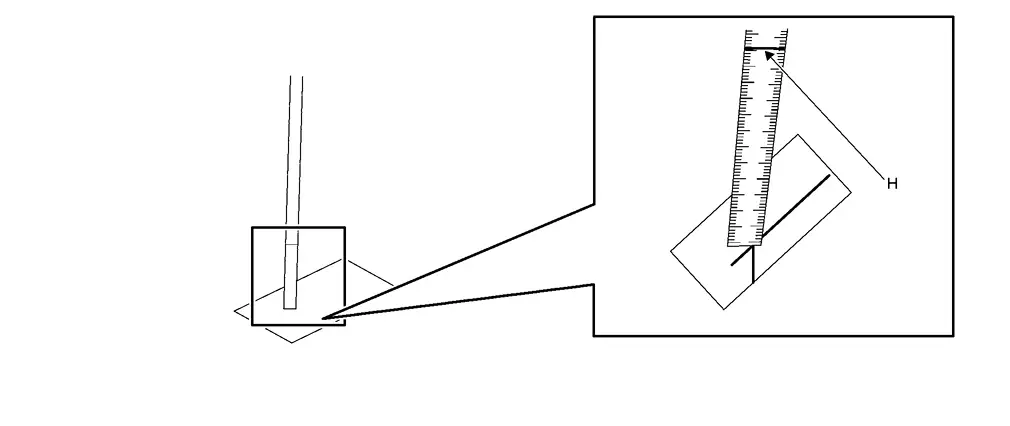
Horizontally irradiate the laser light, and stand the measure at the center position of the targets (T1) - (T7). Read the height (H) of the laser irradiated on the measure.
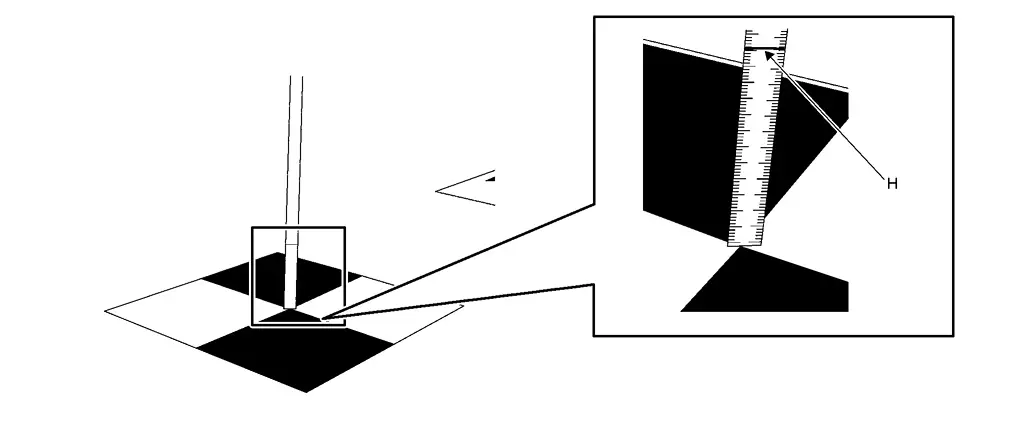
Horizontally irradiate the laser beam and set the measure at the position of 4 points on the axle center point road marked in advance. Read the height (H) of the laser irradiated on the measure.
Left side camera
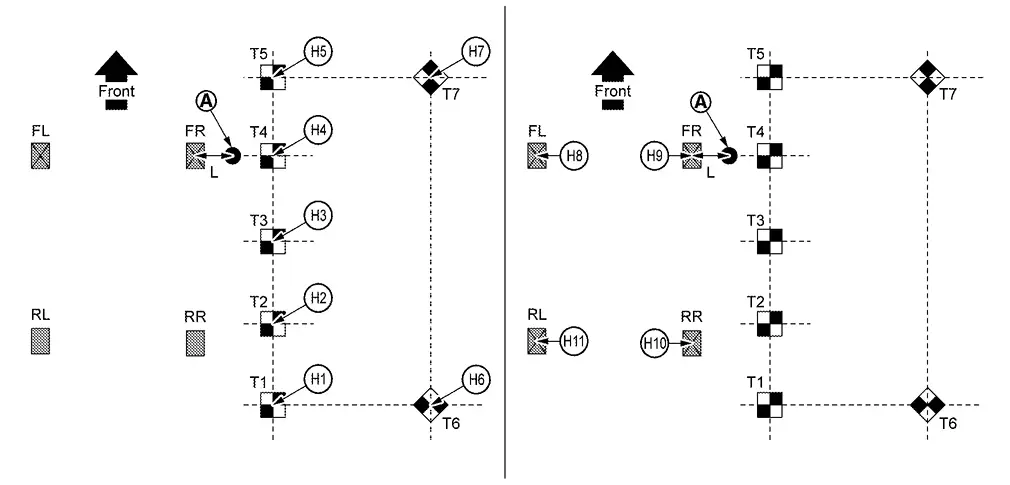
H1 Height from upper surface of target T1 H2 Height from upper surface of target T2 H3 Height from upper surface of target T3 H4 Height from upper surface of target T4 H5 Height from upper surface of target T5 H6 Height from upper surface of target T6 H7 Height from upper surface of target T7 H8 Height from left front axle center marking on the ground H9 Height from right front axle center marking on the ground H10 Height from right rear axle center marking on the ground H11 Height from left rear axle center marking on the ground : Laser leveler L : 200 mm (7.87 in) Right side camera
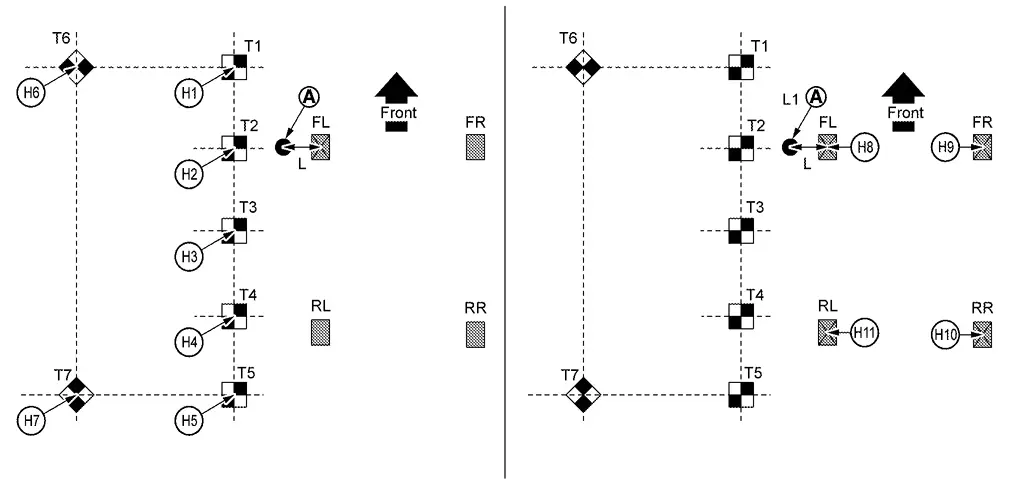
Front camera

H1 Height from upper surface of target T1 H2 Height from upper surface of target T2 H3 Height from upper surface of target T3 H4 Height from upper surface of target T4 H5 Height from upper surface of target T5 H6 Height from upper surface of target T6 H7 Height from upper surface of target T7 H8 Height from left front axle center marking on the ground H9 Height from right front axle center marking on the ground H10 Height from right rear axle center marking on the ground H11 Height from left rear axle center marking on the ground Laser leveler A Center position of front emblem L 200 mm (7.87 in) Rear camera
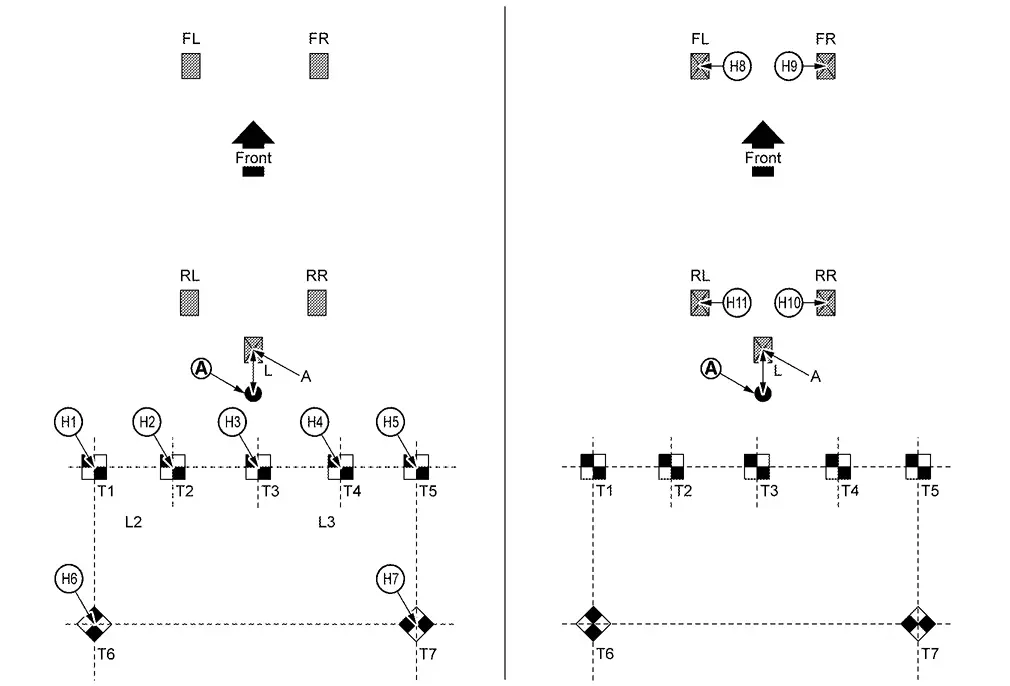
H1 Height from upper surface of target T1 H2 Height from upper surface of target T2 H3 Height from upper surface of target T3 H4 Height from upper surface of target T4 H5 Height from upper surface of target T5 H6 Height from upper surface of target T6 H7 Height from upper surface of target T7 H8 Height from left front axle center marking on the ground H9 Height from right front axle center marking on the ground H10 Height from right rear axle center marking on the ground H11 Height from left rear axle center marking on the ground Laser leveler A Center position of rear emblem L 200 mm (7.87 in)
GO TO 8.
INPUT MEASUREMENT RESULT
Input distance measurement result with mm to CONSULT.
Input height measurement result with mm to CONSULT.
Is the calibration result written correctly?
YES>>END
NO-1>>"Input value is incorrect Please input correct value" display: Check the measurement result and enter the correct value.
NO-2>>"Camera data write failed" is displayed: Restart camera calibration from the beginning. If writing fails even after re-execution, replace the corresponding camera.