Headrests - Seats
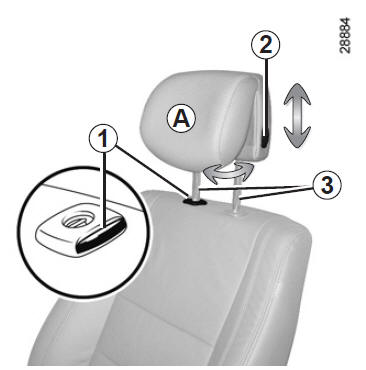
To raise the head restraint
pull the head restraint upwards to the desired height.
To lower the head restraint
press button 2 and guide the head restraint down to the desired height.
To adjust the tilt
depending on the vehicle, move part a apart or closer together until comfortable.
To remove the head restraint
raise the head restraint to its highest position (tilt the backrest rearward if necessary). Press button 1 and lift the head restraint until it is released.
To refit the head restraint
pull rods 3 out as far as they will go. Make sure they are aligned and clean and, if you have difficulty, check that the notches face forward.
Insert the headrest stems into the sleeves (tilt the seatback backwards if necessary).
Push the headrest down until it locks, then press button 1 and push the headrest down as far as it will go.
Make sure each stem 3 is locked in the seatback by trying to raise and lower them.
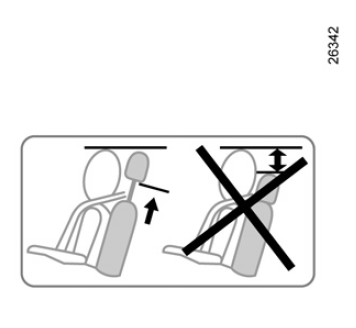
 The head restraint is a safety component: make sure it is present and correctly positioned. The top of the head restraint should be as close as possible to the top of the head, and the distance between the head and part a should be minimal.
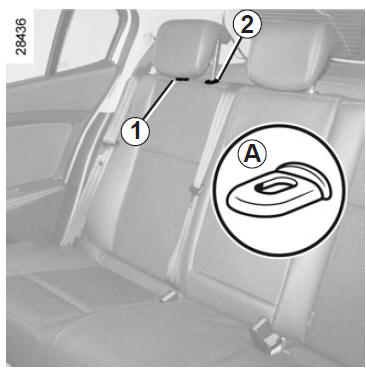
Use position
Raise or lower the head restraint while holding it pulled toward the front of the vehicle.
To remove it
Press tabs A on rods 1 and 2 simultaneously and remove the head restraint.
Note: for three-door versions, first fold down the rear seat backrest (refer to the paragraph "Rear seat operation" in chapter 3).
To reinstall it
Insert the posts into the sleeves and lower the head restraint to the first notch.
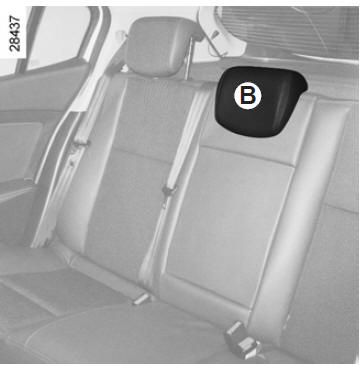
Storage position
Lower the head restraint fully, then press tab 2 and lower it completely.
The head restraint fully lowered (position B) is a storage position: it must not be used when a passenger is seated.
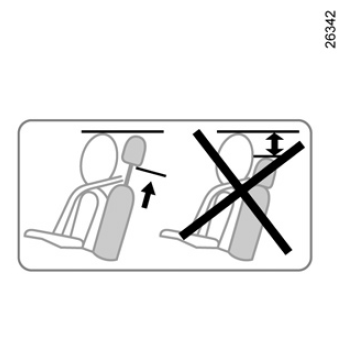
 The head restraint is a safety component: make sure it is present and correctly positioned. The top of the head restraint must be as close as possible to the top of the head.
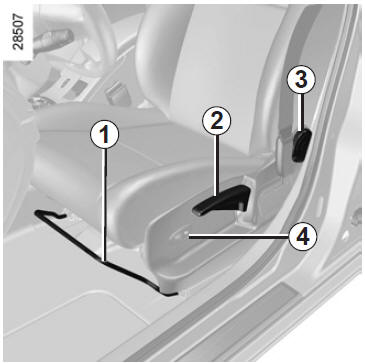
To move the seat forward or backward
Lift handle 1 to unlock. At the chosen position, release the handle and make sure the seat is securely locked.
To raise or lower the seat cushion
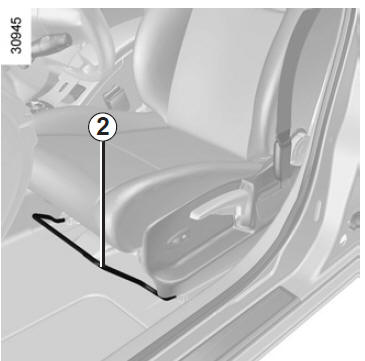
Operate lever 2 up or down as many times as necessary.
To recline the backrest
Turn wheel 3 to the desired position.
Heated seats (depending on vehicle)
With the engine running, turn control 4 to one of positions 1, 2 or 3 (depending on the desired temperature).
An indicator light comes on in the instrument panel as soon as the heating of one of the front seats is on.
The system, which is thermostatically controlled, determines, depending on the selected position, whether heating is necessary.
 For safety reasons, make these adjustments with the vehicle stationary.
To avoid impairing the effectiveness of the seat belts, we advise you not to recline the seatbacks too far.
No objects should be placed on the floor (driver's front footwell): in the event of hard braking, such objects may slide under the pedals and prevent their use.
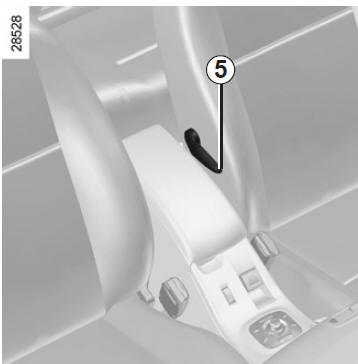
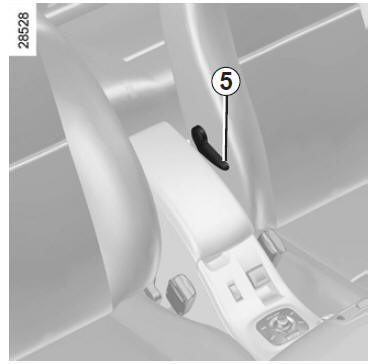
To adjust the driver's seat lumbar support: lower lever 5 to increase support and raise it to decrease support.
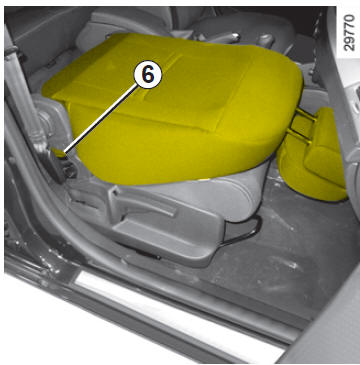
Table position: depending on the vehicle, the passenger-side backrest can fold down onto the seat cushion to form a table position.
Lower the head restraint, move the seat rearward, pull handle 6 and fold the backrest fully down.
 For your safety, secure any transported items when the seat is in the table position.When folding the front seat backrest into the table position, you must deactivate the front passenger airbag (refer to the paragraph "Child safety: deactivating and activating the front passenger airbag" in chapter 1).
Risk of serious injury in the event of airbag deployment from objects placed on the backrest folded into the table position.
The label (on the dashboard) and the markings (on the windshield) remind you of these instructions
Switch 3 adjusts the seatback and switch 4 adjusts the seat cushion.
On vehicles so equipped, buttons 1 are used to store the selected driving position (refer to the next page).
Seat cushion adjustment:
- To move the seat forward or backward, operate switch 4 forward or backward.
- To raise or lower the seat cushion, press switch 4 up or down.
Driver's seat lumbar adjustment: Lower lever 5 to increase lumbar support and raise it to reduce support.
 For safety reasons, make these adjustments with the vehicle stationary.
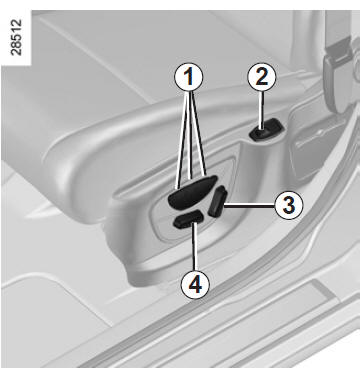
Seatback adjustment:
To recline the seatback, press the top of switch 3 forward or backward.
Heated seats (depending on vehicle)
With the engine running, turn control 2 to one of positions 1, 2 or 3 (depending on the desired temperature).
An indicator light comes on in the instrument panel as soon as the heating of one of the front seats is on.
The system, which is thermostatically controlled, determines, depending on the selected position, whether heating is necessary.
 To avoid impairing the effectiveness of the seat belts, we advise you not to recline the seatbacks too far.
No objects should be placed on the floor (driver's front footwell): in the event of hard braking, such objects may slide under the pedals and prevent their use.
Three driving positions can be stored.
A driving position combines the settings of the seat cushion, the seatback and the driver's seat.
The system operates when:
- a "hands-free" card is detected or, depending on the vehicle, a RENAULT card is in the card reader;
- when the driver's door is opened.
 For safety reasons, make these adjustments with the vehicle stationary.
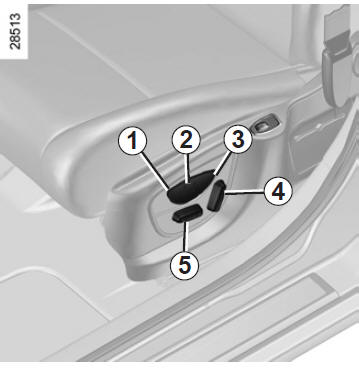
Storing the driving position
- Adjust the seat using switches 4 and 5 (see previous page);
- press one of buttons 1, 2 or 3 until you hear a beep: the driving position is stored;
- to store other driving positions, repeat this procedure with the other buttons.
Recalling a stored driving position
With the vehicle stationary, briefly press button 1, 2 or 3 depending on the stored driving position you want.
Note: recalling the stored driving position is interrupted if any seat adjustment button is pressed during recall.
A driving position cannot be recalled while the vehicle is moving.
 To avoid impairing the effectiveness of the seat belts, we advise you not to recline the seatbacks too far.
No objects should be placed on the floor (driver's front footwell): in the event of hard braking, such objects may slide under the pedals and prevent their use.
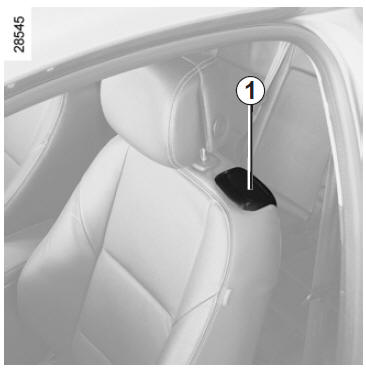
Three-door version
Manually adjustable seats
Lift handle 1 and slide the seat forward.
To return the seat to position, bring the seatback back upright.
Do not operate handle 1 and handle 2 at the same time.
Power-adjustable seats
Lift handle 1 and fully tilt the seatback forward: the seat moves forward.
To return the seat to position, bring the seatback back upright. The seat returns to its original position.
If a person, an object or a child seat prevents the front seats from locking, proceed as follows:
- have the occupant(s) get out and remove bulky objects from the rear seats;
- lock the seat(s) again in their original position;
- move the seat(s) forward to free up enough space;
- put the occupants, objects or child seat back in the rear seats.
 1.21 Front seats: Access to the rear seats. 1 Three-door version. Manually adjusted seats: lift handle 1 and slide the seat forward.
To return the seat to position, bring the seatback back upright.
Power seats: Lift handle 1 and fully tilt the seatback forward: the seat moves forward.
To return the seat to position, bring the seatback back upright. The seat returns to its original position.
Test yourself
A quick Renault Megane quiz: every answer comes with an explanation and a link to the manual page.