Preliminaries
1. APPLICABILITY OF THIS DOCUMENT
This document describes the diagnosis applicable to all control units with the following characteristics:
| Vehicle: MEGANE II TYPE BMXX, CMXX AND SMXX Function concerned: AIRBAG |
Control unit name: AUTOLIV - ACU 4 Program No.: Vdiag No.: 04 |
2. ESSENTIAL ITEMS FOR DIAGNOSIS
Documentation type
Diagnostic methods (this document):
- Assisted diagnosis (built into the diagnostic tool), paper (Repair Manual or Technical Note), Dialogys.
Wiring diagrams:
- Visu-Schéma (CD-ROM), paper.
Diagnostic tool type
- CLIP
Essential tool type
ESSENTIAL SPECIALIST TOOLS |
LOCAL MODIFICATION OF THE INERT IGNITER:
|
|
3. REMINDERS
Faults
Procedure
To diagnose the vehicle's control units, put the ignition in diagnostic mode (+ after forced ignition):
- Place the vehicle badge on the badge holder.
- long press (more than 5 seconds) on the "start" button outside starting conditions,
- Then connect the diagnostic tool and carry out the required operations.
The left and right xenon headlamp control units are powered when the dipped beam headlights are switched on.
Their diagnosis is therefore only possible after switching the ignition on in diagnostic mode (or after forced ignition) and switching on the dipped headlights.
To switch off the +after ignition, proceed as follows:
- Disconnect the diagnostic tool,
- Briefly press the "start" button twice (less than 3 seconds each time),
- Check that the +after ignition forced is switched off by the computer warning lights on the instrument panel going out.
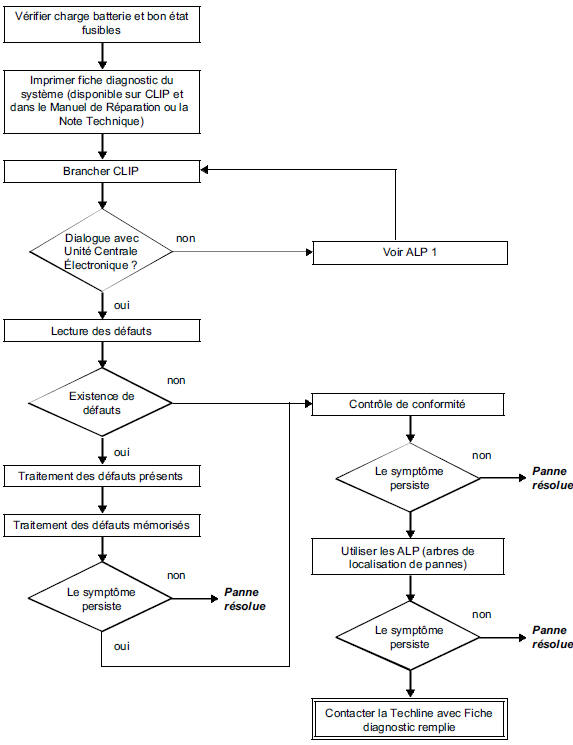
There are declared present faults and declared stored faults (which appeared under certain conditions and have since cleared, or are still present but were not diagnosed under the current conditions).
The “present” or “stored” state of faults must be considered when the diagnostic tool is started after + after ignition (without any action on the system components).
For a present fault, deal with the fault following the procedure given in the chapter "Fault interpretation".
For a stored fault, note the displayed faults and follow the instructions in the "Instructions" section.
If the fault is confirmed when the instruction is applied, the fault is present. In this case, repair the fault.
If the fault is not confirmed, carry out the basic checks. To do so, check:
- the electrical circuits corresponding to the fault,
- the connectors of these lines (corrosion, bent pins, etc.),
- the resistance of the component detected as faulty,
- the condition of the wiring (melted or cut insulation, chafing),
or use the diagnosis as a guide to check the circuit of the suspect component.
Conformity check
The conformity check aims to verify the states and parameters that show no fault on the diagnostic tool when they are inconsistent. This step therefore allows you to:
- diagnose faults with no fault display that may correspond to a customer complaint,
- verify correct operation of the system and make sure a fault will not reappear after repair.
This chapter therefore contains a diagnosis of states and parameters, under the conditions required for their check.
If a state does not operate normally or a parameter is out of tolerance, refer to the corresponding diagnostic page.
Customer complaints - Fault locating tree
If the diagnostic tool check is correct but the customer complaint is still present, deal with the problem using "customer complaints".
A summary of the overall procedure is shown as a flowchart on the next page.4. DIAGNOSTIC PROCEDURE
5. DIAGNOSTIC SHEET
WARNING:
For any reimbursement of a “monitored” part (control unit type) or any Techline call, a properly documented diagnostic record will be required.
A DIAGNOSTIC SHEET MUST BE COMPLETED EVERY TIME A DIAGNOSIS IS PERFORMED.All incidents requiring control unit replacement must be subject to a complete diagnosis using suitable tools. The diagnostic record must be completed during the diagnosis and is used to report findings for warranty reimbursement.
6. SAFETY INSTRUCTIONS
Any work on a component requires compliance with safety rules to avoid any material or personal injury:
- Check that the battery is correctly charged to avoid damage to the ECUs in case of low charge.
When working on airbag and seat belt pretensioner systems, always lock the control unit using the diagnostic tool to prevent any risk of accidental deployment (all firing lines will be inhibited). This “locked” mode is indicated by the warning light on the instrument panel coming on.
If the diagnostic tool cannot connect, switch off the ignition, remove the system's power fuse and wait at least 2 seconds for the reserve energy capacitor to discharge.
Never take measurements on the airbag and pretensioner firing lines with any device other than the XRBAG or the “Airbag and pretensioner harness check” function of the CLIP.
Before using an inert igniter, make sure its resistance is between 1.8 and 2.5 Ω.
During the procedure, make sure the control unit supply voltage does not drop below 10 V.
WARNINGThe destruction and disposal of airbags and pretensioners is subject to the legislation of each country.
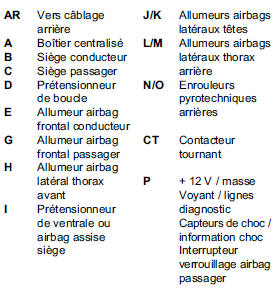
SYSTEM CONFIGURATION SHEET (FRONT PART)
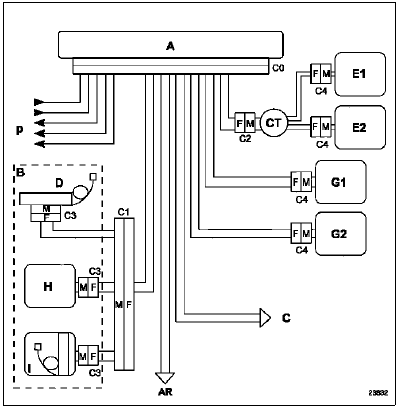
RR To rear wiring harness
SYSTEM CONFIGURATION SHEET (REAR PART)
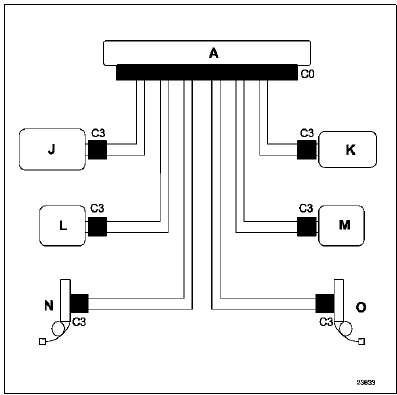
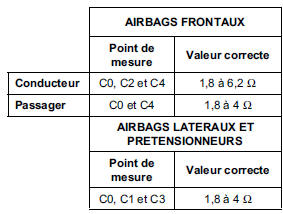
Correct insulation value: display ≥ 100.h or flashing 9999.
DEFINITION OF FIRING LINES
L1: Driver seat cushion / lap belt airbag circuit (wire B of 64-way connector Elé. 1686)
L2: Passenger seat cushion / lap belt airbag circuit (wire D of 64-way connector Elé. 1686)
L3: Front passenger airbag circuit 1 (wire B of 22-way connector Elé. 1685)
L4: Front passenger airbag circuit 2 (wire A of 22-way connector Elé. 1685)
L5: Driver front airbag circuit 1 (wire C of 22-way connector Elé. 1685)
L6: Driver front airbag circuit 2 (wire D of 22-way connector Elé. 1685)
L7: Driver side head airbag circuit (wire I of 64-way connector Elé. 1686)
L8: Passenger side head airbag circuit (wire G of 64-way connector Elé. 1686)
L9: Driver front side thorax airbag circuit (wire H of 64-way connector Elé. 1686)
L10: Passenger front side thorax airbag circuit (wire F of 64-way connector Elé. 1686)
L11: Driver rear side thorax airbag circuit (wire N of 64-way connector Elé. 1686)
L12: Passenger rear side thorax airbag circuit (wire L of 64-way connector Elé. 1686)
L13: Front belt pretensioner circuits (wires A and C of 64-way connector Elé. 1686)
L14: Rear retractors (wires E and J of 64-way connector Elé. 1686)
Test yourself
A quick Renault Megane quiz: every answer comes with an explanation and a link to the manual page.