Engine Mechanical System
Timing Chain Cover Repair Procedures
In this manual: Engine Mechanical System
14steps
~84min
3/5difficulty
Done 0 of 14
Removal
|
|

|

- Remove the drive belt. (Refer to Valve Timing System - "Drive Belt")
- Remove the drive belt tensioner. (Refer to Timing System - Idle Pulley)
- Remove the generator. (Refer to Engine Electrical System - "Generator")
- Remove the generator bracket. (Refer to Engine Electrical System - "Generator")
- Remove the engine room cover.
- Remove the crankshaft damper pulley. (Refer to Valve Train - Crankshaft Damper Pulley).
- Remove the water pump. (Refer to Cooling System - "Water Pump").
- Remove the air cleaner assembly. (Refer to Intake and Exhaust System - "Air Cleaner")
- Remove the high pressure fuel pump. (Refer to Fuel System - "High Pressure Fuel Pump")
- Remove the cylinder head cover. (Refer to Cylinder Head Assembly - Cylinder Head Cover)
- Remove the engine mounting bracket. (Refer to Engine and Transaxle Assembly - "Engine Mounting")
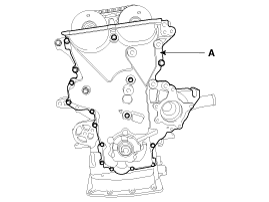
- Remove the timing chain cover (A).
Installation
- Install the timing chain cover.
- Before installation, remove the hardened sealant from the surface of the cylinder block and ladder frame.
- Apply liquid gasket (TB 1217H or LOCTITE 5900H) to the surface between the cylinder head and cylinder block.
Width: 3 ~ 5 mm (0.1181 ~ 0.1969 in)
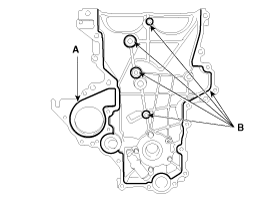
- Apply liquid sealant THREE BOND 1282B or THREE BOND 1216E to the contact areas of the water pump (A) and timing chain cover, and THREE BOND 1217H or LOCTITE 5900H to the other areas (B). Assemble the cover within 5 minutes.
Width: 3.5 ~ 4.5 mm (0.1378 ~ 0.1772 in)
Be sure to remove oil or dust from the surface.
- Align the locating pin of the cylinder block with the hole of the oil pump.
- Tighten the bolts to install the timing chain cover (A). Tightening torque: M8 bolts: 18.6 ~ 24 N·m M6 bolts: 9.8 ~ 11.8 N·m
- Install in the reverse order of removal.
Test yourself
A quick Hyundai Sonata LF quiz: every answer comes with an explanation and a link to the manual page.
Was this page helpful?