Audio / Visual / Telematics
Removal
In this manual: Audio / Visual / Telematics
~1min read
REMOVAL PROCEDURE

1. DISCONNECT CABLE FROM NEGATIVE BATTERY TERMINAL
(See page )
2. REMOVE NO. 1 INSTRUMENT CLUSTER FINISH PANEL GARNISH
3. REMOVE NO. 2 INSTRUMENT CLUSTER FINISH PANEL GARNISH
4. REMOVE HEATER CONTROL ASSEMBLY
5. REMOVE RADIO AND DISPLAY RECEIVER ASSEMBLY WITH BRACKET (for Radio and Display Type)
6. REMOVE NAVIGATION RECEIVER ASSEMBLY WITH BRACKETS (for Navigation Receiver Type)
7. REMOVE HAZARD SWITCH WIRE
8. REMOVE NO. 1 RADIO BRACKET
9. REMOVE NO. 2 RADIO BRACKET
10. REMOVE STEREO COMPONENT TUNER ASSEMBLY
(a) Disconnect the 6 connectors to remove the navigation wire and stereo component tuner assembly as shown in the illustration. |
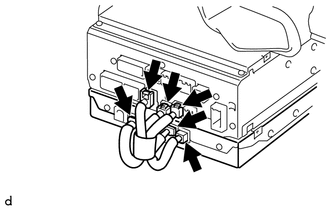 |
Test yourself
A quick Toyota 4Runner quiz: every answer comes with an explanation and a link to the manual page.
Was this page helpful?