Rear Shock Absorber
Components
COMPONENTS
ILLUSTRATION
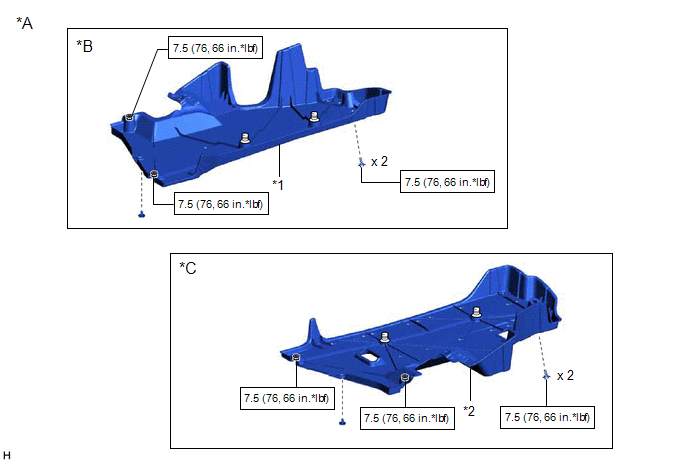
*A |
for Gasoline Model |
*B |
for RH Side |
*C |
for LH Side |
- |
- |
*1 |
NO. 1 FLOOR UNDER COVER |
*2 |
NO. 2 FLOOR UNDER COVER |
 |
N*m (kgf*cm, ft.*lbf): Specified torque |
- |
- |
ILLUSTRATION
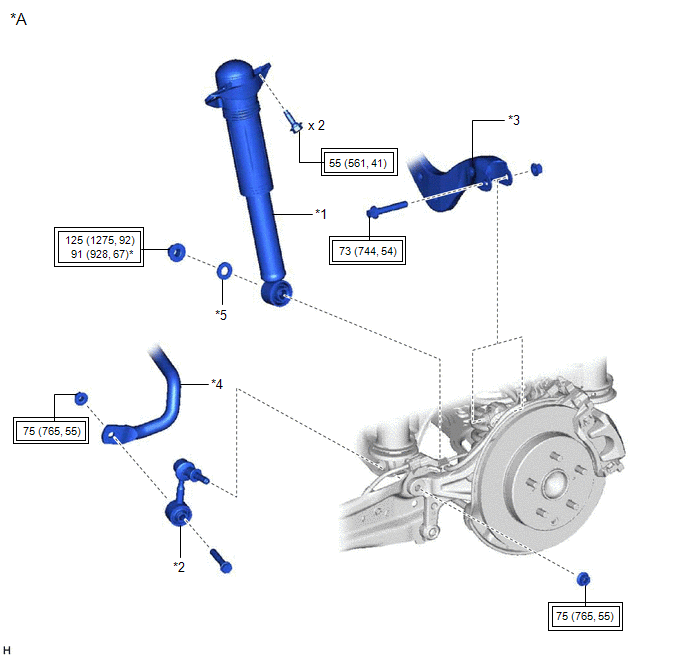
*A |
w/o AVS |
- |
- |
*1 |
REAR SHOCK ABSORBER ASSEMBLY |
*2 |
REAR STABILIZER LINK ASSEMBLY |
*3 |
REAR UPPER CONTROL ARM ASSEMBLY |
*4 |
REAR STABILIZER BAR |
*5 |
PLATE WASHER |
- |
- |
 |
Tightening torque for "Major areas involving basic vehicle performance such as moving/turning/stopping": N*m (kgf*cm, ft.*lbf) |
* |
For use with a ball joint lock nut wrench |
ILLUSTRATION
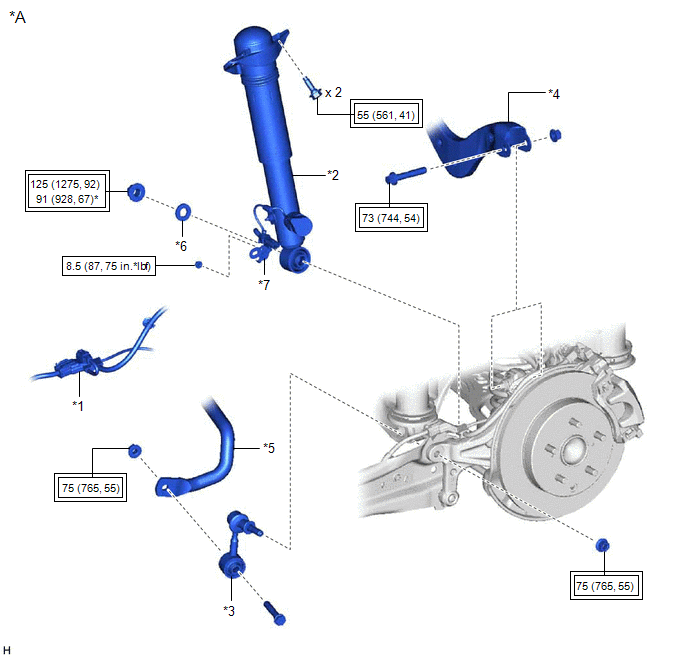
*A |
w/ AVS |
- |
- |
*1 |
NO. 2 PARKING BRAKE WIRE ASSEMBLY |
*2 |
REAR SHOCK ABSORBER ASSEMBLY |
*3 |
REAR STABILIZER LINK ASSEMBLY |
*4 |
REAR UPPER CONTROL ARM ASSEMBLY |
*5 |
REAR STABILIZER BAR |
*6 |
PLATE WASHER |
*7 |
WIRE HARNESS BRACKET |
- |
- |
|
Tightening torque for "Major areas involving basic vehicle performance such as moving/turning/stopping": N*m (kgf*cm, ft.*lbf) |
|
N*m (kgf*cm, ft.*lbf): Specified torque |
* |
For use with a ball joint lock nut wrench |
- |
- |
ILLUSTRATION
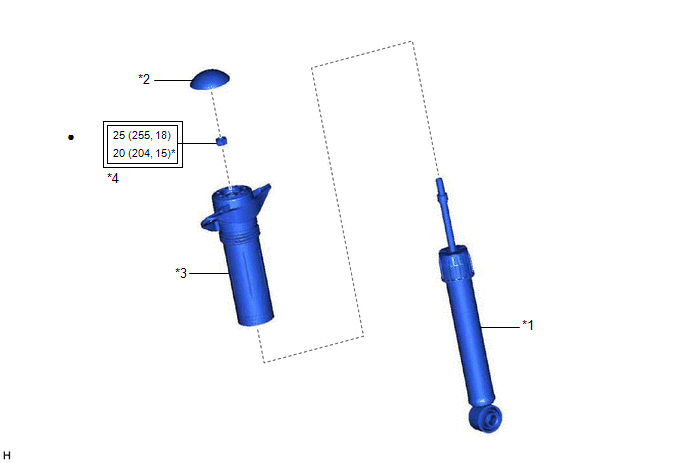
*1 |
REAR SHOCK ABSORBER ASSEMBLY |
*2 |
REAR SHOCK ABSORBER CAP |
*3 |
REAR SUSPENSION SUPPORT ASSEMBLY |
*4 |
REAR SUPPORT TO REAR SHOCK ABSORBER NUT |
|
Tightening torque for "Major areas involving basic vehicle performance such as moving/turning/stopping": N*m (kgf*cm, ft.*lbf) |
* |
For use with SST |
● |
Non-reusable part |
★ |
Precoated part |
Disposal
DISPOSAL
PROCEDURE
1. DISPOSE OF REAR SHOCK ABSORBER ASSEMBLY
CAUTION:
- Always use a cloth to prevent shards of metal flying about due to the release of pressurized gas.
- Always wear safety glasses.
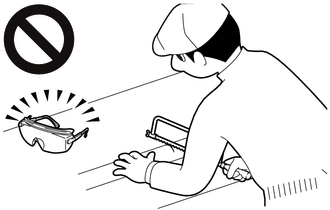
HINT:
The gas is colorless, odorless and non-poisonous.
(a) Extend the piston rod and secure the rear shock absorber assembly at an angle in a vise. |
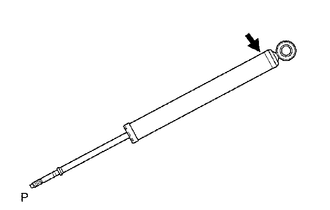 |
(b) Using a hacksaw, slowly make a hole at the position indicated by the arrow in the illustration to discharge the gas inside.
Inspection
INSPECTION
PROCEDURE
1. INSPECT REAR SHOCK ABSORBER ASSEMBLY
(a) Compress and extend the rear shock absorber assembly rod 4 or more times.
Standard:
When compressed and extended at a constant speed, the stroke of the shock absorber rod is smooth with no abnormal resistance or sounds. When extended, the shock absorber rod returns to its original position at a constant speed with no abnormal sounds.
HINT:
If there are any abnormalities, replace the rear shock absorber assembly with a new one.
Installation
INSTALLATION
HINT:
- Use the same procedure for the RH side and LH side.
- The following procedure is for the LH side.
PROCEDURE
1. INSTALL REAR SUSPENSION SUPPORT ASSEMBLY
(a) Secure the rear suspension support assembly in a vise using aluminum plates.
NOTICE:
Do not overtighten the vise.
(b) Install the rear suspension support assembly to the rear shock absorber assembly.
(c) Apply a few drops of adhesive to the threads of a new rear support to rear shock absorber nut.
Adhesive:
Toyota Genuine Adhesive 1324, Three Bond 1324 or equivalent
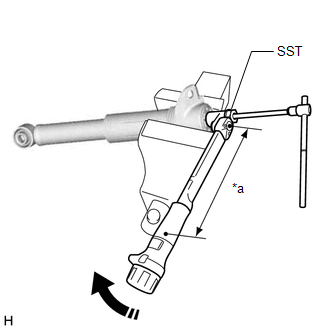
(d) Using SST and a 6 mm hexagon socket wrench, hold the rear shock absorber rod and tighten the rear support to rear shock absorber nut. SST: 09729-97202 Torque: Specified tightening torque : 25 N·m {255 kgf·cm, 18 ft·lbf} NOTICE: Securely insert the 6 mm hexagon socket wrench into the rear shock absorber rod to prevent damage to the rear shock absorber assembly when tightening the rear support to rear shock absorber nut. HINT:
|
|
2. INSTALL REAR SHOCK ABSORBER CAP
(a) Install the rear shock absorber cap to the rear shock absorber assembly.
3. TEMPORARILY INSTALL REAR SHOCK ABSORBER ASSEMBLY
(a) Temporarily install the rear shock absorber assembly to the rear axle carrier sub-assembly with the nut and plate washer. NOTICE: Hold the rear axle carrier pin while rotating the nut. |
|
4. STABILIZE SUSPENSION
(a) Using a jack and wooden block, apply load to the suspension so that the rear No. 2 suspension arm assembly is positioned as shown in the illustration.
Standard Length (A):
13 mm (0.512 in.)
CAUTION:
Do not jack up the rear No. 2 suspension arm assembly too high as the vehicle may fall.
NOTICE:
- When jacking up the rear No. 2 suspension arm assembly, be sure to jack it up slowly.
- Make sure to perform this operation with the vehicle kept as low as possible.
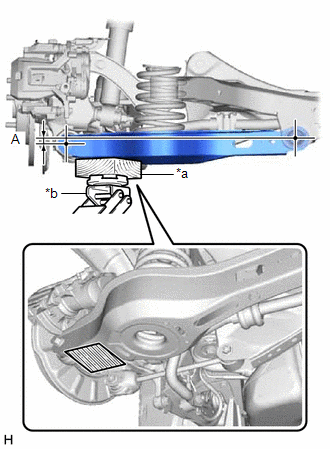
*a |
Wooden Block |
*b |
Jack |
 |
Wooden Block Placement Location |
5. INSTALL REAR UPPER CONTROL ARM ASSEMBLY
(a) Install the rear upper control arm assembly to the rear axle carrier sub-assembly with the bolt and nut.
Torque:
73 N·m {744 kgf·cm, 54 ft·lbf}
NOTICE:
- Insert the bolt with the threaded end facing the rear of the vehicle.
- Because the nut has its own stopper, do not turn the nut. Tighten the bolt with the nut secured.
6. CONNECT REAR SHOCK ABSORBER ASSEMBLY
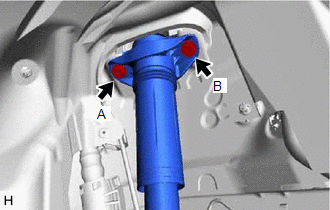
(a) Connect the rear shock absorber assembly to the vehicle with the 2 bolts. Torque: 55 N·m {561 kgf·cm, 41 ft·lbf} NOTICE: Temporarily tighten the bolt (A) and then fully tighten the 2 bolts in the order of (B) and (A). |
 |
7. INSTALL REAR SHOCK ABSORBER ASSEMBLY
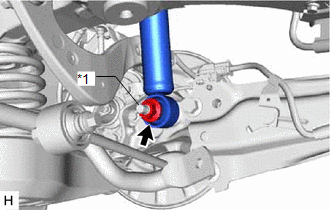
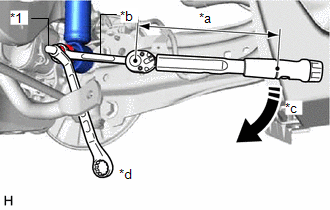
(a) Using a ball joint lock nut wrench fully tighten the rear shock absorber assembly with the nut. Torque: Specified tightening torque : 125 N·m {1275 kgf·cm, 92 ft·lbf} NOTICE: Hold the rear axle carrier pin while rotating the nut. HINT:
|
|
8. INSTALL REAR STABILIZER LINK ASSEMBLY
Click here 
9. INSTALL NO. 2 PARKING BRAKE WIRE ASSEMBLY (w/ AVS)
(a) Engage the guide and install the wire harness bracket. |
|
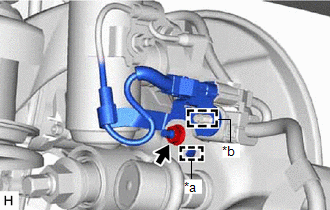
(b) Install the nut.
Torque:
8,5 N·m {87 kgf·cm, 75 in·lbf}
(c) Engage the clamp and install the No. 2 parking brake wire assembly to the wire harness bracket.
(d) Connect the connector. |
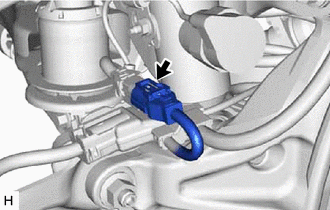 |
10. INSTALL NO. 1 FLOOR UNDER COVER (for Gasoline Model)
(a) for RH Side:
Click here
11. INSTALL NO. 2 FLOOR UNDER COVER (for Gasoline Model)
(a) for LH Side:
Click here
12. INSTALL REAR WHEEL
Click here
13. INSPECT AND ADJUST REAR WHEEL ALIGNMENT
Click here
14. PERFORM INITIALIZATION
for Gasoline Model:
|
|
Parking Assist Monitor System |
|
Panoramic View Monitor System |
|
|
|
Parking Assist Monitor System |
|
Panoramic View Monitor System |
|
Removal
REMOVAL
The necessary procedures (adjustment, calibration, initialization, or registration) that must be performed after parts are removed and installed, or replaced during rear shock absorber assembly removal/installation are shown below.
Necessary Procedures After Parts Removed/Installed/Replaced (for Gasoline Model:)Replaced Part or Performed Procedure | Necessary Procedure | Effect/Inoperative Function when Necessary Procedure not Performed | Link |
|---|---|---|---|
Rear wheel alignment adjustment |
Perform system variant learning and acceleration sensor zero point calibration. |
|
 |
Suspension, tires, etc. (The vehicle height changes because of suspension or tire replacement.) |
|
|
|
Rear television camera assembly optical axis adjustment (Back camera position setting) |
Parking Assist Monitor System |
|
|
|
Panoramic View Monitor System |
|
Replaced Part or Performed Procedure | Necessary Procedure | Effect/Inoperative Function when Necessary Procedure not Performed | Link |
|---|---|---|---|
Rear wheel alignment adjustment |
|
|
|
Suspension, tires, etc. (The vehicle height changes because of suspension or tire replacement.) |
|
|
|
Rear television camera assembly optical axis adjustment (Back camera position setting) |
Parking Assist Monitor System |
|
|
|
Panoramic View Monitor System |
|
HINT:
- Use the same procedure for the RH side and LH side.
- The following procedure is for the LH side.
PROCEDURE
1. REMOVE REAR WHEEL
Click here
2. REMOVE NO. 2 FLOOR UNDER COVER (for Gasoline Model)
(a) for LH Side:
Click here
3. REMOVE NO. 1 FLOOR UNDER COVER (for Gasoline Model)
(a) for RH Side:
Click here
4. LOOSEN REAR SHOCK ABSORBER ASSEMBLY
(a) Loosen the nut of the rear shock absorber assembly. NOTICE: Hold the rear axle carrier pin while rotating the nut. |
|
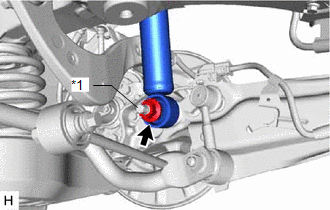
5. SEPARATE NO. 2 PARKING BRAKE WIRE ASSEMBLY (w/ AVS)
(a) Disconnect the connector. |
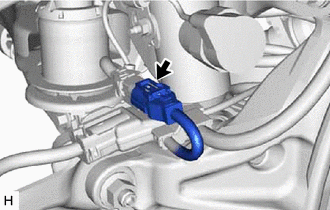 |
(b) Remove the nut. |
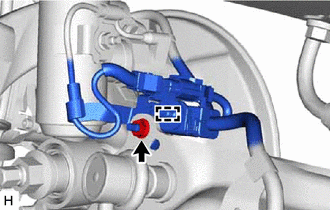 |
(c) Disengage the clamp and separate the No. 2 parking brake wire assembly.
6. REMOVE REAR STABILIZER LINK ASSEMBLY
Click here
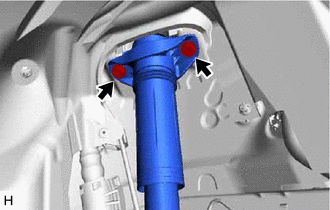
7. SEPARATE REAR SHOCK ABSORBER ASSEMBLY
(a) Remove the 2 bolts and separate the rear shock absorber assembly from the vehicle. |
 |
8. SEPARATE REAR UPPER CONTROL ARM ASSEMBLY
(a) Using a jack and wooden block, support the rear No. 2 suspension arm assembly. NOTICE:
|
|
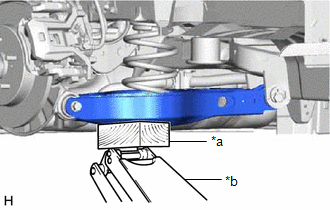
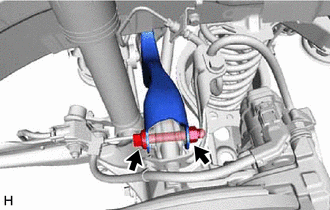
(b) Remove the bolt and nut, and separate the rear upper control arm assembly from the rear axle carrier sub-assembly. NOTICE: Because the nut has its own stopper, do not turn the nut. Loosen the bolt with the nut secured. |
 |
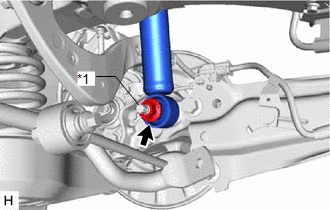
9. REMOVE REAR SHOCK ABSORBER ASSEMBLY
(a) Remove the nut, plate washer and rear shock absorber assembly from the rear axle carrier sub-assembly. NOTICE: Hold the rear axle carrier pin while rotating the nut. |
|
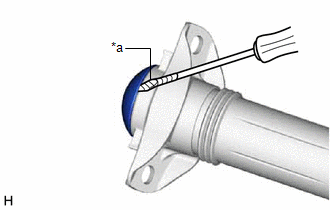
10. REMOVE REAR SHOCK ABSORBER CAP
(a) Using a screwdriver with its tip wrapped with protective tape, remove the rear shock absorber cap from the rear shock absorber assembly. |
|
11. REMOVE REAR SUSPENSION SUPPORT ASSEMBLY
(a) Secure the rear shock absorber assembly in a vise using aluminum plates. NOTICE: Do not overtighten the vise. |
|
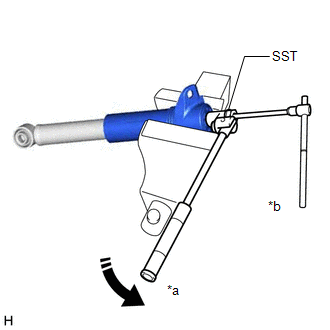
(b) Using SST and a 6 mm hexagon socket wrench, hold the rear shock absorber rod and remove the rear support to rear shock absorber nut.
SST: 09729-97202
(c) Remove the rear suspension support assembly from the rear shock absorber assembly.