Reassembly
REASSEMBLY
PRECAUTION / NOTICE / HINT
HINT:
- Repeat the same procedure for the right side and the left side.
- The following procedure applies to the left side.
PROCEDURE
1. INSTALL REAR DOOR OUTSIDE GARNISH MOULDING
Click here
2. INSTALL REAR DOOR OUTSIDE LOWER GARNISH MOULDING
Click here
3. INSTALL REAR DOOR WINDOW FRAME REAR MOULDING
Click here
4. INSTALL REAR DOOR WINDOW FRAME UPPER MOULDING
Click here
5. INSTALL REAR DOOR OUTSIDE MOULDING
Click here
6. INSTALL REAR DOOR OUTSIDE MOULDING SUB-ASSEMBLY
Click here
7. INSTALL REAR DOOR PANEL PAD
(a) Engage the claws to install the 2 rear door panel pads. |
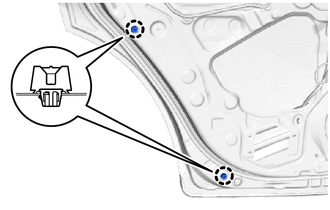 |
8. INSTALL REAR SPEAKER ASSEMBLY
Click here
9. INSTALL REAR DOOR DUST SEAL
(a) Install the 3 rear door dust seals. |
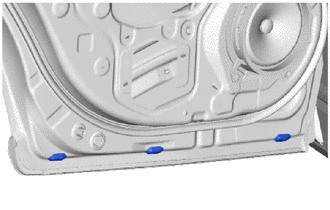 |
10. INSTALL REAR DOOR LOCK ASSEMBLY WITH MOTOR
Click here
11. INSTALL REAR DOOR OUTSIDE HANDLE GASKET
(a) Install 2 new rear door outside handle gaskets as shown in the illustration.
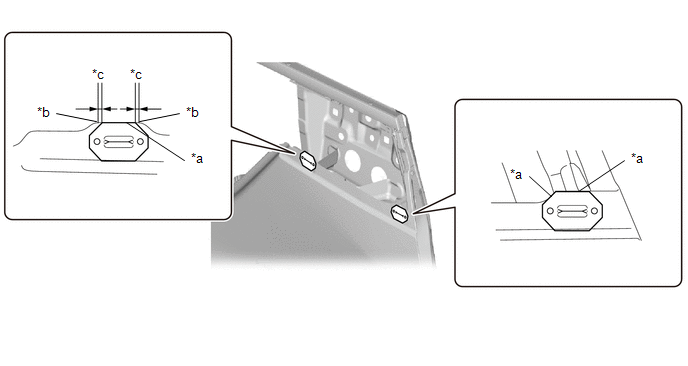
*a |
Rear door panel edge |
*b |
R line |
*c |
2.0 mm |
- |
- |
12. INSTALL REAR DOOR OUTSIDE HANDLE ASSEMBLY
(a) Engage the guide to connect the No. 1 rear door remote control central door lock cable assembly. |
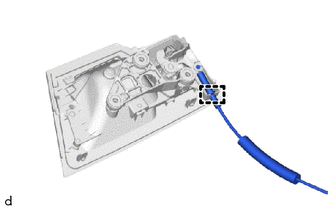 |
(b) Engage the claws to install the rear door outside handle assembly. |
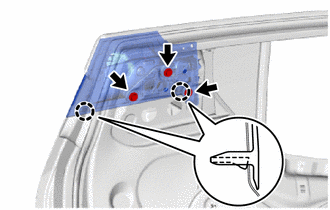 |
(c) Install the 3 bolts.
Torque:
4 N·m {41 kgf·cm, 35 in·lbf}
(d) Connect the No. 1 remote control central door lock cable assembly to the clips. |
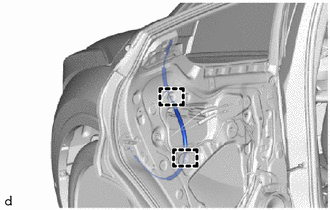 |
13. INSTALL REAR DOOR OUTSIDE HANDLE COVER
(a) Clean the rear door outside handle assembly surface.
(b) Remove the protective sheet from the surface of the rear door outside handle cover.
(c) Engage the clips and guide to install the rear door outside handle cover.
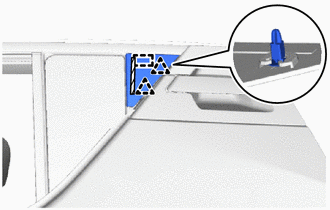
 |
Double-sided adhesive tape |
(d) Press the double-sided adhesive tape area of the rear door outside handle cover.
14. INSTALL REAR DOOR BELT MOULDING ASSEMBLY
Click here
15. INSTALL REAR DOOR QUARTER WINDOW WEATHERSTRIP
(a) Install the rear door quarter window weatherstrip onto the rear door quarter window glass. |
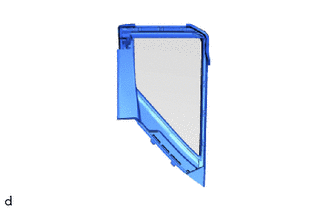 |
16. INSTALL REAR DOOR QUARTER WINDOW GLASS
(a) Install the rear door quarter window glass with the rear door quarter window weatherstrip as shown in the illustration.
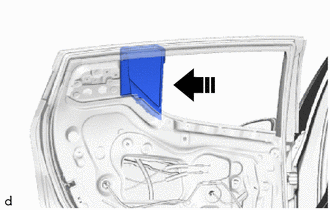
 |
Install in this direction |
17. INSTALL REAR DOOR WINDOW REGULATOR ASSEMBLY
(a) Apply MP grease to the sliding parts of the rear door window regulator assembly.
(b) Temporarily install the temporary bolt on the rear door power window regulator assembly. |
|
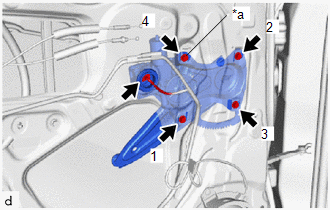
(c) Temporarily install the rear door window regulator assembly using the 3 bolts.
(d) Tighten the temporary bolt and the 3 bolts to install the rear door window regulator assembly.
Torque:
8 N·m {82 kgf·cm, 71 in·lbf}
HINT:
Tighten the bolts in the order shown in the illustration.
(e) Connect the connector.
18. INSTALL REAR DOOR WINDOW SLIDER
(a) Install the rear door window slider. |
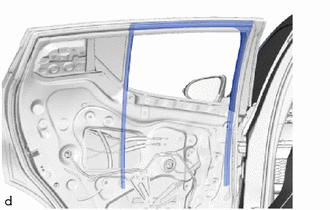 |
19. INSTALL REAR DOOR FRAME GARNISH
(a) Engage the guides to install the rear door frame garnish. |
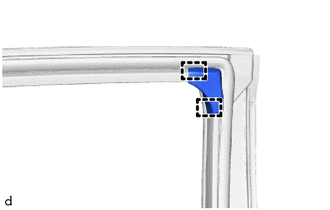 |
20. INSTALL REAR DOOR GLASS SUBASSEMBLY
(a) Insert the rear door glass subassembly as shown in the illustration.
NOTICE:
Do not damage the rear door window sub-assembly.
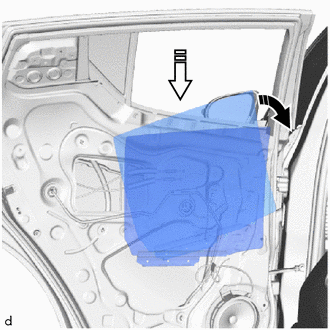
|
Install in this direction (1) |
 |
Install in this direction (2) |
(b) Install the rear door glass subassembly onto the rear door window regulator assembly as shown in the illustration.
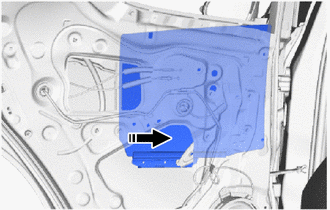
|
Install in this direction |
21. INSTALL REAR DOOR LOWER REAR FRAME SUBASSEMBLY
(a) Install the rear door lower rear frame subassembly with the screw and 2 bolts. Torque: Bolt: 8.5 N·m {87 kgf·cm, 75 in·lbf} |
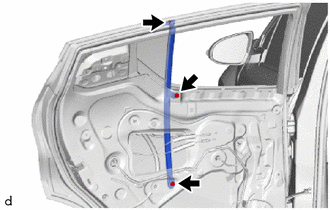 |
(b) Connect the rear door window slider.
22. INSTALL REAR DOOR SEAL
(a) Clean the rear door panel.
(b) Remove the protective sheet from a new rear door seal.
(c) Engage the clip (A) and the other clips to install the rear door seal.
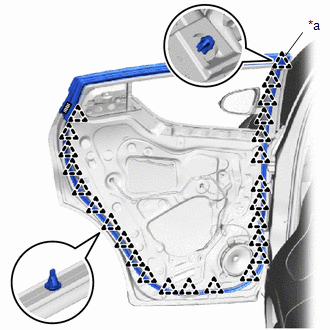
*a |
Clip (A) |
|
Double-sided adhesive tape |
(d) Press the double-sided adhesive tape area of the rear door seal.
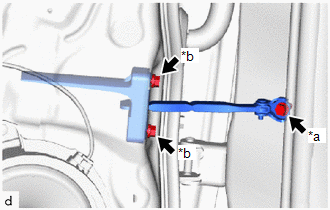
23. INSTALL REAR DOOR CHECK ASSEMBLY
(a) Apply MP grease to the sliding parts of the rear door check assembly.
(b) Clean the bolt hole in the vehicle body.
(c) Clean the threads of the bolt (A).
(d) Apply adhesive to the threads of the bolt (A).
Adhesive:
Adhesive 1324, Three Bond 1324 Toyota genuine or equivalent
(e) Install the rear door check assembly with the bolt (A) and 2 bolts (B). Torque: Bolt (A): 30 N·m {306 kgf·cm, 22 ft·lbf} Bolt (B): 5.5 N·m {56 kgf·cm, 49 in·lbf} |
|
24. INSTALL REAR DOOR PAD (with rear seat side airbag)
(a) Engage the hooks to install the rear door pad. |
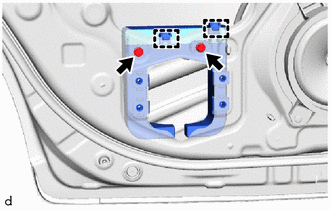 |
(b) Reinstall the 2 screws.
Torque:
8.5 N·m {87 kgf·cm, 75 in·lbf}
25. INSTALL NO. 2 PARTITION DOOR RETAINER PAD (with rear seat side airbag)
(a) Clean the rear door panel.
(b) Remove the protective sheet from a new No. 2 partition door retainer pad.
(c) Engage the guides to install the No. 2 partition door retainer pad.
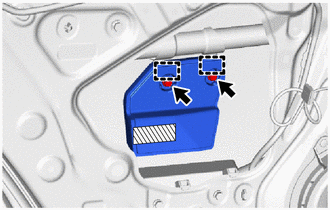
|
Double-sided adhesive tape |
(d) Install the 2 bolts.
Torque:
8.5 N·m {87 kgf·cm, 75 in·lbf}
(e) Press the double-sided adhesive tape area of the No. 2 partition door retainer pad.
26. REFIT THE REAR DOOR ACCESS HOLE COVER
(a) Apply new butyl tape to the rear door panel.
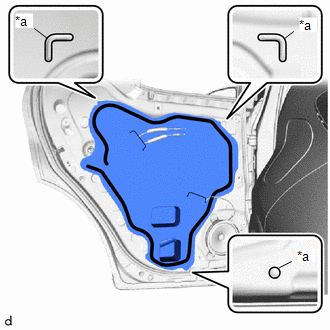
*a |
Reference point |
 |
Butyl Tape |
(b) Pass the rear door remote control central door lock cable assembly and the rear door inside lock cable assembly through a new rear door access hole cover.
(c) Install the rear door access hole cover using the reference points on the rear door panel.
NOTICE:
Install the rear door access hole cover correctly, avoiding wrinkles and air bubbles.
27. INSTALL REAR DOOR INNER PANEL REINFORCEMENT SUBASSEMBLY (with rear seat side airbag)
(a) Install the rear door inner panel reinforcement subassembly with the 4 screws. |
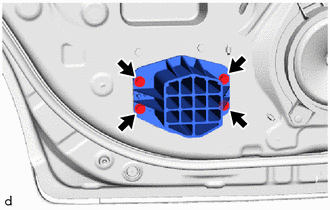 |
28. INSTALL REAR DOOR TRIM BRACKET
(a) Install the rear door trim bracket with the 2 screws. |
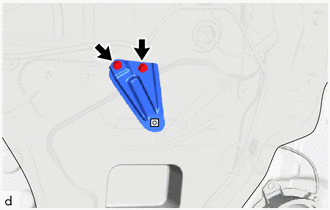 |
29. INSTALL NO. 2 REAR DOOR FRAME GARNISH
(a) Install the No. 2 rear door frame garnish. |
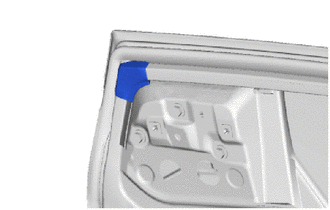 |
30. INSTALL HOLE PLUG
(a) Install the 2 hole plugs. |
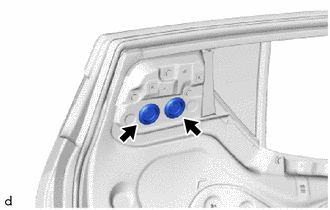 |
31. INSTALL REAR DOOR BELT SEAL
(a) Install the rear door belt seal onto the rear door window inner seal as shown in the illustration.
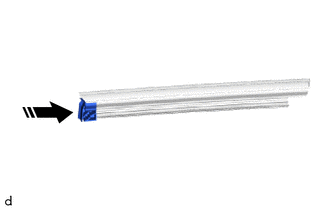
|
Install in this direction |
32. INSTALL REAR DOOR WINDOW INNER SEAL
(a) Install the rear door window inner seal with the rear door belt seal as shown in the illustration.
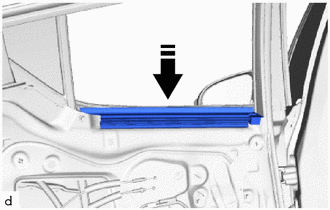
|
Install in this direction |
33. INSTALL REAR DOOR BELT SEAL REAR
(a) Install the rear door belt weatherstrip outer seal. |
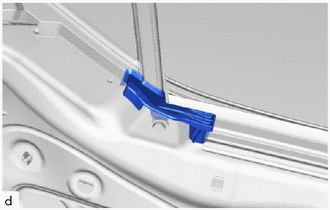 |
34. INSTALL REAR DOOR INSIDE HANDLE SUB-ASSEMBLY
(a) Engage the guides and claw to install the rear door inside handle sub-assembly. |
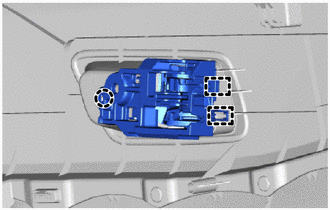 |
35. INSTALL REAR DOOR TRIM PANEL SUB-ASSEMBLY
(a) Engage the guides to connect the rear door inside locking cable assembly and the rear door remote control locking cable assembly.
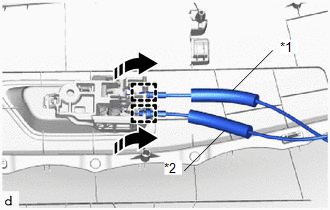
*1 |
Rear Door Inside Locking Cable Assembly |
*2 |
Rear Door Remote Control Locking Cable Assembly |
|
Install in this direction |
(b) Engage the claws as shown in the illustration.
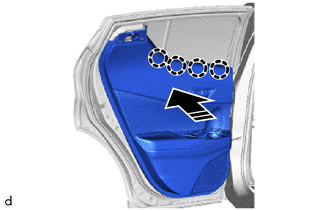
|
Install in this direction |
(c) Engage the guides and clips to install the rear door trim panel sub-assembly. |
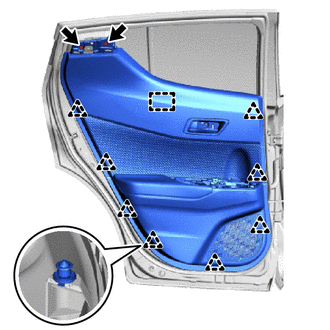 |
(d) Install the 2 screws.
(e) Install the 3 screws. |
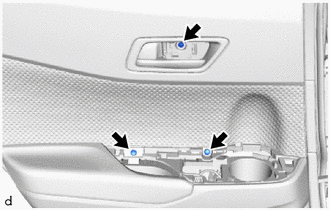 |
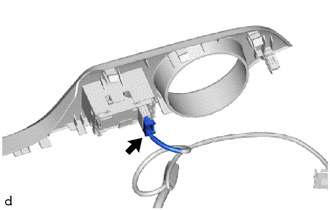
36. INSTALL REAR POWER WINDOW SWITCH ASSEMBLY WITH REAR DOOR ARMREST BASE UPPER PANEL
(a) Connect the connector. |
 |
(b) Engage the guides, clips and claws to install the rear power window switch assembly with rear door armrest base upper panel, as shown in the illustration.
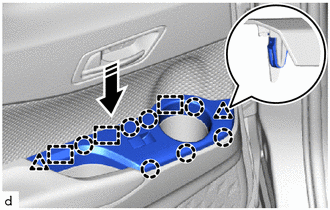
|
Install in this direction |
37. INSTALL REAR DOOR INSIDE HANDLE GARNISH CLIP
(a) Engage the claws to install the rear door inside handle garnish clip, as shown in the illustration.
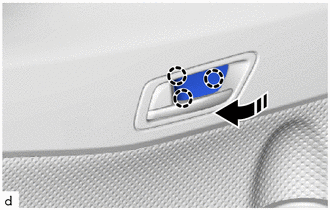
|
Install in this direction |
38. INSTALL REAR DOOR REAR FRAME BRACKET
(a) Engage the claws and clip to install the rear door rear frame bracket, as shown in the illustration.
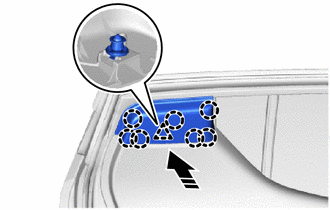
|
Install in this direction |
39. CONNECT CABLE TO NEGATIVE BATTERY TERMINAL
Click here
NOTICE:
When the cable has been disconnected, some systems must be reset after the cable is reconnected.
Click here
40. INITIALIZE POWER WINDOW CONTROL SYSTEM
Click here
41. CHECK POWER WINDOW OPERATION
Click here