Installation
INSTALLATION
PROCEDURE
1. REFILL COMPRESSOR OIL
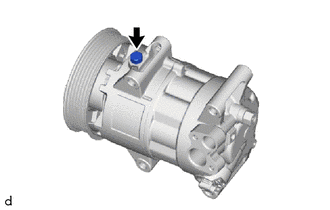
(a) When replacing the compressor with pulley assembly with a new part, gradually discharge the refrigerant gas through the service valve. Then drain the following amount of oil from the new compressor with pulley assembly before installation, so that its oil volume is the same as that of the compressor with pulley assembly being replaced. Standard: Standard: (oil quantity inside new cooler compressor with pulley assembly: 80 (+15) cm3 (2.71 (+0.507) fl. oz.)) - (oil quantity remaining in removed compressor with pulley assembly A) = (oil quantity to drain when replacing cooler compressor with pulley assembly) HINT: A new cooler compressor with pulley assembly is filled with enough oil for the entire system. For this reason, it is necessary to drain the residual oil from the condenser and the cooler core. Example: If A is 45 cm3 (1.52 fl. oz.). Since 80 cm3 (2.82 fl. oz.) - 45 cm3 (1.52 fl. oz.) = 35 cm3 (1.18 fl. oz.), drain 35 cm3 (1.18 fl. oz.) of oil from the new cooler compressor with pulley assembly. NOTICE:
|
 |
2. INSTALL COMPRESSOR WITH PULLEY ASSEMBLY
(a) Using a TORX E8 socket wrench, temporarily install the compressor with pulley assembly using the 2 stud bolts.
Torque:
9.8 N·m {100 kgf·cm, 87 in·lbf}
(b) Temporarily install the 2 bolts and 2 nuts. |
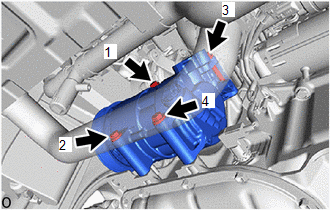 |
(c) Tighten the 2 bolts and 2 nuts to install the compressor with pulley assembly in the direction shown in the illustration.
Torque:
25 N·m {255 kgf·cm, 18 ft·lbf}
3. CONNECT SUCTION HOSE SUB-ASSEMBLY
(a) Remove the vinyl tape from the suction hose sub-assembly.
(b) Apply a sufficient amount of compressor oil to a new O-ring and to the connecting surface of the compressor with pulley assembly.
Compressor oil:
VC100YF or equivalent
(c) Install the O-ring to the suction hose sub-assembly.
NOTICE:
Keep the O-ring and O-ring connection surface free of foreign matter.
(d) Connect the suction hose sub-assembly to the compressor with pulley assembly with the bolt.
Torque:
9.8 N·m {100 kgf·cm, 87 in·lbf}
4. CONNECT DISCHARGE HOSE SUB-ASSEMBLY
(a) Remove the vinyl tape from the discharge hose sub-assembly.
(b) Apply a sufficient amount of compressor oil to a new O-ring and to the connecting surfaces of the cooler compressor with pulley assembly.
Compressor oil:
VC100YF or equivalent
(c) Install the O-ring to the discharge hose sub-assembly.
NOTICE:
Keep the O-ring and O-ring connection surface free of foreign matter.
(d) Connect the suction hose sub-assembly to the compressor with pulley assembly with the bolt.
Torque:
9.8 N·m {100 kgf·cm, 87 in·lbf}
(e) Connect the connector.
5. INSTALL FAN AND GENERATOR V BELT
Click here
6. INSTALL ENGINE UNDER COVER SUB-ASSEMBLY NO. 1
Click here
7. CHARGE REFRIGERANT INTO AIR CONDITIONING SYSTEM (for HFC-134a (R134a))
Click here
8. CHARGE REFRIGERANT INTO AIR CONDITIONING SYSTEM (for HFO-1234yf (R1234yf))
Click here
9. WARM UP ENGINE (for HFC-134a (R134a))
Click here
10. WARM UP ENGINE (for HFO-1234yf (R1234yf))
Click here
11. CHECK FOR REFRIGERANT LEAKS (for HFC-134a (R134a))
Click here
12. CHECK FOR REFRIGERANT LEAKS (for HFO-1234yf (R1234yf))
Click here