Emission control system (2AZ−FE)(From July, 2003)
Install a clean hose to the ventilation valve.
Check ventilation valve operation.
1. Blow air into the cylinder head side, and check air passes through easily.
CAUTION: Do not suck air through the valve. Petroleum substances inside the valve are harmful.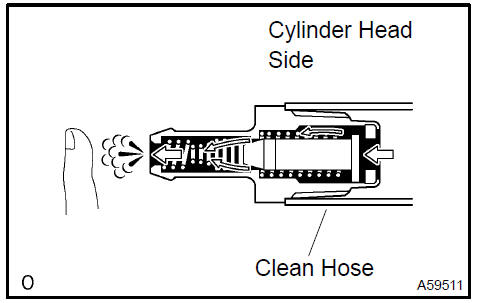
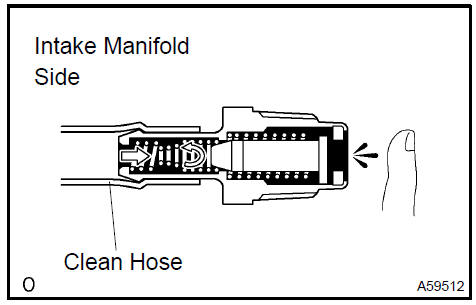
2) Blow air into the intake manifold side, and check that air passes through with difficulty.
If operation is not as specified, replace the ventilation valve.
c. Remove the clean hose from the ventilation valve.
a. Visually check if the cap and gasket are deformed or damaged.
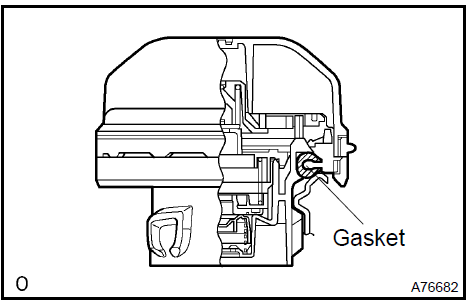
Inspect fuel tank cap assy 3. INSPECT CHARCOAL CANISTER ASSY (Except PZEV)
a. Visually check the charcoal canister for cracks or damage.
If cracks or damage is found, replace the charcoal canister assy.
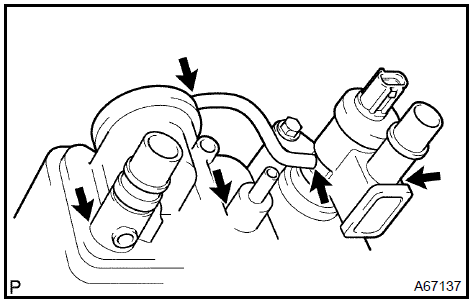
b. Check charcoal canister operation.
1. While holding the purge port closed, blow air (0.39 kPa, 4.0 gf/cm2, 0.06 psi) into the vent port, and check that air flows from the air inlet port.
If the result is not as specified, replace the charcoal canister.
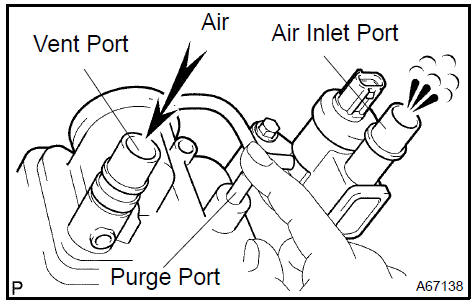
2. While holding the air inlet port closed, blow air (0.39 kPa, 4.0 gf/cm2, 0.06 psi) into the vent port, and check that air flows from the purge port.
If the result is not as specified, replace the charcoal canister.
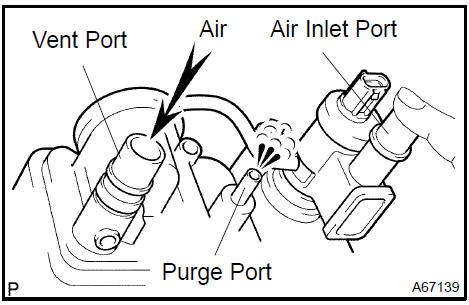
3. While holding the air inlet port closed, apply vacuum (3.43 kPa, 25.7 gf/cm2, 1.01 psi) to the vent port, and check that air is sucked in from the purge port.
If the result is not as specified, replace the charcoal canister.
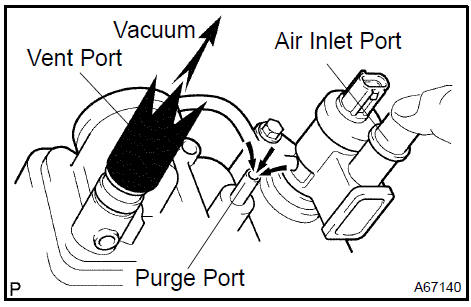
c. Check the air tightness.
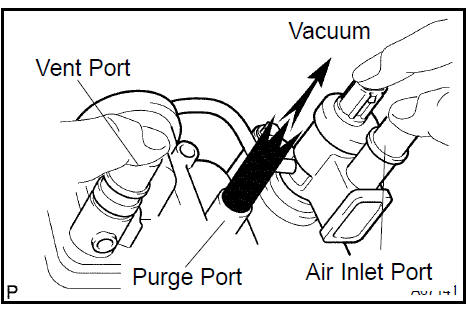
1. While holding the vent and air inlet ports closed, apply vacuum (3.43 kPa, 25.7 gf/cm2, 1.01 psi) to the purge port, and check that the vacuum is maintained for 1 minute.
HINT: In order to maintain air tightness, the check should be performed while holding the CCV terminal port closed.
If the result is not as specified, replace the charcoal canister.
d. Check the diaphragm.
Remove the air hose between ports A and B.
While holding the vent, purge and air inlet ports closed, apply vacuum (1.42 kPa, 11 mmHg, 0.42 in.Hg) into port A, and check that air is sucked in from port B.
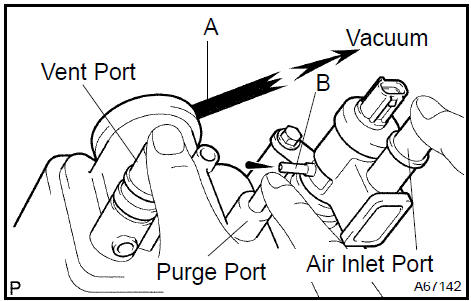
3. While holding the vent, purge and air inlet ports closed, apply vacuum (1.42 kPa, 11 mmHg, 0.42 in.Hg) into port A, and measure how long it takes for vacuum to drop.
Vacuum drop time: 10 seconds or moreIf the result is not as specified, replace the charcoal canister.
4. Reinstall the air hose between ports A and B.

e. Check the VSV for open circuit.
1. Measure the resistance between the terminals.
Standard:

If the result is not as specified, replace the charcoal canister.

f. Check VSV operation.
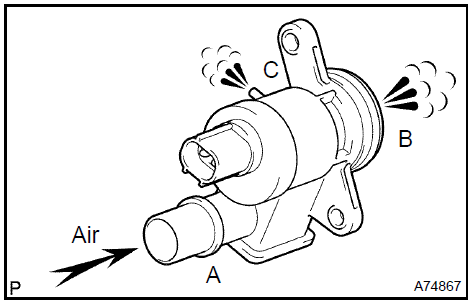
1. Check that air flows from port A to ports B and C.
If the result is not as specified, replace the charcoal canister.
Apply battery positive voltage across the terminals.
Check that the valve is closed.
If the result is not as specified, replace the charcoal canister.
NOTICE: Incorrect electrode connection causes damage to the VSV.
Pay due attention when connecting the lead wire.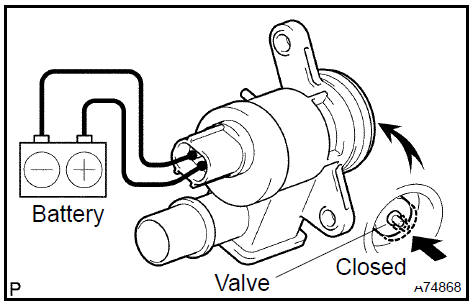
Check that air does not flow from port A to port B.
Check that air flows from port A to port C.
If the result is not as specified, replace the charcoal canister.
NOTICE: Incorrect electrode connection causes damage to the VSV.
Pay due attention when connecting the lead wire.
a. Visually check the charcoal canister for cracks or damage.
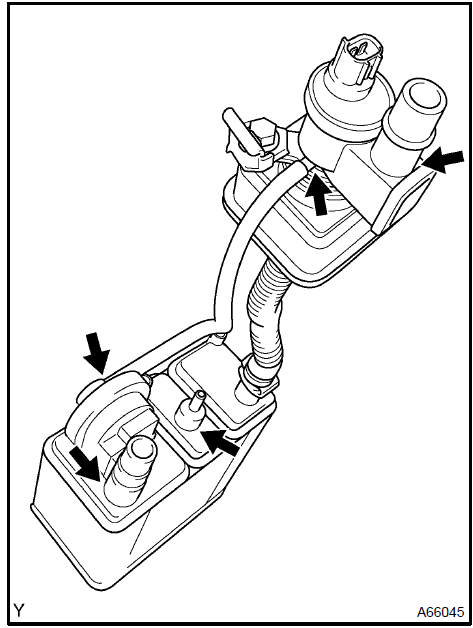
b. Inspect the charcoal canister operation.
1. While holding the purge port closed, blow air (0.39 kPa, 4.0 gf/cm2, 0.06 psi) into the vent port, and check that air flows from the air line port.
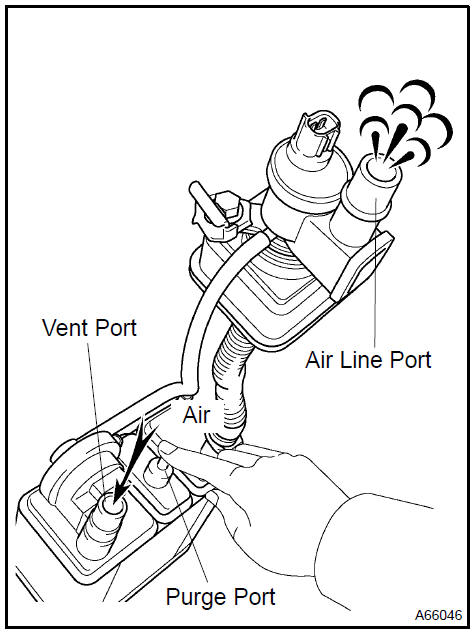
2. While holding the air line port closed, blow air (0.39 kPa, 4.0 gf/cm2, 0.06 psi) into the vent port, and check that air flows from the purge port.
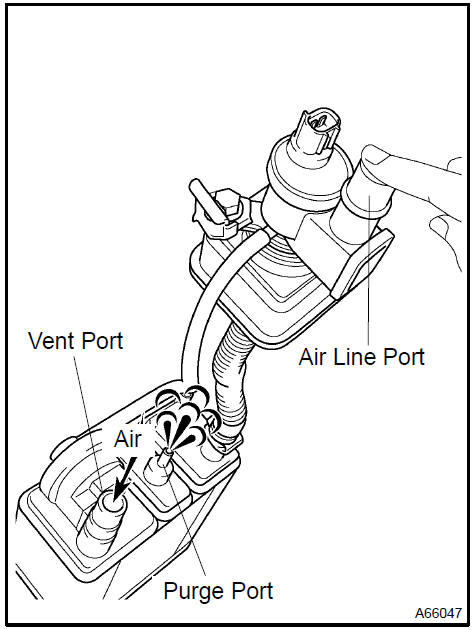
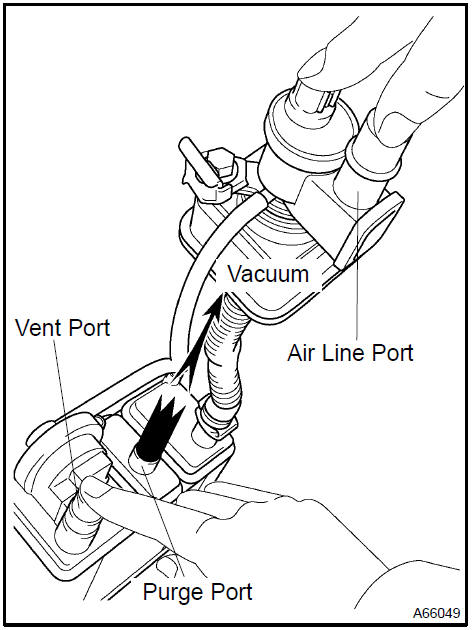
3. While holding the air line port closed, apply vacuum (3.43 kPa, 25.7 gf/cm2, 1.01 psi) to the vent port, and check that air is sucked in from the purge port.
If operation is not as specified, replace the charcoal canister.

c. Inspect air tightness.
1. While holding the vent and air line ports closed, apply vacuum (3.43 kPa, 25.7 gf/cm2, 1.01 psi) to the purge port, and check that the vacuum is maintained for 1 minute.
HINT: In order to maintain air tightness, this check should be performed with the CCV terminal port held closed by your fingers.
If operation is not as specified, replace the charcoal canister.
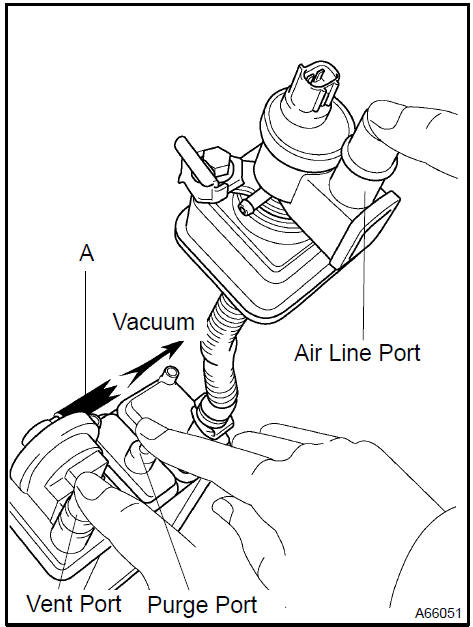
d. Inspect the diaphragm.
Remove the air hose between ports A and B.
While holding the vent, purge and air line ports closed, apply vacuum (1.42 kPa, 11 mmHg, 0.42 in.Hg) into port A, and check that air is sucked in from port B.

3. While holding the vent, purge and air line ports closed, apply vacuum (1.42 kPa, 11 mmHg, 0.42 in.Hg) into port A, and measure how long it takes for vacuum to drop.
Vacuum drop time: 10 sec. or moreIf operation is not as specified, replace the charcoal canister.
4. Reinstall the air hose between ports A and B.
e. Check the VSV for open circuit.
1. Measure the resistance between the terminals.
Standard:

If the result is not as specified, replace the charcoal canister.
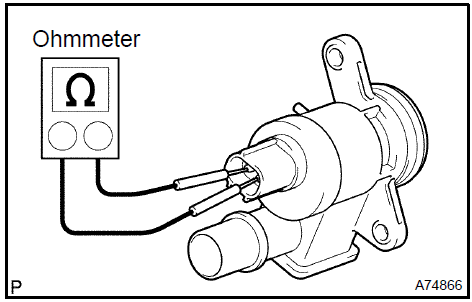
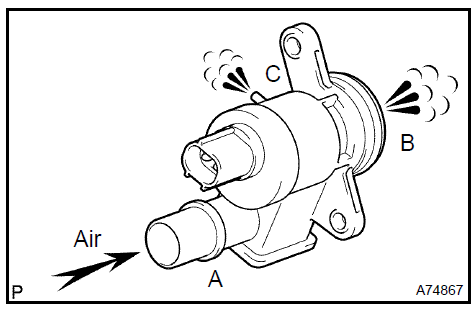
f. Check VSV operation.
1. Check that air flows from port A to ports B and C.
If the result is not as specified, replace the charcoal canister.
Apply battery positive voltage across the terminals.
Check that the valve is closed.
If the result is not as specified, replace the charcoal canister.
NOTICE: Incorrect electrode connection causes damage to the VSV.
Pay due attention when connecting the lead wire.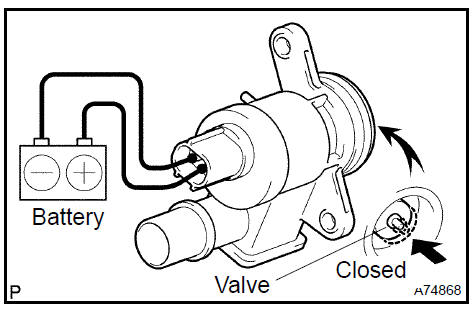
Check that air does not flow from port A to port B.
Check that air flows from port A to port C.
If the result is not as specified, replace the charcoal canister.
NOTICE: Incorrect electrode connection causes damage to the VSV.
Pay due attention when connecting the lead wire.
a. Check the VSV for open circuit.
1. Measure the resistance.

If the resistance is not as specified, replace the VSV assy.
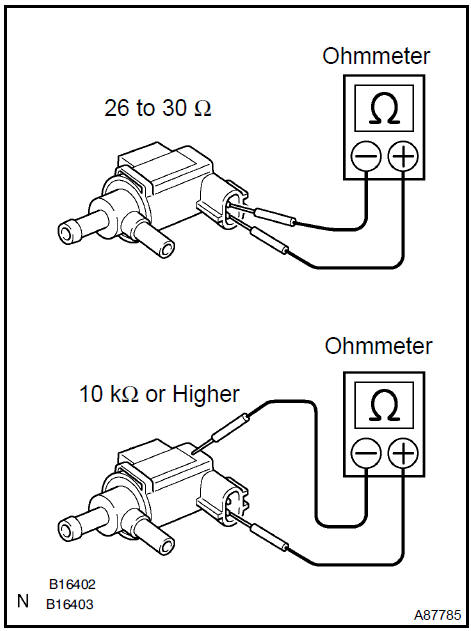
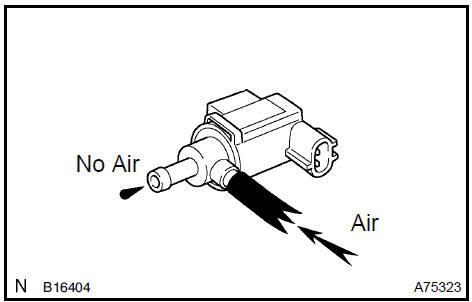
b. Check VSV operation.
1. Check that air does not flow from the port as shown in the illustration.
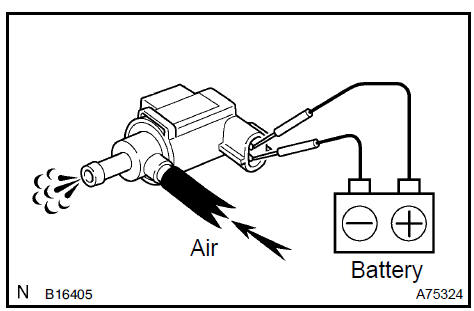
Apply battery positive voltage across the terminals.
Check that air flows from the ports.
If the result is not as specified, replace the VSV assy.
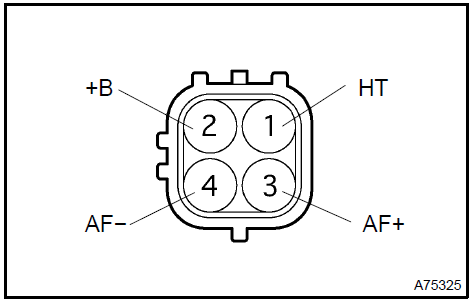
a. Measure the resistance between terminals 1 (HT) and 2 (+B).
Standard:

If the result is not as specified, replace the .
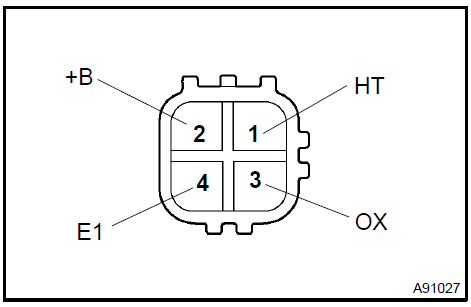
a. Measure the resistance between terminals 1 (HT) and 2 (+B).
Standard:

If the result is not as specified, replace the .
Test yourself
A quick Toyota Camry quiz: every answer comes with an explanation and a link to the manual page.