Replacement
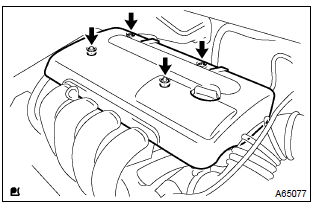
- Remove the 2 nuts, 2 clips and cylinder head cover.
- disconnect the radiator hose inlet from the radiator.
- disconnect the radiator hose outlet from the radiator.
- disconnect the oil cooler inlet tube from the radiator.
- disconnect the oil cooler outlet tube from the radiator.
- remove the 2 bolts and 2 radiator support upper.
- disconnect the connector and harness clamp, and remove the radiator.
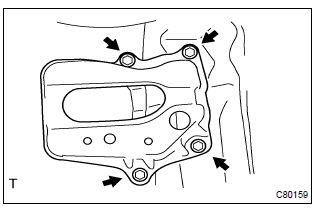
- Remove the 4 bolts and battery carrier.
- disconnect the mass air flow sensor connector.
- disconnect the vsv connector.
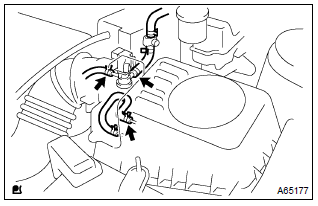
- Disconnect the 3 vacuum hoses, as shown in the illustration.
- loosen the air cleaner hose clamp and disconnect the air cleaner hose.
- remove the air cleaner cap.
- remove the air cleaner filter element.
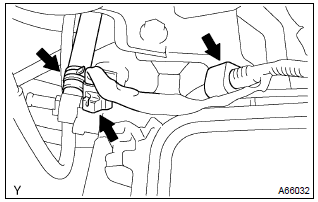
- Disconnect the wire harness clamp, connector and hose.
- remove the 3 bolts and air cleaner case.
- loosen the nut, then remove the accelerator control cable.
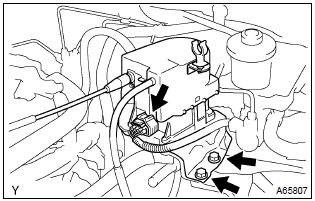
- Disconnect the actuator connector.
- remove the 2 bolts, then separate the actuator from the body.
- Disconnect the union to connector tube hose from the brake booster.
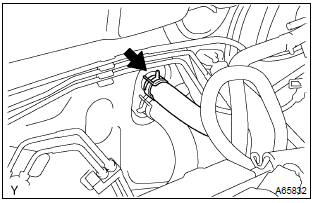
- Disconnect the heater inlet water hose from the air conditioner tube.
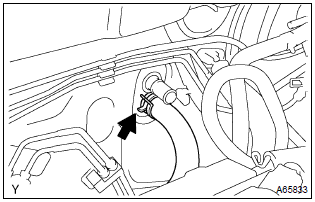
- Disconnect the heater outlet water hose from the air conditioner tube.
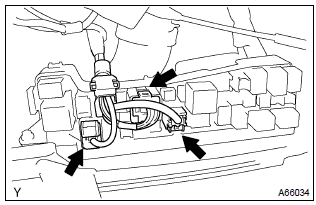
- Disconnect the engine wire from the ecm and junction block.
- pull out the engine wire.
- remove the engine room relay block cover.
- disconnect the engine wire from the engine room relay block.
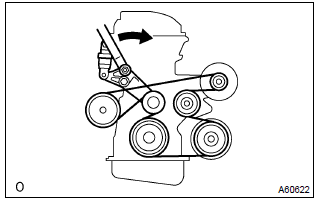
- Slowly turn the v–ribbed belt tensioner clockwise, then remove the v belt.
: hang up the hoses instead of detaching.
31. Separate return tube sub–assy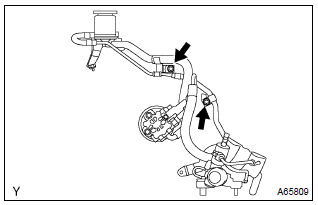
- Separate the vane pump oil reservoir from the oil reservoir bracket.
- remove the 2 bolts installing the return tube.
- remove the 2 clips and column hole cover silencer sheet.
- remove the 2 nuts and floor panel brace front.
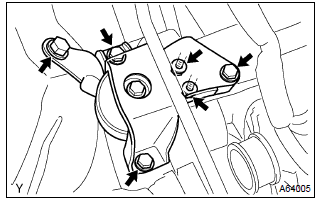
- Set the engine lifter.
- remove the 4 bolts, 2 nuts and engine mounting insulator.
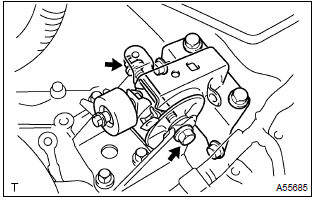
- Remove the through bolt and nut, then detach the engine mounting insulator from the vehicle.
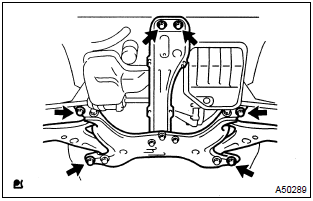
- Remove the 6 bolts, as shown in the illustration.
- carefully, remove the engine with transaxle from the vehicle.
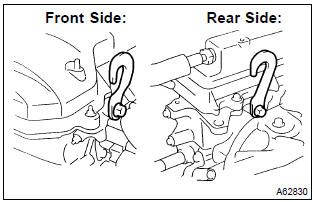
- Install the 2 engine hangers with the 2 bolts.
Part no.:
12281–15040 For no. 1 Engine hanger 12281–22021 for no. 2 Engine hanger 91512–b1016 for bolt
torque: 38 nvm (387 Kgf·cm, 28 ft·lbf)
: be sure to install the engine hanger (12281–22021) to the front side of the engine and the engine hanger (12281–15040) to the rear side.
- using the chain block and engine sling device, hang the engine assembly.
: do not disconnect the hose.
50. Remove front suspension crossmember w/center member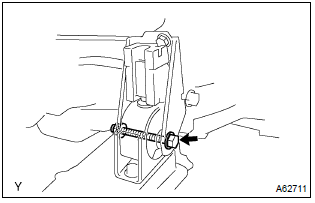
- Remove the through bolt and nut, then detach the engine mounting insulator fr from the engine mounting bracket.
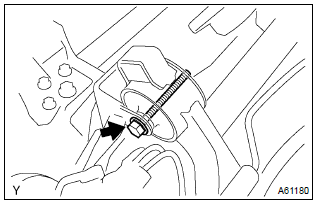
- Remove the through bolt, then detach the engine mounting insulator rr from the suspension crossmember.
- separate the engine and transaxle assembly from the suspension crossmember and engine mounting member.
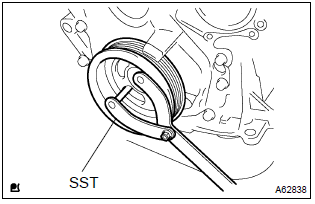
- Fix the crankshaft with sst, then remove the 8 bolts and flywheel.
Sst 09960–10010 (09962–01000, 09963–01000)
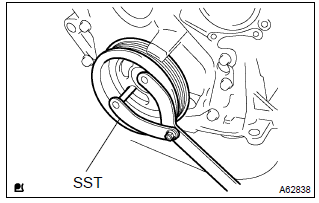
- Fix the crankshaft with sst, then remove the 8 bolts and drive plate & ring gear.
Sst 09960–10010 (09962–01000, 09963–01000)
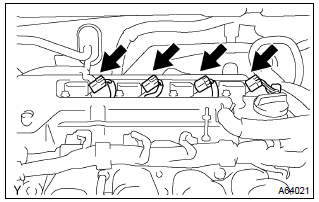
- Disconnect the 4 ignition coil connectors.
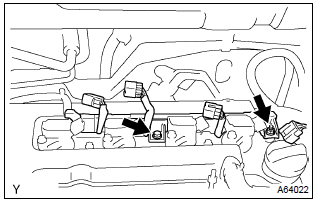
- Remove the bolt and nut installing the engine wire.
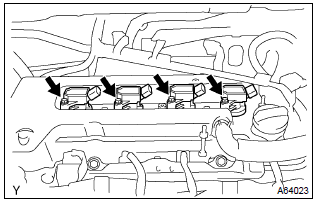
- Remove the 4 bolts and 4 ignition coils.
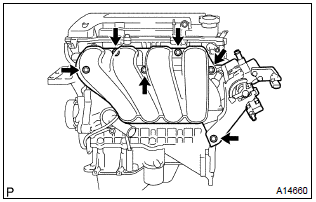
- Disconnect the 2 water hoses from the throttle body.
- disconnect the 2 vacuum hoses from the intake manifold.
- remove the 4 bolts, 2 nut, 2 wire brackets, intake manifold and throttle body assembly.
- remove the gasket from the intake manifold and throttle body assembly.
- Remove the oil level gage from the oil level gage guide.
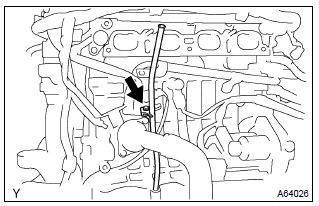
- Remove the bolt and oil level gage guide.
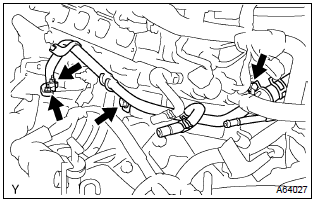
- Remove the 2 bolts, 2 nuts, water by–pass pipe and gasket.
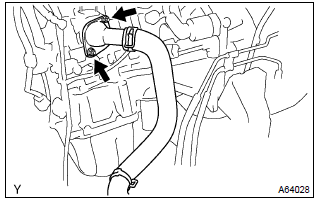
- Remove the 2 nuts and water inlet.
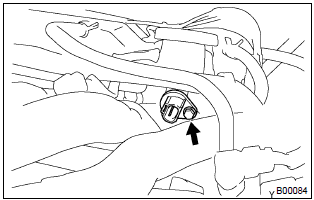
- Remove the bolt and camshaft position sensor.
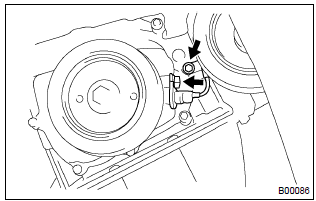
- Remove the 2 bolts and crankshaft position sensor.
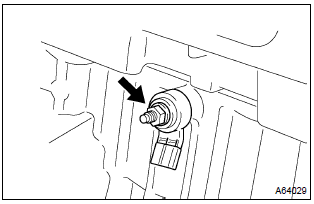
- Remove the nut and knock sensor.
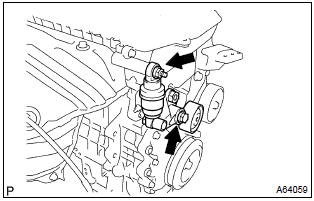
- Remove the bolts, nut and v–ribbed belt tensioner.
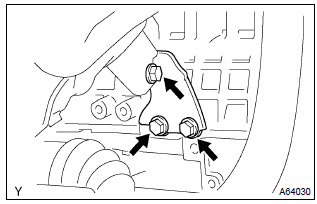
- Remove the 3 bolts and manifold stay.
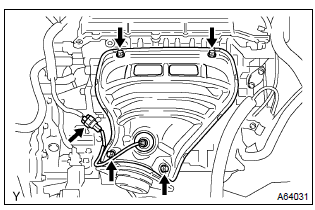
- Remove the 4 bolts and exhaust manifold heat insulator.
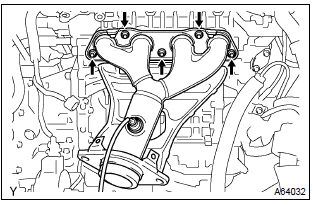
- Remove the 5 nuts, exhaust manifold and gasket.
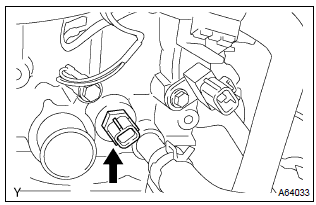
- Using sst, remove the engine coolant temperature sensor.
Sst 09817–33190
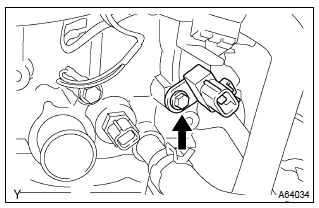
- Remove the bolt and condenser.
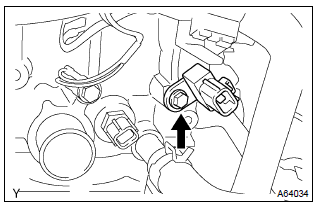
- Install the condenser with the bolt.
Torque: 10 nvm (102 Kgf·cm, 7 ft·lbf)
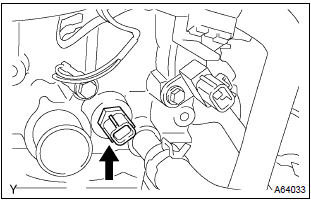
- Install a new gasket to the engine coolant temperature sensor.
- using sst, install the engine coolant temperature sensor.
Sst 09817–33190
torque: 20 nvm (204 Kgf·cm, 15 ft·lbf)
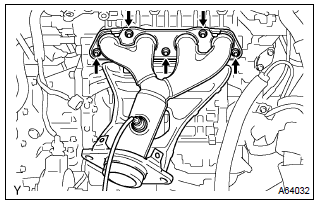
- Install a new gasket and the exhaust manifold with the 5 nuts.
Torque: 37 nvm (377 Kgf·cm, 27 ft·lbf)
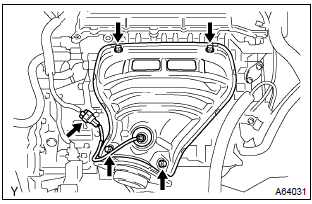
- Install the exhaust manifold heat insulator with the 4 bolts.
Torque: 18 nvm (184 Kgf·cm, 13 ft·lbf)
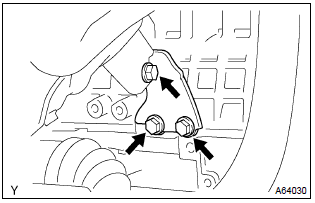
- Install the manifold stay with the 3 bolts.
Torque: 49 nvm (500 Kgf·cm, 36 ft·lbf)
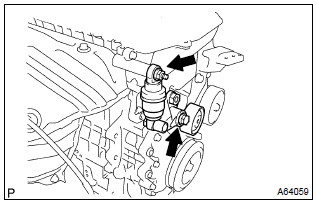
- Install the v–ribbed belt tensioner with the bolt and nut.
Torque:
29 nvm (296 Kgf·cm, 21 ft·lbf) for nut 69 nvm (704 Kgf·cm, 51 ft·lbf) for bolt
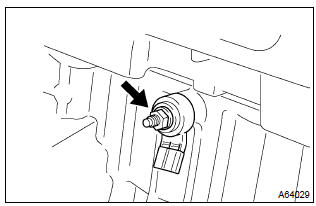
- Install the knock sensor with the nut.
Torque: 20 nvm (204 Kgf·cm, 15 ft·lbf)
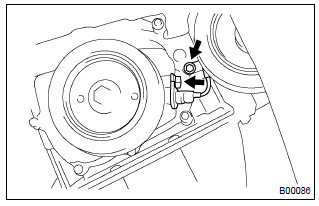
- Install the crankshaft position sensor with the 2 bolts.
Torque: 9.0 Nvm (92 Kgf·cm, 80 in.Vlbf)
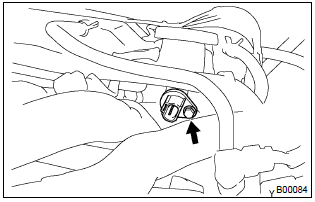
- Install the camshaft position sensor with the bolt.
Torque: 9.0 Nvm (92 Kgf·cm, 80 in.Vlbf)
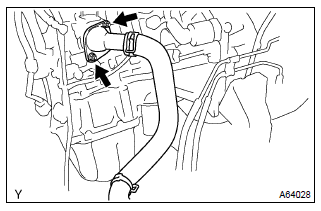
- Install the water inlet with the 2 nuts.
Torque: 11 nvm (112 Kgf·cm, 8 ft·lbf)
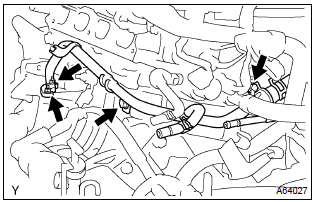
- Install a new gasket and water by–pass with the 2 nuts and 2 bolts.
Torque: 9.0 Nvm (92 Kgf·cm, 80 in.Vlbf)
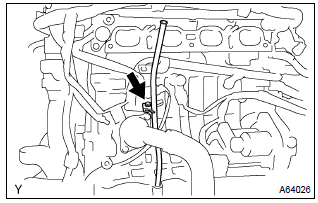
- Apply a light coat of a new o–ring, then install it to the oil level gage guide.
- install the oil level gage guide with the bolt.
Torque: 13 nvm (133 Kgf·cm, 10 ft·lbf)
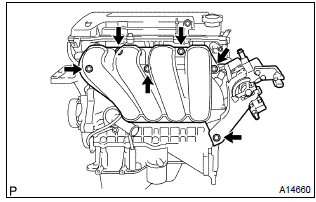
- Install a new gasket to the intake manifold.
- install the intake manifold and throttle body assembly with the 2 brackets, 4 bolts and 2 nuts. Uniformly tighten the bolts and nuts in several passes.
Torque: 30 nvm (306 Kgf·cm, 22 ft·lbf)
- connect the 2 vacuum hoses to the intake manifold.
- connect the 2 water hoses to the throttle body.
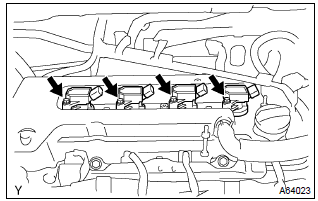
- Install the 4 ignition coils with the 4 bolts.
Torque: 9.0 Nvm (92 Kgf·cm, 80 in.Vlbf)
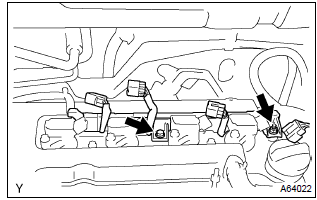
- Install the engine wire with the bolt and nut.
Torque: 9.0 Nvm (92 Kgf·cm, 80 in.Vlbf)
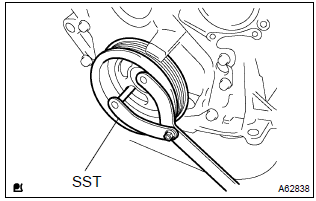
- Fix the crankshaft with sst.
Sst 09960–10010 (09962–01000, 09963–01000)
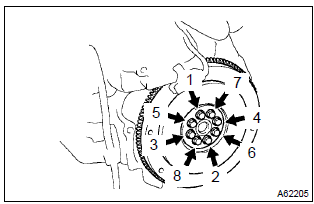
- Clean the bolt and bolt hole.
- apply adhesive to the bolts.
Adhesive: part no. 09330–00070, Three bond or equivalent
- install and uniformly tighten the 8 bolts, in several passes, in the sequence shown.
Torque: 49 nvm (500 Kgf·cm, 36 ft·lbf)
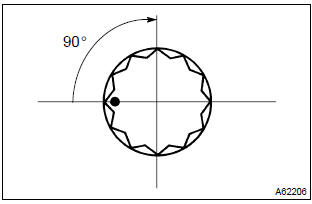
- Mark the bolts with paint.
- retighten the bolts by an additional 90 .
- check that the point marked bolts are moved by 90 angle.
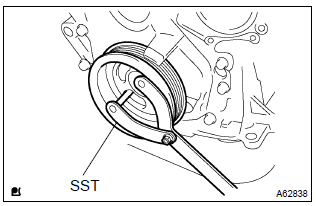
- Fix the crankshaft with sst.
Sst 09960–10010 (09962–01000, 09963–01000)
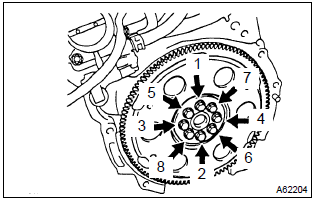
- Clean the bolt and bolt hole.
- apply adhesive to the bolts.
Adhesive: part no. 09330–00070, Three bond or equivalent
- install and uniformly tighten the 8 bolts, in several passes, in the sequence shown.
Torque: 88 nvm (897 Kgf·cm, 65 ft·lbf)
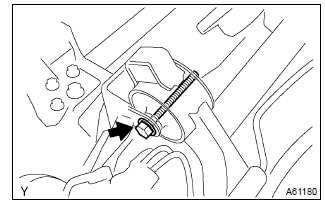
- Attach the engine and transaxle assembly to the suspension crossmember and engine mounting member.
- install the bolt holding the rear engine mounting bracket to the mounting insulator.
Tmmc, nummi made:
torque: 65 nvm (663 Kgf·cm, 48 ft·lbf) takaoka, tal made:
torque: 87 nvm (887 Kgf·cm, 64 ft·lbf) - install the bolt holding the front engine mounting bracket to the mounting insulator.
Torque: 52 nvm (530 Kgf·cm, 38 ft·lbf)
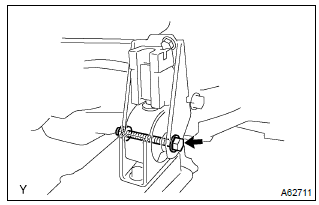
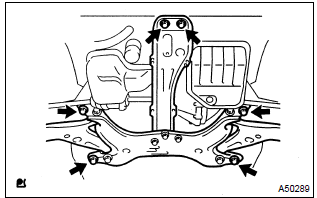
- Set the engine with transaxle on the engine lifter.
- install the engine with transaxle to the vehicle.
- temporarily, install the suspension crossmember and 6 bolts.
- install the engine mounting insulator lh.
Torque: 80 nvm (816 Kgf·cm, 59 ft·lbf)
- install the engine mounting insulator rh.
Torque: 52 nvm (530 Kgf·cm, 38 ft·lbf)
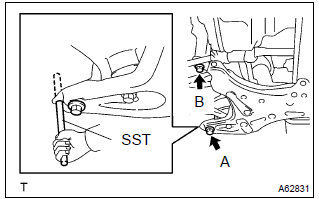
- Insert sst to the positioning holes on the right handle crossmember and on the right–handle of the vehicle.
Sst 09670–00010
- temporarily tighten the bolt a first, then bolt b.
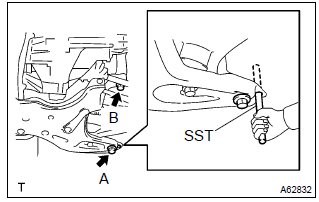
- Insert sst to the positioning holes on the left handle crossmember and on the left–handle of the vehicle.
Sst 09670–00010
- ) temporarily tighten the bolt a first, then bolt b.
- insert sst to the positioning holes on the right–handle crossmember and right–handle of the vehicle, then tighten the bolts with the specified torque.
- insert sst to the positioning holes on the right–handle crossmember and left–handle of the vehicle, then tighten the bolts with the specified torque.
Sst 09670–00010 torque:
157 nvm (1,601 Kgf·cm, 116 ft·lbf) for bolt a 113 nvm (1,152 Kgf·cm, 83 ft·lbf) for bolt b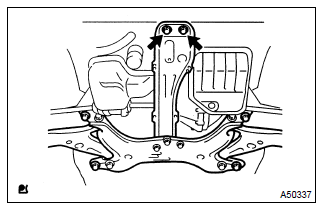
- Tighten the 2 bolts, as shown in the illustration.
Torque: 39 nvm (398 Kgf·cm, 29 ft·lbf)
: after installing the crossmember, check that the positioning holes on the crossmember and vehicle are aligned with each other.
109. Install front suspension arm sub–assy lower no.1 Lh 110. Install front suspension arm sub–assy lower no.1 Rh 111. Install front stabilizer link assy lh 112. Install front stabilizer link assy rh 113. Install tie rod end sub–assy lh 114. Install tie rod end sub–assy rh 115. Install front axle hub lh nut 116. Install front axle hub rh nut 117. Install exhaust pipe assy front 118. Install floor panel brace front- install the front floor panel brace with the 2 nuts.
Torque: 30 nvm (306 Kgf·cm, 22 ft·lbf)
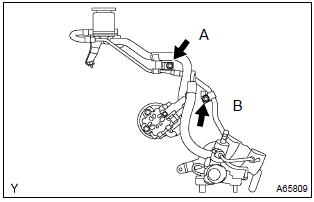
- Install the return tube with 2 bolts.
Torque:
5.0 Nvm (51 Kgf·cm, 44 in.Vlbf) for bolt a 7.8 Nvm (80 Kgf·cm, 69 in.Vlbf) for bolt b
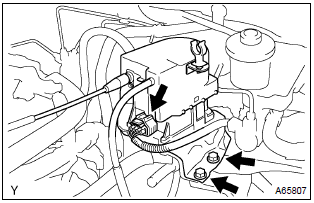
- Install the actuator with the 2 bolts.
Torque: 6.0 Nvm (61 Kgf·cm, 53 in.Vlbf)
- connect the actuator connector.
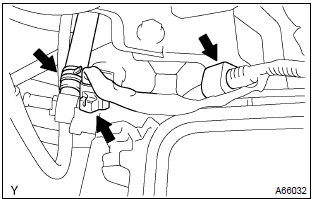
- Install the air cleaner case with the 3 bolts.
Torque: 7.0 Nvm (71 Kgf·cm, 62 in.Vlbf)
- connect the wire harness clamp, connector and hose.
- install the air cleaner filter element.
- install the air cleaner cap.
- connect the air cleaner hose.
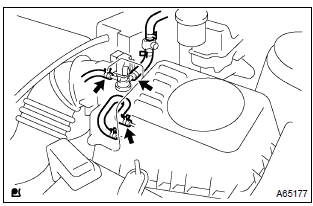
- Connect the 3 vacuum hoses, as shown in the illustration.
- connect the vsv connector.
- connect the intake air flow meter connector.
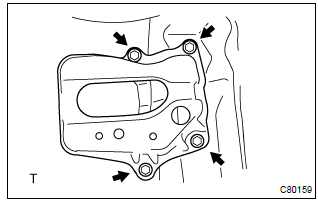
- Install the battery carrier with the 4 bolts.
Torque: 13 nvm (133 Kgf·cm, 10 ft·lbf)
Torque:
5.0 Nvm (51 Kgf·cm, 44 in.Vlbf) for bolt 3.5 Nvm (36 Kgf·cm, 31 in.Vlbf) for nut
- Install the 2 radiator support uppers with the 2 bolts.
Torque: 19 nvm (194 Kgf·cm, 14 ft·lbf)
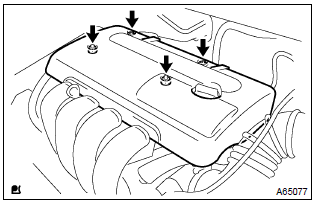
- Install the cylinder head cover with the 2 nuts and 2 clips.
Torque: 7.0 Nvm (71 Kgf·cm, 62 in.Vlbf)
Test yourself
A quick Toyota Corolla quiz: every answer comes with an explanation and a link to the manual page.