Replacement
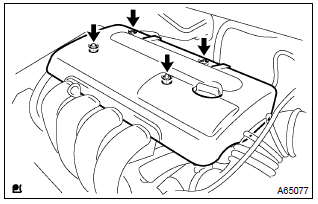
- Remove the 2 nuts, 2 clips and cylinder head cover.
- loosen the 2 air cleaner hose clamp bolts, and remove the air cleaner hose.
- loosen the nut, and remove the accelerator control cable from the accelerator control cable bracket.
- disconnect the water by–pass hose from the throttle body.
- disconnect the water by–pass hose from the throttle body.
- disconnect the union to connector tube hose from the hose to hose tube.
- disconnect radiator hose inlet from the cylinder head.
- disconnect the heater inlet water hose from the cylinder head
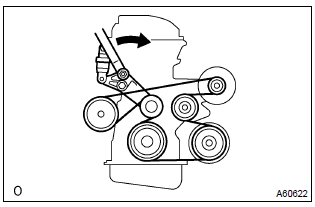
- Turn the v–ribbed belt tensioner slowly clockwise and loosen it. Then, remove the fan and generator v belt and put back the v–ribbed belt tensioner little by little and fix it quietly.
: do not disconnect the hose.
17. Remove generator assy 18. Separate exhaust pipe assy front- remove the 2 bolts, 2 compression spring installing the front side of exhaust pipe.
- remove the gasket.
- Remove the ps oil pump reservoir and put it aside.
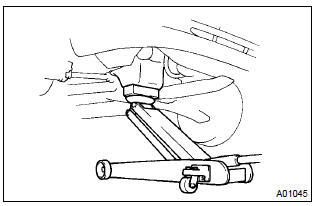
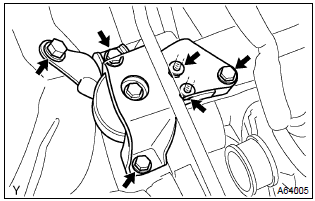
- place a wooden block between the jack and engine, and set the jack, then remove the 4 bolts, the 2 nuts and engine mounting insulator rh.
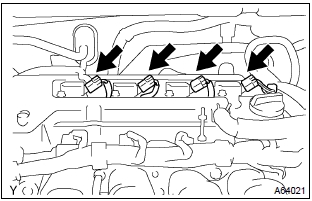
- Remove the 5 clamps from the 5 clamp brackets.
- disconnect the 4 ignition coil connectors.
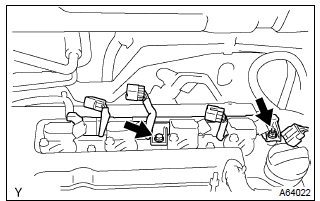
- Remove the bolt and nut installing the engine wire.
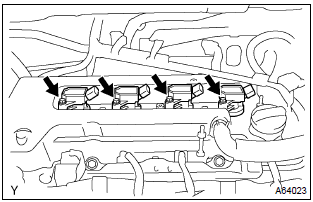
- Remove the 4 bolts and 4 ignition coils.
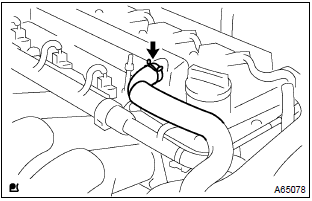
- Disconnect the ventilation hose from the cylinder head cover.
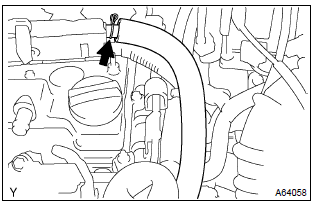
- Disconnect the ventilation hose from the cylinder head cover.
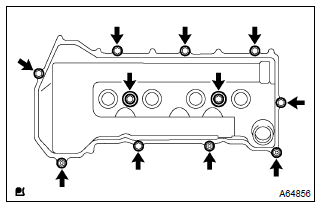
- Remove the 9 bolts, 2 seal washers, 2 nuts, 3 clamp brackets and cylinder head cover.
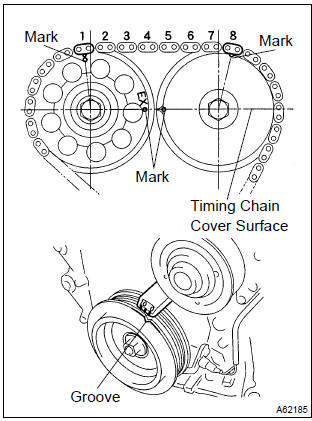
- Turn the crankshaft pulley, and align its groove with timing mark ”0” of the timing chain cover.
- check that the point marks of the camshaft timing sprocket and vvt timing sprocket are in straight line on the timing chain cover surface as shown in the illustration.
: if not, turn the crankshaft 1 revolution (360 ) and align the marks as above.
26. Remove crankshaft pulley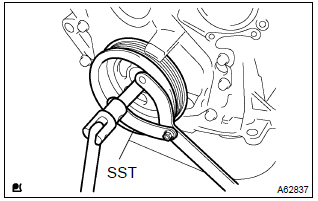
- Using sst, remove the pulley bolt.
Sst 09960–10010 (09962–01000, 09963–01000)
- remove the crankshaft pulley from the crankshaft.
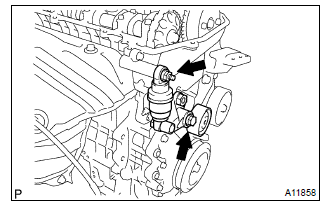
- Remove the bolt, nut and v–ribbed belt tensioner.
: handle a jack up and down to remove the bolt.
28. Remove water pump assy 29. Remove transverse engine engine mounting bracket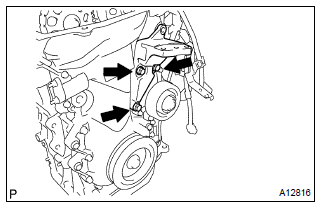
- Remove the 3 bolts and transverse engine engine mounting bracket.
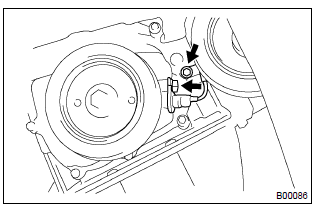
- Remove the 2 bolts installing the crank position sensor.
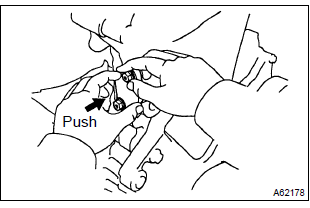
- Remove the 2 nuts and chain tensioner.
: be sure not to revolve the crankshaft without the chain tensioner.
32. Remove timing chain or belt cover sub–assy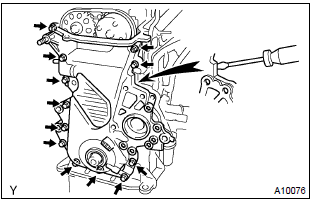
- Remove the 11 bolts and nuts.
- using a torx wrench socket (e8), remove the stud bolt.
- remove the timing chain cover by prying the portions between the cylinder head and cylinder block with a screwdriver.
: be careful no tot damage the contact surfaces of the timing chain cover, cylinder head and cylinder block.
33. Remove timing gear cover oil seal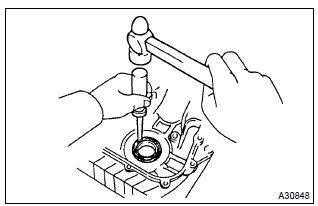
- Using a screwdriver, remove the oil seal.
- remove the bolt and chain tensioner slipper.
- remove the 2 bolt and chain vibration damper.
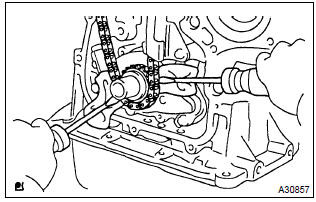
- Remove the timing chain with the crankshaft timing gear plying screwdrivers as shown in the illustration.
:
- put shop rag to protect the engine.
- In case of revolving the camshafts with the chain off the sprockets, turn the crankshaft 1/4 revolution for valves not to touch the pistons.
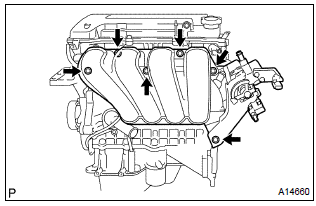
- Disconnect the 2 water hoses from the throttle body.
- disconnect the 2 vacuum hoses from the intake manihold.
- remove the 4 bolts, 2 nuts, 2 wire brackets, the intake manihold and throttle body assembly.
- remove the gasket from the intake manihold and throttle body assembly.
- remove the oil level gage from the oil level gage guide.
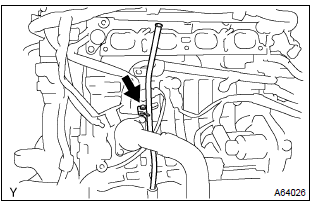
- Remove the bolt and oil level gage guide.
- Remove the 2 bolts installing the water by–pass pipe.
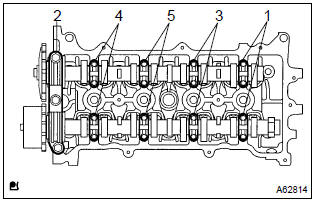
- Uniformly loosen and remove the 19 bearing cap bolts, in several passes, in the sequence shown, and remove the 9 bearing caps, intake and exhaust camshafts.
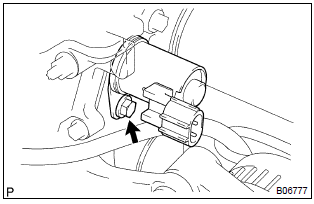
- Remove the bolt and camshaft timing oil control valve.Remove the bolt and camshaft timing oil control valve.
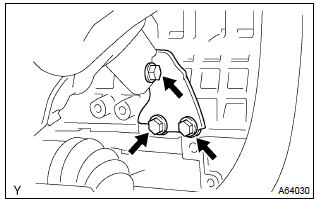
- Remove the 3 bolts and manifold stay.
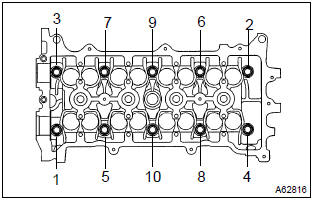
- Using a 10 mm bi–hexagon wrench, uniformly loosen and remove the 10 cylinder head bolts, in several passes, in the sequence shown, and remove the 10 cylinder head bolts and 10 plate washers.
- remove the cylinder head.
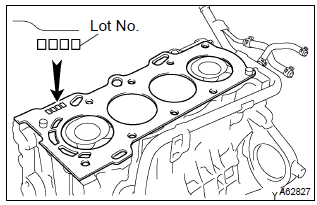
- Place a new cylinder head gasket on the cylinder block surface with the lot no. Stamp upward.
:
- pay attention to the installation direction.
- Place the cylinder head quietly in order not to damage the gasket with the bottom part of the head.
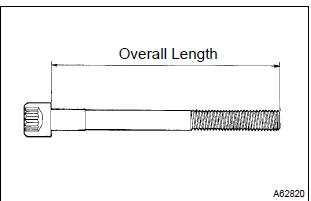
- Using a vernier calipers, measure the length of cylinder head bolt from the seat to the end.
Standard length: 146.8 – 148.2 Mm (5.780 – 5.835 In.) Maximum length: 148.5 Mm (5.846 In.)
If the length surpasses the maximum, replace the bolt.
49. Install cylinder head sub–assy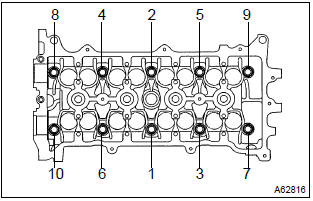
: the cylinder head bolts are tightened in 2 progressive steps.
- apply a light coat of engine oil on the threads and under the heads of the cylinder head bolts.
- using a 10 mm bi–hexagon wrench, install and uniformly tighten the 10 cylinder head bolts and plate washers, in several passes, in the sequence shown.
Torque: 49 nvm (500 Kgf·cm, 36 ft·lbf)
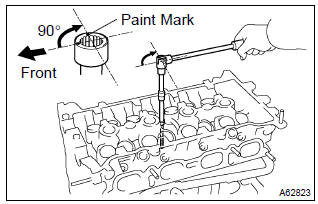
- Make the front of the cylinder head bolt with paint.
- retighten the cylinder head bolts 90 in the numerical order shown.
- check that the point marked bolts are moved at 90 angle.
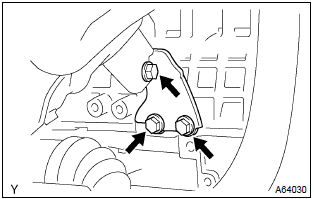
- Install the manifold stay with 3 bolts.
Torque: 49 nvm (500 Kgf·cm, 36 ft·lbf)
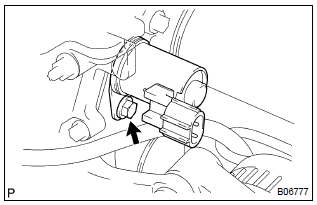
- Apply a light coat of engine oil on a new o–ring, and install it to the camshaft timing oil control valve.
- install the camshaft timing oil control valve with the bolt.
Torque: 9.0 Nvm (92 Kgf·cm, 80 in.Vlbf)
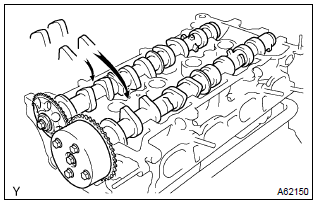
- Apply a light coat of engine oil on the camshaft journals.
- place the 2 camshafts on the cylinder head with the no.
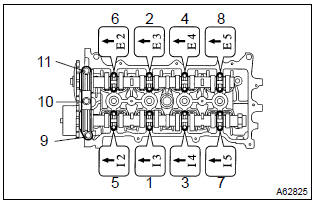
- Examine the front marks and numbers and tighten the bolts in the order shown in the illustration.
Torque:
bearing cap no. 1 23 Nvm (235 Kgf·cm, 17 ft·lbf) bearing cap no. 3 13 Nvm (133 Kgf·cm, 10 ft·lbf)
- install the water by–pass pipe with the 2 bolts.
Torque: 9.0 Nvm (92 Kgf·cm, 80 in.Vlbf)
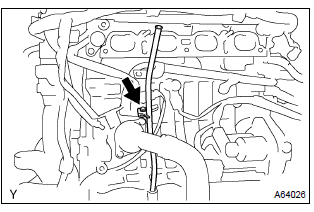
- Apply a light coat of engine oil on a new o–ring, and install it to the oil level gage guide.
- install the oil level gage guide with the bolt.
Torque: 13 nvm (133 Kgf·cm, 10 ft·lbf)
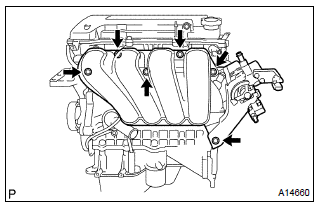
- Install a new gasket to the intake manifold.
- install the intake manifold and throttle body assembly with the 2 brackets, 4 bolts and 2 nuts. Uniformly tighten the bolts and nuts in several passes.
Torque: 30 nvm (306 Kgf·cm, 22 ft·lbf)
- connect the 2 vacuum hoses to the intake manifold.
- connect the 2 water hoses to the throttle body.
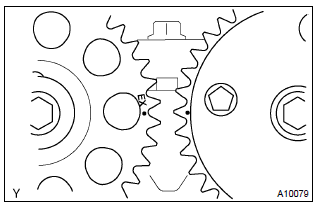
- Set no. 1 Cylinder to tdc/compression.
- Turn the hexagonal wrench head portion of the camshafts, and align the point marks of the camshaft timing sprockets.
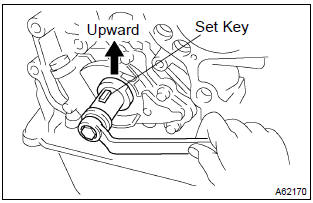
- Using a crankshaft pulley bolt, turn the crankshaft and set the set key on the crankshaft upward.
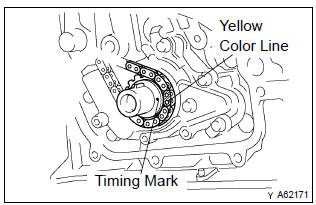
- Install the timing chain on the crankshaft timing sprocket with the yellow color link aligned with the timing mark on the crankshaft timing sprocket.
: three yellow color links are on the chain.
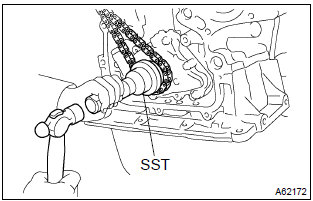
- Using sst, install the crankshaft timing sprocket.
Sst 09223–22010
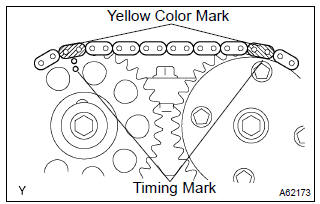
- Install the timing chain on the camshaft timing sprockets with the yellow color links aligned with the timing marks on the camshaft timing sprockets.
- install the chain vibration damper with the 2 bolts.
Torque: 9.0 Nvm (92 Kgf·cm, 80 in.Vlbf)
- install the chain tensioner slipper with the bolt.
Torque: 19 nvm (194 Kgf·cm, 14 ft·lbf)
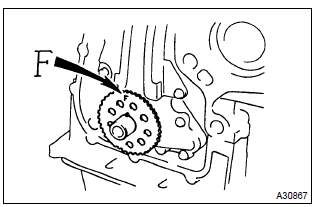
- Install the plate with the ”f” mark facing forward.
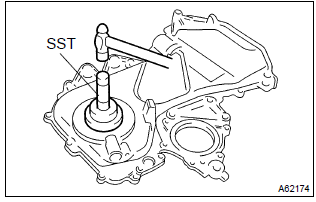
- Apply mp grease to a new oil seal lip.
- using sst, tap in the oil seal until its surface is flush with the timing chain cover edge.
Sst 09223–22010
: keep the lip off foreign materials.
61. Install timing chain or belt cover sub–assy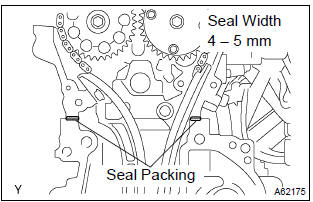
- Remove any old packing material from the contact surface.
- apply seal packing in the shape of bead (diameter 3.5 Mm – 4.5 Mm (0.1379 – 0.177 In.)) Consequently as shown in the illustration.
Seal packing:
water pump part part no. 08826–00100 Or equivalent other part part no. 08826–00080 Or equivalent.
:
- remove any oil from the contact surface.
- Install the oil pan within 3 minutes after applying seal packing.
- Do not put into engine oil within 2 hours after installing.
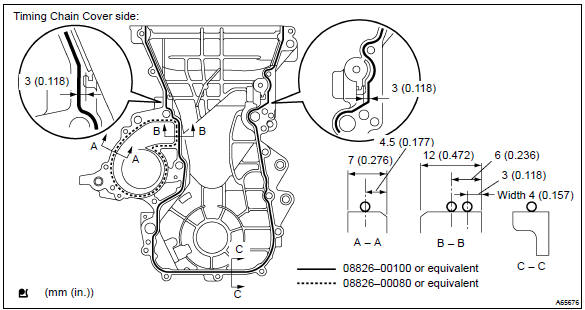
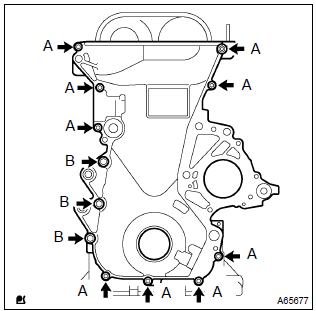
- Install the timing chain cover with the 11 bolts and nut.
Torque:
a 13 nvm (133 Kgf·cm, 10 ft·lbf) b 19 nvm (194 Kgf·cm, 14 ft·lbf) - using a torx wrench socket (e8), install the stud bolt.
Torque: 9.5 Nvm (97 Kgf·cm, 84 in.Vlbf)
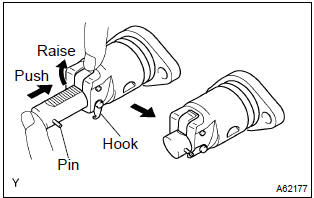
- Check the o–ring is clean, and set the hook as shown in the illustration.
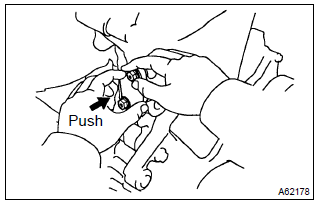
- Apply engine oil to the chain tensioner and install it withe 2 nuts.
Torque: 9.0 Nvm (92 Kgf·cm, 80 in.Vlbf)
: when installing the tensioner, set the hook again if the hook release the plunger.
63. Install crank position sensor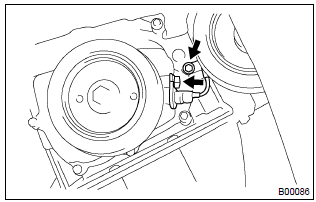
- Install the crank position sensor with the 2 bolts.
Torque: 9.0 Nvm (92 Kgf·cm, 80 in.Vlbf)
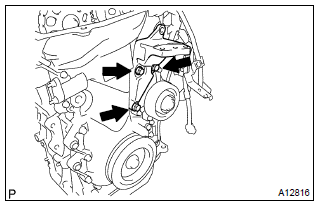
- Install the transverse engine engine mounting bracket with the 3 bolts.
Torque: 47 nvm (479 Kgf·cm, 35 ft·lbf)
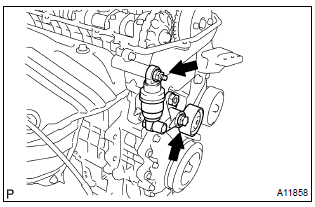
- Install the v–ribbed belt tensioner with the nut and bolt.
Torque:
nut 29 nvm (296 Kgf·cm, 21 ft·lbf) bolt 69 nvm (704 Kgf·cm, 51 ft·lbf)
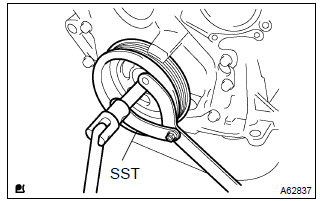
- Align the pulley set key with the key groove of the pulley, and slide on the pulley.
- using sst, install the crankshaft pulley bolt.
Sst 09960–10010 (09962–01000, 09963–01000) torque: 138 nvm (1,407 Kgf·cm, 102 ft·lbf)
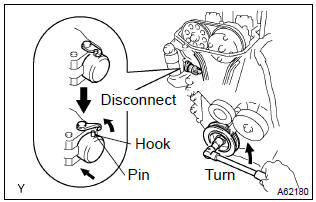
- Turn the crankshaft counter clockwise, and disconnect the plunger knock pin form the hook.
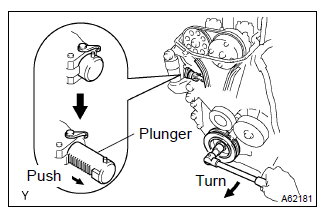
- Turn the crankshaft clockwise, and check that the slipper is pushed by the plunger.
: if the plunger does not spring out, press the slipper into the chain tensioner with a screwdriver so that the hook is released from the knock pin and the plunger springs out.
68. Install cylinder head cover sub–assy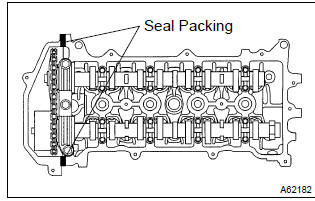
- Remove any old pacing (fipg) material.
- apply seal packing to 2 locations as shown in the illustration.
Seal packing: part no. 08826–00080 Or equivalent
:
- remove any oil from the contact surface.
- Install the cylinder head cover within 3 minutes after applying seal packing.
- Do not put into engine oil 2 hours after installing.
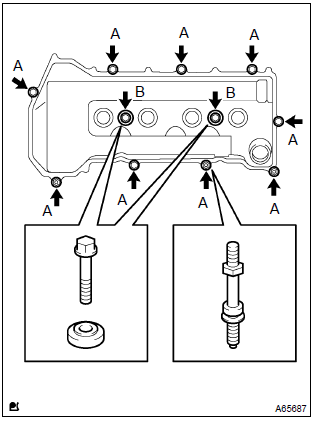
- Install the cylinder head cover and 3 cable brackets with the 9 bolts, 2 seal washers and 2 nuts. Uniformly tighten the bolts and nuts, in the several passes.
Torque:
a 11 nvm (112 Kgf·cm, 8 ft·lbf) b 9.0 Nvm (92 Kgf·cm, 80 in.Vlbf)
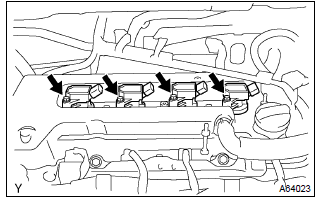
- Install the 4 ignition coils with the 4 bolts.
Torque: 9.0 Nvm (92 Kgf·cm, 80 in.Vlbf)
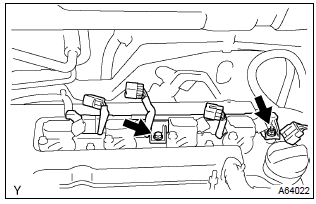
- Install the engine wire with the bolt and nut.
Torque: 9.0 Nvm (92 Kgf·cm, 80 in.Vlbf)
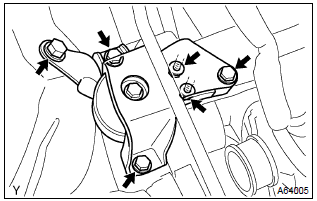
- Install the engine mounting insulator with the 4 bolts and 2 nuts.
Torque: 52 nvm (530 Kgf·cm, 38 ft·lbf)
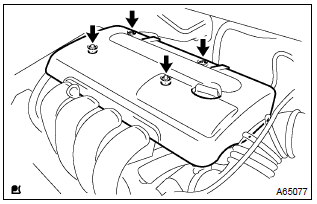
- Install the cylinder head cover with the 2 nuts and 2 clips.
Torque: 7.0 Nvm (71 Kgf·cm, 62 in.Vlbf)
Test yourself
A quick Toyota Corolla quiz: every answer comes with an explanation and a link to the manual page.