Removal
NOTICE: Before starting the work, make sure that the ignition switch is OFF and depress the brake pedal more than 40 times.
HINT: When a pressure in power supply system is released, reaction force becomes light and stroke becomes longer.
NOTICE:
- As high pressure is applied to the brake actuator tube No. 1, never deform it.
- Until the work is over, do not turn the ignition switch ON.
1. DRAW OUT FLUID WITH SYRINGE
NOTICE: Do not let brake fluid remain on a painted surface. Wash it off immediately.
2. REMOVE SCUFF PLATE, COWL SIDE TRIM, LOWER NO. 1 PANEL, LH LOWER PANEL AND NO. 2 HEATER TO REGISTER DUCT ( BO-81 )
3. REMOVE ABS OR ABS & TRAC & VSC ECU
Remove the 2 nuts and ABS or ABS & TRAC & VSC ECU.
Torque: 5 N·m
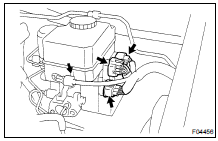
4. w/ ABS only: DISCONNECT 4 CONNECTORS
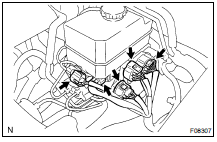
5. w/ ABS & TRAC & VSC only: DISCONNECT 5 CONNECTORS
6. w/ ABS only: DISCONNECT BRAKE LINES

Using SST, disconnect the 3 brake lines.
SST 09023-00100
Torque: 15 N·m
7. w/ ABS & TRAC & VSC only: DISCONNECT BRAKE LINES

Using SST, disconnect the 4 brake lines.
SST 09023-00100
Torque: 15 N·m
8. REMOVE CLIP AND CLEVIS PIN
9. REMOVE HYDRAULIC BRAKE BOOSTER ASSEMBLY

(a) Remove the 4 booster installation nuts.
Torque: 15 N·m
(b) Remove the booster assembly and gasket.
Test yourself
A quick Toyota Land Cruiser quiz: every answer comes with an explanation and a link to the manual page.