Center airbag sensor assembly communication circuit malfunction

Description
The center airbag sensor communication circuit consists of the occupant classification ecu and the center airbag sensor.
Dtc b1790 is recorded when a malfunction is detected in the center airbag sensor communication circuit.
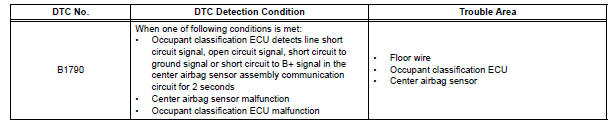
Wiring diagram
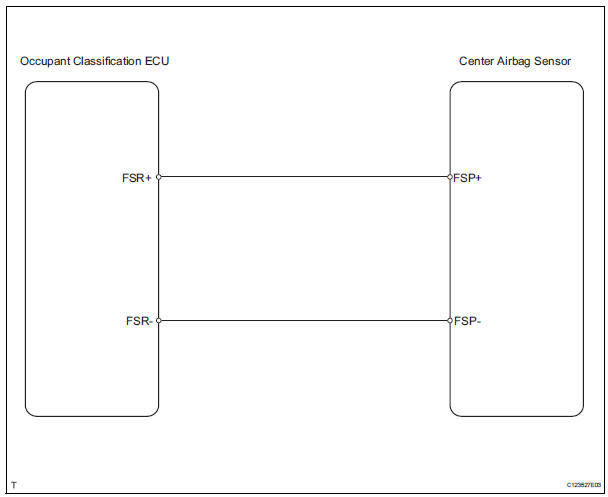
Inspection procedure Hint:
- If troubleshooting (wire harness inspection) is difficult to perform, remove the front passenger seat installation bolts to see the undersurface of the seat cushion.
- In the above case, hold the seat so that it does not tip over. Holding the seat for a long period of time may cause a problem, such as seat rail deformation. Hold the seat up only for as long as necessary.
- Check for dtc
- Turn the ignition switch on.
- Clear the dtcs (see page rs-249).
First clear dtcs stored in the occupant classification ecu and then in the center airbag sensor.
- Turn the ignition switch off.
- Turn the ignition switch on.
- Check the dtcs (see page rs-249).
Dtcs other than dtc b1790 may be output at this time, but they are not related to this check.


- Check connection of connector
- Turn the ignition switch off.
- Disconnect the cable from the negative (-) battery terminal, and wait for at least 90 seconds.
- Check that the connectors are properly connected to the occupant classification ecu and the center airbag sensor.


- Check floor wire (to b+)
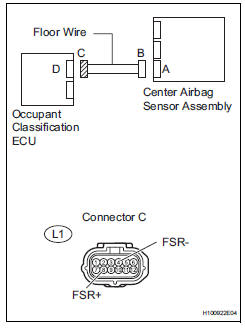
- Disconnect the connectors from the occupant classification ecu and the center airbag sensor.
- Connect the cable to the negative (-) battery terminal, and wait for at least 2 seconds.
- Turn the ignition switch on.
- Measure the voltage of the wire harness side connector.



- Check floor wire (for open)

- Turn the ignition switch off.
- Disconnect the cable from the negative (-) battery terminal, and wait for at least 90 seconds.
- Using a service wire, connect terminals l6-12 (fsp+) *1 and l6-13 (fsp-) *1 or l7-16 (fsp+) *2 and l7-24 (fsp-) *2 of connector b.
Do not forcibly insert a service wire into the terminals of the connector when connecting them.
- Measure the resistance of the wire harness side connector.

Hint:
*1: W/o curtain shield airbag
*2: W/ curtain shield airbag


- Check floor wire (for short)
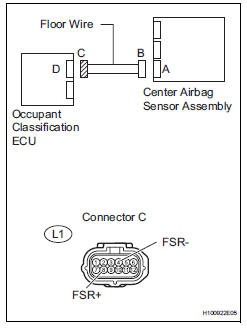
- Disconnect the service wire from connector b.
- Measure the resistance of the wire harness side connector.



- Check floor wire (to ground)

- Measure the resistance of the wire harness side connector.



- Check for dtc
- Connect the connectors to the occupant classification ecu and the center airbag sensor.
- Connect the cable to the negative (-) battery terminal, and wait for at least 2 seconds.
- Turn the ignition switch on.
- Clear the dtcs (see page rs-249).
First clear dtcs stored in the occupant classification ecu and then in the center airbag sensor.
- Turn the ignition switch off.
- Turn the ignition switch on.
- Check the dtcs (see page rs-249).
Dtcs other than dtc b1790 may be output at this time, but they are not related to this check.


- Replace occupant classification ecu
- Turn the ignition switch off.
- Disconnect the cable from the negative (-) battery terminal, and wait for at least 90 seconds.
- Replace the occupant classification ecu (see page rs- 392).
Perform the inspection using parts from a normal vehicle if possible.

- Perform zero point calibration
- Connect the cable to the negative (-) battery terminal, and wait for at least 2 seconds.
- Connect the intelligent tester (with can vim) to the dlc3.
- Turn the ignition switch on.
- Using the intelligent tester, perform the zero point calibration (see page rs-241).

- Perform sensitivity check
- Using the intelligent tester, perform the sensitivity check (see page rs-241).

- Check for dtc
- Turn the ignition switch on.
- Clear the dtcs (see page rs-249).
First clear dtcs stored in the occupant classification ecu and then in the center airbag sensor.
- Turn the ignition switch off.
- Turn the ignition switch on.
- Check the dtcs (see page rs-249).
Dtcs other than dtc b1790 may be output at this time, but they are not related to this check.


End
Test yourself
A quick Toyota RAV4 quiz: every answer comes with an explanation and a link to the manual page.