Audio / visual
Front No. 2 speaker
In this manual: Audio / visual
2steps
~12min
1/5difficulty
Done 0 of 2
COMPONENTS

ON-VEHICLE INSPECTION
1. INSPECT FRONT NO.2 SPEAKER
HINT: Remove interior parts so that the front No.2 speaker can be seen.
- Check the speaker installation.
OK: The speaker is securely installed.
If the result is not as specified, reinstall the front No.2 speaker.
OK: The cone paper of the speaker is not torn.
If the result is not as specified, replace the front No.2 speaker.REMOVAL
1. REMOVE INSTRUMENT PANEL SPEAKER PANEL SUB-ASSEMBLY
2. REMOVE FRONT NO. 2 SPEAKER ASSEMBLY
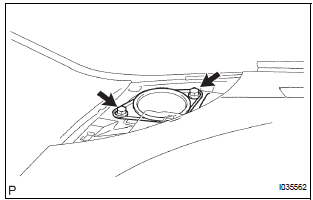
- Disconnect the connector and remove the 2 screws and the front No. 2 speaker assembly.
INSTALLATION
1. INSTALL FRONT NO. 2 SPEAKER ASSEMBLY
- Connect the connector.
- Install the front No. 2 speaker assembly with the 2 screws.
NOTICE: Tighten the screws in order shown in the illustration to install the front No. 2 speaker assembly.
2. INSTALL INSTRUMENT PANEL SPEAKER PANEL SUB-ASSEMBLY

Test yourself
A quick Toyota Sienna quiz: every answer comes with an explanation and a link to the manual page.
Was this page helpful?