Solar Sensor Circuit (Passenger Side)
DTC B1421/21 Solar Sensor Circuit (Passenger Side)
DESCRIPTION

The solar sensor, which is installed on the upper side of the instrument panel, detects sunlight and controls the air conditioning in AUTO mode. The output voltage from the solar sensor varies according to the amount of sunlight. When the sunlight increases, the output voltage increases. As the sunlight decreases, the output voltage decreases. The A/C amplifier detects voltage output from the solar sensor. 
WIRING DIAGRAM

INSPECTION PROCEDURE
HINT:
- If DTC B1244 is output at the same time, troubleshoot DTC B1244 first (See page LI-16).
- If the check is performed in a dark place, DTC B1421/21 or B1424/24 (solar sensor circuit abnormal) may be output even though the system is normal.
1 READ VALUE OF INTELLIGENT TESTER
(a) Connect the intelligent tester to the DLC3.
(b) Turn the ignition switch to the ON position and turn the intelligent tester main switch on.
(c) Expose the sensing portion of the solar sensor to light.
HINT: Use an incandescent light for inspection.
(d) Select the item below in the DATA LIST, and read the display on the intelligent tester.
DATA LIST / AIR CONDITIONER: 
OK: The display is as specified in the normal condition column.
Result 

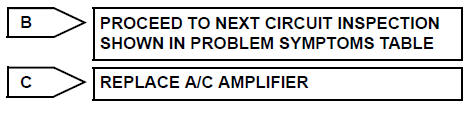
2 CHECK HARNESS AND CONNECTOR (SOLAR SENSOR)

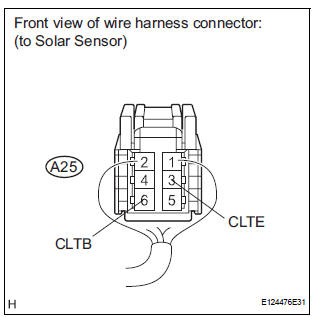
(a) Disconnect the solar sensor connector.
(b) Measure the voltage according to the value(s) in the table below.
Standard voltage 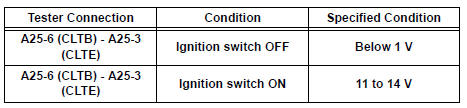


3 CHECK HARNESS AND CONNECTOR (SOLAR SENSOR - BODY ECU)
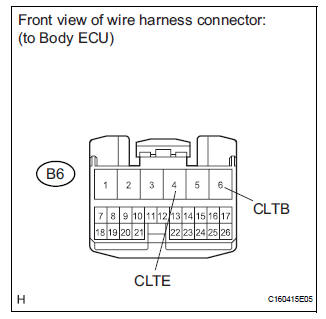
(a) Disconnect the body ECU connector.
(b) Measure the resistance according to the value(s) in the table below.
Standard resistance 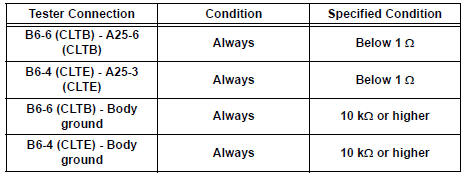


REPLACE BODY ECU
4 CHECK SOLAR SENSOR
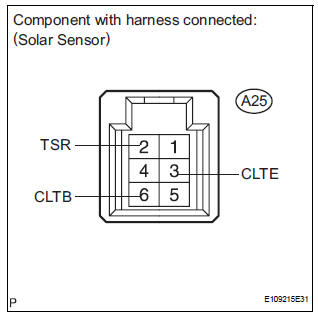
(a) Remove the solar sensor with its connector still connected.
(b) Connect the positive (+) lead from the battery to terminal 6 (CLTB), and the negative (-) lead to terminal 3 (CLTE) of the solar sensor.
(c) Measure the voltage according to the value(s) in the table below.
Standard voltage 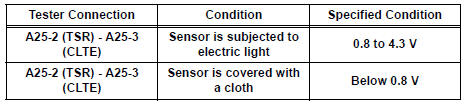
NOTICE: While using the battery during inspection, do not bring the positive and negative tester probes too close to each other as a short circuit may occur.
HINT:
- Use an incandescent light for inspection. Bring it within about 30 cm (11.8 in.) of the solar sensor.
- As the inspection light is moved away from the sensor, the voltage increases.


5 CHECK HARNESS AND CONNECTOR (SOLAR SENSOR - A/C AMPLIFIER)

(a) Disconnect the solar sensor connector.
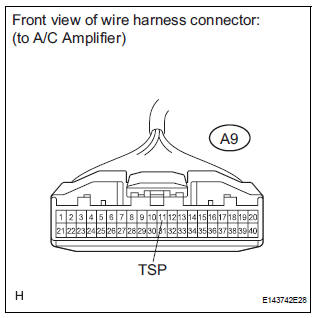
(b) Disconnect the A/C amplifier connector.
(c) Measure the resistance according to the value(s) in the table below.
Standard resistance 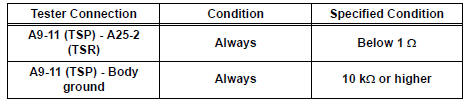


REPLACE A/C AMPLIFIER
Test yourself
A quick Toyota Sienna quiz: every answer comes with an explanation and a link to the manual page.